BERT 文本分类 实操
版权声明:本文为博主原创文章,转载请注明出处:https://blog.csdn.net/ling620/article/details/97749908
本文目录
- 0. 准备工作
- 1. 数据集的准备
- 2. 增加自定义数据类
- 3. 修改predict输出
- 4.fine-tuning模型
上篇文章介绍了如何安装和使用BERT进行文本相似度任务,包括如何修改代码进行训练和测试。本文在此基础上介绍如何进行文本分类任务。
文本相似度任务具体见: BERT介绍及中文文本相似度任务实践
文本相似度任务和文本分类任务的区别在于数据集的准备以及run_classifier.py中数据类的构造部分。
0. 准备工作
如果想要根据我们准备的数据集进行fine-tuning,则需要先下载预训练模型。由于是处理中文文本,因此下载对应的中文预训练模型。
BERTgit地址: google-research/bert
- BERT-Base, Chinese: Chinese Simplified and Traditional, 12-layer, 768-hidden, 12-heads, 110M parameters
文件名为 chinese_L-12_H-768_A-12.zip。将其解压至bert文件夹,包含以下三种文件:
- 配置文件(bert_config.json):用于指定模型的超参数
- 词典文件(vocab.txt):用于WordPiece 到 Word id的映射
- Tensorflow checkpoint(bert_model.ckpt):包含了预训练模型的权重(实际包含三个文件)
1. 数据集的准备
对于文本分类任务,需要准备的数据集的格式如下:
label, 文本 ,其中标签可以是中文字符串,也可以是数字。
如: 天气, 一会好像要下雨了 或者0, 一会好像要下雨了
将准备好的数据存放于文本文件中,如.txt, .csv等。至于用什么名字和后缀,只要与数据类中的名称一致即可。
如,在run_classifier.py中的数据类get_train_examples方法中,默认训练集文件是train.csv,可以修改为自己命名的文件名即可。
    def get_train_examples(self, data_dir):
        """See base class."""
        file_path = os.path.join(data_dir, 'train.csv')
2. 增加自定义数据类
将新增的用于文本分类的数据类命名为 TextClassifierProcessor,如下
class TextClassifierProcessor(DataProcessor):
重写其父类的四个方法,从而实现数据的获取过程。
get_train_examples:对训练集获取InputExample的集合get_dev_examples:对验证集…get_test_examples:对测试集…get_labels:获取数据集分类标签列表
InputExample类的作用是对于单个分类序列的训练/测试样例。构建了一个InputExample,包含id, text_a, text_b, label。
其定义如下:
class InputExample(object):
    """A single training/test example for simple sequence classification."""

    def __init__(self, guid, text_a, text_b=None, label=None):
        """Constructs a InputExample.

        Args:
          guid: Unique id for the example.
          text_a: string. The untokenized text of the first sequence. For single
            sequence tasks, only this sequence must be specified.
          text_b: (Optional) string. The untokenized text of the second sequence.
            Only must be specified for sequence pair tasks.
          label: (Optional) string. The label of the example. This should be
            specified for train and dev examples, but not for test examples.
        """
        self.guid = guid
        self.text_a = text_a
        self.text_b = text_b
        self.label = label
重写get_train_examples方法, 对于文本分类任务,只需要label和一个文本即可,因此,只需要赋值给text_a。
因为准备的数据集 标签 和 文本 是以逗号隔开的,因此先将每行数据以逗号隔开,则split_line[0]为标签赋值给label,split_line[1]为文本赋值给text_a。
此处,准备的数据集标签和文本是以逗号隔开的,难免文本中没有同样的英文逗号,为了避免获取到不完整的文本数据,建议使用
str.find(',')找到第一个逗号出现的位置,则label = line[:line.find(',')].strip()
对于测试集和验证集的处理相同。
    def get_train_examples(self, data_dir):
        """See base class."""
        file_path = os.path.join(data_dir, 'train.csv')
        examples = []
        with open(file_path, encoding='utf-8') as f:
            reader = f.readlines()
        for (i, line) in enumerate(reader):
            guid = "train-%d" % (i)
            split_line = line.strip().split(",")
            text_a = tokenization.convert_to_unicode(split_line[1])
            text_b = None
            label = str(split_line[0])
            examples.append(
                InputExample(guid=guid, text_a=text_a, text_b=text_b, label=label))
        return examples
get_labels方法用于获取数据集所有的类别标签,此处使用数字1,2,3… 来表示,如有66个类别(1—66),则实现方法如下:
   def get_labels(self):
        """See base class."""
        labels = [str(i) for i in range(1,67)]
        return labels
<注意>
为了方便,可以构建一个字典类型的变量,存放数字类别和文本标签中间的对应关系。当然也可以直接使用文本标签,想用哪种用哪种。
定义完TextClassifierProcessor类之后,还需要将其加入到main函数中的processors变量中去。
找到main()函数,增加新定义数据类,如下所示:
def main(_):
    tf.logging.set_verbosity(tf.logging.INFO)

    processors = {
        "cola": ColaProcessor,
        "mnli": MnliProcessor,
        "mrpc": MrpcProcessor,
        "xnli": XnliProcessor,
        "sim": SimProcessor,
        "classifier":TextClassifierProcessor,  # 增加此行
    }
3. 修改predict输出
在run_classifier.py文件中,预测部分的会输出两个文件,分别是 predict.tf_record和test_results.tsv。其中test_results.tsv中存放的是每个测试数据得到的属于所有类别的概率值,维度为[n*num_labels]。
但这个结果并不能直接反应得到的预测结果,因此增加处理代码,直接获取得到的预测类别。
原始代码如下:
    if FLAGS.do_predict:
        print('*'*30,'do_predict', '*'*30)
        predict_examples = processor.get_test_examples(FLAGS.data_dir)
        num_actual_predict_examples = len(predict_examples)
        if FLAGS.use_tpu:
            # TPU requires a fixed batch size for all batches, therefore the number
            # of examples must be a multiple of the batch size, or else examples
            # will get dropped. So we pad with fake examples which are ignored
            # later on.
            while len(predict_examples) % FLAGS.predict_batch_size != 0:
                predict_examples.append(PaddingInputExample())

        predict_file = os.path.join(FLAGS.output_dir, "predict.tf_record")
        file_based_convert_examples_to_features(predict_examples, label_list,
                                                FLAGS.max_seq_length, tokenizer,
                                                predict_file)

        tf.logging.info("***** Running prediction*****")
        tf.logging.info("  Num examples = %d (%d actual, %d padding)",
                        len(predict_examples), num_actual_predict_examples,
                        len(predict_examples) - num_actual_predict_examples)
        tf.logging.info("  Batch size = %d", FLAGS.predict_batch_size)

        predict_drop_remainder = True if FLAGS.use_tpu else False
        predict_input_fn = file_based_input_fn_builder(
            input_file=predict_file,
            seq_length=FLAGS.max_seq_length,
            is_training=False,
            drop_remainder=predict_drop_remainder)

        result = estimator.predict(input_fn=predict_input_fn)

        output_predict_file = os.path.join(
            FLAGS.output_dir, "test_results.tsv")
        with tf.gfile.GFile(output_predict_file, "w") as writer:
            num_written_lines = 0
            tf.logging.info("***** Predict results *****")
            for (i, prediction) in enumerate(result):
                probabilities = prediction["probabilities"]
                if i >= num_actual_predict_examples:
                    break
                output_line = "\t".join(
                    str(class_probability)
                    for class_probability in probabilities) + "\n"
                writer.write(output_line)
                num_written_lines += 1
        assert num_written_lines == num_actual_predict_examples
修改后的代码如下:
		result_predict_file = os.path.join(
            FLAGS.output_dir, "test_labels_out.txt")

        right = 0 # 预测正确的个数
        f_res = open(result_predict_file, 'w') #将结果保存到此文件中
        with tf.gfile.GFile(output_predict_file, "w") as writer:
            num_written_lines = 0
            tf.logging.info("***** Predict results *****")
            for (i, prediction) in enumerate(result):
                probabilities = prediction["probabilities"] #预测结果
                if i >= num_actual_predict_examples:
                    break
                output_line = "\t".join(
                    str(class_probability)
                    for class_probability in probabilities) + "\n"
                # 获取概率值最大的类别的下标Index
                index = np.argmax(probabilities, axis = 0)
                # 将真实标签和预测标签及对应的概率值写入到结果文件中
                res_line = 'real: %s, \tpred:%s, \tscore = %.2f\n' \
                        %(lable_to_cate[real_label[i]], lable_to_cate[index+1], probabilities[index])
                f_res.write(res_line)
                writer.write(output_line)
                num_written_lines += 1

                if real_label[i] == (index+1):
                    right += 1

            print('precision = %.2f' %(right / len(real_label)))
4.fine-tuning模型
准备好数据集,修改完数据类后,接下来就是如何fine-tuning模型。
查看 run_classifier.py文件的入口部分,包含了fine-tuning模型所需的必要参数,如下:
if __name__ == "__main__":
    flags.mark_flag_as_required("data_dir")
    flags.mark_flag_as_required("task_name")
    flags.mark_flag_as_required("vocab_file")
    flags.mark_flag_as_required("bert_config_file")
    flags.mark_flag_as_required("output_dir")
    tf.app.run()
部分参数说明
data_dir :数据存放路径
task_mask :processor的名字,对于文本分类任务,则为classifier
vocab_file :字典文件的地址
bert_config_file :配置文件
output_dir :模型输出地址
由于需要设置的参数较多,因此将其统一放置到sh脚本中,名称fine-tuning_classifier.sh,如下所示:
#!/usr/bin/env bash
export BERT_BASE_DIR=/**/NLP/bert/chinese_L-12_H-768_A-12 #全局变量 下载的预训练bert地址
export MY_DATASET=/**/NLP/bert/data/text_classifition #全局变量 数据集所在地址

python run_classifier.py \
  --task_name=classifier  \
  --do_train=true \
  --do_eval=true \
  --do_predict=true \
  --data_dir=$MY_DATASET \
  --vocab_file=$BERT_BASE_DIR/vocab.txt \
  --bert_config_file=$BERT_BASE_DIR/bert_config.json \
  --init_checkpoint=$BERT_BASE_DIR/bert_model.ckpt \
  --max_seq_length=32  \
  --train_batch_size=64 \
  --learning_rate=5e-5 \
  --num_train_epochs=10.0 \
  --output_dir=./fine_tuning_out/text_classifier_64_epoch10_5e5
执行命令
sh ./fine-tuning_classifier.sh
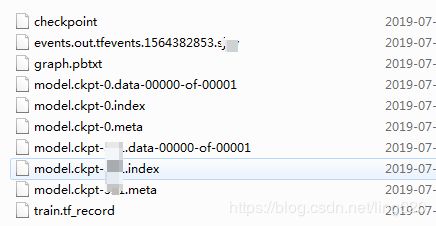
生成的模型文件,在output_dir目录中,如下:

得到的测试结果文件test_labels_out.txt内容如下:
real: 天气, pred:天气, score = 1.00
文本相似度任务具体见: BERT介绍及中文文本相似度任务实践
