图像旋转原理及实现
建议阅读该博客的朋友最好对插值、matlab编程、数字图像有一些了解,另外所有代码和测试图片都可以到GitHub去下载。
在一次数字图像处理课中,我接触到了图片旋转的一些原理,当时没完全想明白,课后通过一段时间的学习,终于完成了图片旋转的matlab程序。开始觉得应该挺简单的,但终究是纸上谈兵,在实现的过程中遇到很多问题。
1 旋转矩形
首先建议阅读 图像旋转算法原理-旋转矩阵,这篇博客可以让你很好地理解图像中的每一个点是如何进行旋转操作的。其中涉及到了图像原点与笛卡尔坐标原点之间的相互转换以及点旋转的一些公式推导。我们一般认为图像应该绕着中心点旋转,但是图像的原点在左上角,在计算的时候首先需要将左上角的原点移到图像中心,并且Y轴需要翻转。设一点 ( X 0 , Y 0 ) (X_0,Y_0) (X0,Y0),图像宽为 W W W,高为 H H H,原点变换后的点为 ( X 1 , Y 1 ) (X_1,Y_1) (X1,Y1),变换如下式。
(1) [ X 1 Y 1 1 ] = [ X 0 Y 0 1 ] [ 1 0 0 0 − 1 0 − 0.5 W 0.5 H 1 ] \begin{bmatrix} X_1 & Y_1 & 1 \end{bmatrix} = \begin{bmatrix} X_0 & Y_0 & 1 \end{bmatrix} \begin{bmatrix} 1 & 0 & 0 \\ 0 & -1 & 0 \\ -0.5W & 0.5H & 1 \end{bmatrix} \tag{1} [X1Y11]=[X0Y01]⎣⎡10−0.5W0−10.5H001⎦⎤(1)
图像旋转角度为 θ \theta θ,设原点变换后通过旋转矩阵旋转 θ \theta θ后的点为 ( X 2 , Y 2 ) (X_2,Y_2) (X2,Y2),公式如下。
(2) [ X 2 Y 2 1 ] = [ X 1 Y 1 1 ] [ c o s θ − s i n θ 0 s i n θ c o s θ 0 0 0 1 ] \begin{bmatrix} X_2 & Y_2 & 1 \end{bmatrix} = \begin{bmatrix} X_1 & Y_1 & 1 \end{bmatrix} \begin{bmatrix} cos\theta & -sin \theta & 0 \\ sin\theta & cos\theta & 0 \\ 0 & 0 & 1 \end{bmatrix} \tag{2} [X2Y21]=[X1Y11]⎣⎡cosθsinθ0−sinθcosθ0001⎦⎤(2)
旋转后的图像的宽为 W " W^" W",高为 H " H^" H",那么从笛卡尔坐标原点变换回左上角的公式如下。
(3) [ X 3 Y 3 1 ] = [ X 2 Y 2 1 ] [ 1 0 0 0 − 1 0 0.5 W " 0.5 H " 1 ] \begin{bmatrix} X_3 & Y_3 & 1 \end{bmatrix} = \begin{bmatrix} X_2 & Y_2 & 1 \end{bmatrix} \begin{bmatrix} 1 & 0 & 0 \\ 0 & -1 & 0 \\ 0.5W^" & 0.5H^" & 1 \end{bmatrix} \tag{3} [X3Y31]=[X2Y21]⎣⎡100.5W"0−10.5H"001⎦⎤(3)
综上可得,原图像的一点 ( X 0 , Y 0 ) (X_0,Y_0) (X0,Y0)经过如下公式可以变换到旋转后的 ( X 3 , Y 3 ) (X_3,Y_3) (X3,Y3)。
(4) [ X 3 Y 3 1 ] = [ X 0 Y 0 1 ] ∗ [ 1 0 0 0 − 1 0 − 0.5 W 0.5 H 1 ] [ c o s θ − s i n θ 0 s i n θ c o s θ 0 0 0 1 ] [ 1 0 0 0 − 1 0 0.5 W " 0.5 H " 1 ] \begin{bmatrix} X_3 & Y_3 & 1 \end{bmatrix} = \begin{bmatrix} X_0 & Y_0 & 1 \end{bmatrix} * \begin{bmatrix} 1 & 0 & 0 \\ 0 & -1 & 0 \\ -0.5W & 0.5H & 1 \end{bmatrix} \begin{bmatrix} cos\theta & -sin \theta & 0 \\ sin\theta & cos\theta & 0 \\ 0 & 0 & 1 \end{bmatrix} \begin{bmatrix} 1 & 0 & 0 \\ 0 & -1 & 0 \\ 0.5W^" & 0.5H^" & 1 \end{bmatrix} \tag{4} [X3Y31]=[X0Y01]∗⎣⎡10−0.5W0−10.5H001⎦⎤⎣⎡cosθsinθ0−sinθcosθ0001⎦⎤⎣⎡100.5W"0−10.5H"001⎦⎤(4)
同理,旋转后的一点 ( X 3 , Y 3 ) (X_3,Y_3) (X3,Y3)经过如下公式可以变换回原图像的 ( X 0 , Y 0 ) (X_0,Y_0) (X0,Y0)。
(5) [ X 0 Y 0 1 ] = [ X 3 Y 3 1 ] ∗ [ 1 0 0 0 − 1 0 − 0.5 W " 0.5 H " 1 ] [ c o s θ s i n θ 0 − s i n θ c o s θ 0 0 0 1 ] [ 1 0 0 0 − 1 0 0.5 W 0.5 H 1 ] \begin{bmatrix} X_0 & Y_0 & 1 \end{bmatrix} = \begin{bmatrix} X_3 & Y_3 & 1 \end{bmatrix} * \begin{bmatrix} 1 & 0 & 0 \\ 0 & -1 & 0 \\ -0.5W^" & 0.5H^" & 1 \end{bmatrix} \begin{bmatrix} cos\theta & sin \theta & 0 \\ -sin\theta & cos\theta & 0 \\ 0 & 0 & 1 \end{bmatrix} \begin{bmatrix} 1 & 0 & 0 \\ 0 & -1 & 0 \\ 0.5W & 0.5H & 1 \end{bmatrix} \tag{5} [X0Y01]=[X3Y31]∗⎣⎡10−0.5W"0−10.5H"001⎦⎤⎣⎡cosθ−sinθ0sinθcosθ0001⎦⎤⎣⎡100.5W0−10.5H001⎦⎤(5)
在开始下一部分之前,先要得到旋转后图像的大小,设原图像高为m,宽为n。代码如下,虽然看起来有点复杂,建议朋友们自己画张图看一下,那样会一目了然。
% image size after rotation
[m, n, o] = size(img);
new_m = ceil(abs(m*cosd(degree)) + abs(n*sind(degree)));
new_n = ceil(abs(n*cosd(degree)) + abs(m*sind(degree)));
2 前向映射
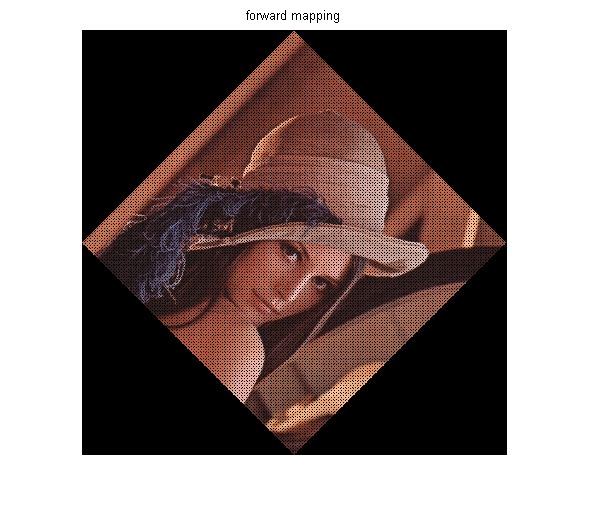
建议阅读 图像旋转变换-matlab实现,里面采用的是前向映射的方法。什么是前向映射呢?就是通过原图像的坐标计算旋转之后的坐标,并将相应的灰度值传给旋转后的图像。这样遇到最大的问题就是出现了一些有规律的噪声,如下图。
通过代码来分析一下产生这种现象的原因,前向映射的代码如下。m1,m2和m3这三个矩阵可以对应到公式(4)中的三个矩阵,可以看出转换后的坐标是小数,并且进行了取整操作,这样部分像素并没有对应的灰度值。
% forward mapping matrices
m1 = [1 0 0; 0 -1 0; -0.5*n 0.5*m 1];
m2 = [cosd(degree) -sind(degree) 0; sind(degree) cosd(degree) 0; 0 0 1];
m3 = [1 0 0; 0 -1 0; 0.5*new_n 0.5*new_m 1];

for i = 1:n
   for j = 1:m
      new_coordinate = [i j 1]*m1*m2*m3;
      col = round(new_coordinate(1));
      row = round(new_coordinate(2));
      % no-rotation image's coordinates to rotated image's coordinates
      new_img_forward(row, col, 1) = img(j, i, 1);
      new_img_forward(row, col, 2) = img(j, i, 2);
      new_img_forward(row, col, 3) = img(j, i, 3);
   end
end
3 反向映射
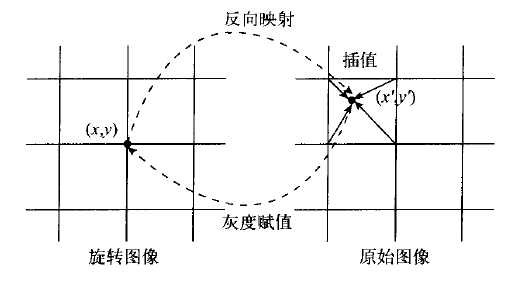
为了解决上述问题,可以采用反向映射的方法,即从旋转后的图像出发,找到对应的原图像的点,然后将原图像中的灰度值传递过来即可,这样旋转后的图像的每个像素肯定可以对应到原图像中的一个点,采取不同策略可以让像素对应地更加准确,建议首先阅读 图像旋转算法与实现以及 基于Matlab的双线性插值算法在图像旋转中的应用来更好的理解反向映射。下图可以很好地理解反向映射的过程。
下面代码实现了最近邻插值和双线性插值,其中rm1,rm2和rm3表示式(5)中的三个转换矩阵。
% reverse mapping matrices
rm1 = [1 0 0; 0 -1 0; -0.5*new_n 0.5*new_m 1];
rm2 = [cosd(degree) sind(degree) 0; -sind(degree) cosd(degree) 0; 0 0 1];
rm3 = [1 0 0; 0 -1 0; 0.5*n 0.5*m 1];

for i = 1:new_n
   for j = 1:new_m
       % rotated image's coordinates to no-rotation image's coordinates
      old_coordinate = [i j 1]*rm1*rm2*rm3;
      col = round(old_coordinate(1));
      row = round(old_coordinate(2));
      % prevent border overflow
      if row < 1 || col < 1 || row > m || col > n
          new_img_nnp(j, i) = 0;
          new_img_lp(j, i) = 0;
      else
          % nearest neighbor interpolation
          new_img_nnp(j, i, 1) = img(row, col, 1);
          new_img_nnp(j, i, 2) = img(row, col, 2);
          new_img_nnp(j, i, 3) = img(row, col, 3);

          % bilinear interpolation
          left = floor(col);
          right = ceil(col);
          top = floor(row);
          bottom = ceil(row);

          a = col - left;
          b = row - top;
          new_img_lp(j, i, 1) = (1-a)*(1-b)*img(top, left, 1) + a*(1-b)*img(top, right, 1) + ...
              (1-a)*b*img(bottom, left, 1) + a*b*img(bottom, right, 1);
          new_img_lp(j, i, 2) = (1-a)*(1-b)*img(top, left, 2) + a*(1-b)*img(top, right, 2) + ...
              (1-a)*b*img(bottom, left, 2) + a*b*img(bottom, right, 2);
          new_img_lp(j, i, 3) = (1-a)*(1-b)*img(top, left, 3) + a*(1-b)*img(top, right, 3) + ...
              (1-a)*b*img(bottom, left, 2) + a*b*img(bottom, right, 3);
      end
   end
end
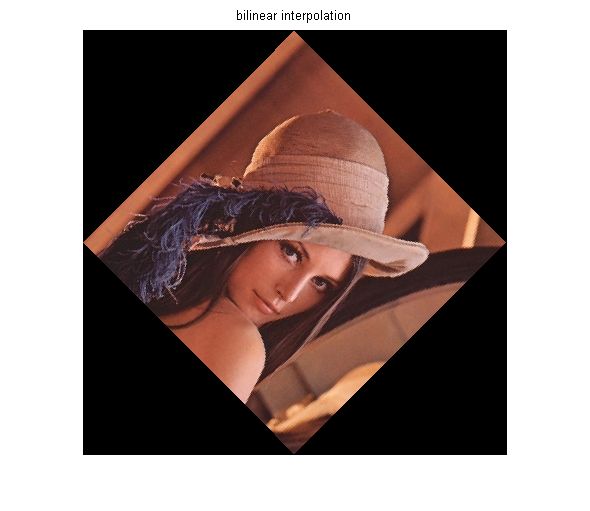
经过反向映射得到如下结果,下面展示的是反向映射+双线性插值的结果,很好的解决了前向映射出现有规律噪声的问题。
4 总结
文章介绍了关于图像旋转的一些原理和相关的实现,从旋转矩阵开始,到前向映射,再到反向映射,反向映射中采用了最近邻插值和双线性插值,较好的实现了图片的旋转功能。建议朋友们多阅读文中引用的一些博客和论文,这样对图像旋转的很多细节会有更好的把握。- http://blog.csdn.net/liyuan02/article/details/6750828
- http://blog.csdn.net/abee23/article/details/7398749
- http://www.cnblogs.com/mlv5/archive/2012/02/02/2336321.html
- http://www.cqvip.com/qk/80356a/201004/35811191.html


