Lua实现LSTM 前向传播
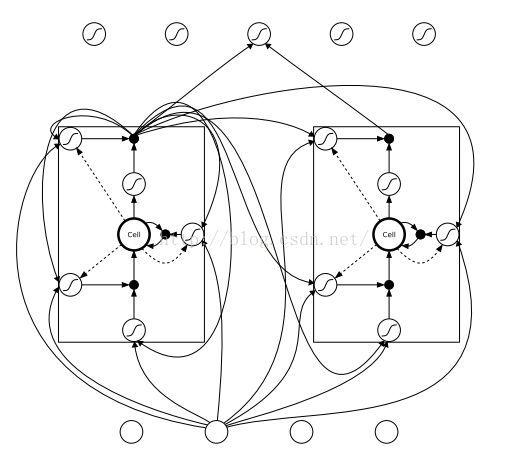
LSTM本身不是一个完整的模型,LSTM是对RNN隐藏层的改进。一般所称的LSTM网络应该称为使用了LSTM单元的RNN网络。如下图所示,LSTM网络,只是将RNN的隐层神经元换成了LSTM单元。本博文翻译自https://apaszke.github.io/lstm-explained.html。
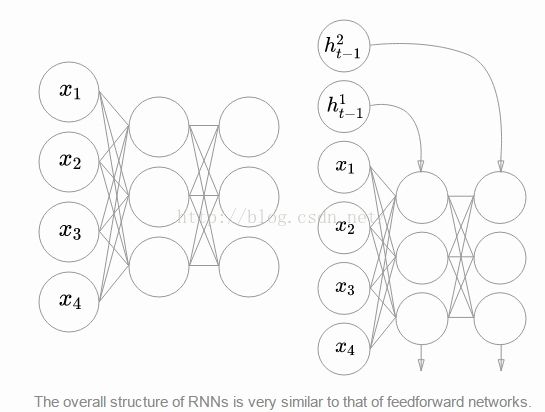
1、RNN其实和前馈网络没很大差异,RNN也可以层级堆叠。只是说前一时刻的隐藏层的输出要继续作为当前时刻的输入。
2、Lua实现LSTM前馈传播单元。深度学习网络都是可以模块化的,包括前向传播过程和BP反向传播过程。整个复杂的网络都是可以按照模块进行组装在一起的。本文,我们只实现了LSTM的前向传播模块。
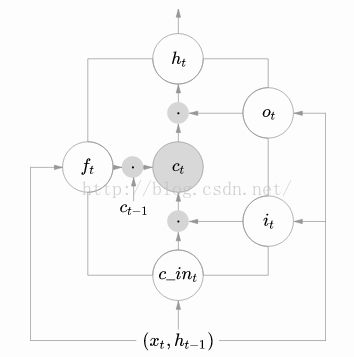
LSTM的模块示意图如下:该模块的输入(x(t),h(t-1),c(t-1)),该模块的输出(h(t),c(t)) 。
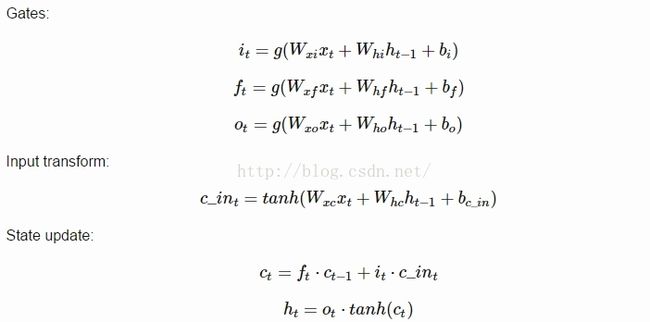
整个LSTM模块前向传播的算法如下:
具体Lua的实现步骤,可以参照该博客:
整个LSTM模块前向传播的lua代码如下:
require 'nn'
require 'nngraph'

local LSTM = {}

function LSTM.create(input_size, rnn_size)
  --------------------- input structure ---------------------
  local inputs = {}
  table.insert(inputs, nn.Identity()())   -- network input
  table.insert(inputs, nn.Identity()())   -- c at time t-1
  table.insert(inputs, nn.Identity()())   -- h at time t-1
  local input = inputs[1]
  local prev_c = inputs[2]
  local prev_h = inputs[3]

  --------------------- preactivations ----------------------
  local i2h = nn.Linear(input_size, 4 * rnn_size)(input)   -- input to hidden
  local h2h = nn.Linear(rnn_size, 4 * rnn_size)(prev_h)    -- hidden to hidden
  local preactivations = nn.CAddTable()({i2h, h2h})        -- i2h + h2h

  ------------------ non-linear transforms ------------------
  -- gates
  local pre_sigmoid_chunk = nn.Narrow(2, 1, 3 * rnn_size)(preactivations)
  local all_gates = nn.Sigmoid()(pre_sigmoid_chunk)

  -- input
  local in_chunk = nn.Narrow(2, 3 * rnn_size + 1, rnn_size)(preactivations)
  local in_transform = nn.Tanh()(in_chunk)

  ---------------------- gate narrows -----------------------
  local in_gate = nn.Narrow(2, 1, rnn_size)(all_gates)
  local forget_gate = nn.Narrow(2, rnn_size + 1, rnn_size)(all_gates)
  local out_gate = nn.Narrow(2, 2 * rnn_size + 1, rnn_size)(all_gates)

  --------------------- next cell state ---------------------
  local c_forget = nn.CMulTable()({forget_gate, prev_c})  -- previous cell state contribution
  local c_input = nn.CMulTable()({in_gate, in_transform}) -- input contribution
  local next_c = nn.CAddTable()({
    c_forget,
    c_input
  })

  -------------------- next hidden state --------------------
  local c_transform = nn.Tanh()(next_c)
  local next_h = nn.CMulTable()({out_gate, c_transform})

  --------------------- output structure --------------------
  outputs = {}
  table.insert(outputs, next_c)
  table.insert(outputs, next_h)

  -- packs the graph into a convenient module with standard API (:forward(), :backward())
  return nn.gModule(inputs, outputs)
end

return LSTM
当然,LSTM也是可以跟传统的CNN一样,几个模块堆起来,前一个模块隐层的输出作为下一个模块的输入。所以,通过堆叠三个LSTM单元,得到LSTM深度网络的代码如下:
require 'nn'
require 'nngraph'

LSTM = require 'LSTM.lua'

-- 3-layer LSTM network (input and output have 3 dimensions)
network = {LSTM.create(3, 4), LSTM.create(4, 4), LSTM.create(4, 3)}

-- network input
local x = torch.randn(1, 3)
local previous_state = {
  {torch.zeros(1, 4), torch.zeros(1,4)},
  {torch.zeros(1, 4), torch.zeros(1,4)},
  {torch.zeros(1, 3), torch.zeros(1,3)}
}

-- network output
output = nil
next_state = {}

-- forward pass
local layer_input = {x, table.unpack(previous_state[1])}
for l = 1, #network do
  -- forward the input
  local layer_output = network[l]:forward(layer_input)
  -- save output state for next iteration
  table.insert(next_state, layer_output)
  -- extract hidden state from output
  local layer_h = layer_output[2]
  -- prepare next layer's input or set the output
  if l < #network then
    layer_input = {layer_h, table.unpack(previous_state[l + 1])}
  else
    output = layer_h
  end
end

print(next_state)
print(output)


