Handler的前世今生之framework层源码分析
Handler在线程间通讯随处可见,尤其framework层,Activity的生命周期就是AMS(ActivityManagerService)通过ApplicationThread(ActivityThread的内部类,也是一个Binder)发送Handler消息通知执行ActivityThread的相应的Activity生命周期函数。那就先来分析一下App点击运行后Handler如何执行Activity的生命周期的,当手指点击手机屏幕上的app图标时,Launcher(其实就是一个Activity,在SystemServer进程初始化后,由Zygote孵化的第一个系统进程)根据点击的图标通过AMS、PMS(Package Manager Services)来完成新App进程的创建,在创建过程中就会启动ActivityThread的main()方法,来看一下main()中做了什么:
    public static void main(String[] args) {

       // 省略部分代码

        Looper.prepareMainLooper();  //【1.0】

        ActivityThread thread = new ActivityThread();
        thread.attach(false);// 【1.1】

        if (sMainThreadHandler == null) {
            sMainThreadHandler = thread.getHandler();// 【1.2】
        }

        if (false) {
            Looper.myLooper().setMessageLogging(new
                    LogPrinter(Log.DEBUG, "ActivityThread"));
        }
        Looper.loop(); //【1.3】

        throw new RuntimeException("Main thread loop unexpectedly exited");
    }
【1.0】就是主线程开始创建Lopper,这就是为什么我们在UI线程不需要写Loop.prepare()和Lopper.loop()代码,因为ActivityThread已经在App进程创建的时候帮我们完成了,ActivtyThread不是Thread类,只是默认的线程,所以以后她也就代表的main线程(UI 线程),看一下这句代码如何创建主线程的Looper:
   public static void prepareMainLooper() {
        prepare(false); // 【2.1】
        synchronized (Looper.class) {// 加同步对象锁 避免多线程执行
            if (sMainLooper != null) {
                throw new IllegalStateException("The main Looper has already been prepared.");
            }
            sMainLooper = myLooper();//【2.2】
        }
    }
【2.1】真正创主线程的sMainLooper:
 private static void prepare(boolean quitAllowed) {
        if (sThreadLocal.get() != null) {
            throw new RuntimeException("Only one Looper may be created per thread");
        }
        sThreadLocal.set(new Looper(quitAllowed)); // 【3.1】创建一个Looper,存到TLS(Thread Local Storge),也就是存在了Main线程的线程本地存储区
    }
【3.1】创建一个Lopper对象存储到ActivityThread所代表的的UI线程的存储区,以后就直接通过一下代码获取:
public static Looper getMainLooper() {
        synchronized (Looper.class) {
            return sMainLooper; // 该变量为私有的静态变量
        }
    }
方便查看,再写一遍ActivityThread 的Main()吧:
   public static void main(String[] args) {

       // 省略部分代码

        Looper.prepareMainLooper();  //【1.0】

        ActivityThread thread = new ActivityThread();
        thread.attach(false);// 【1.1】

        if (sMainThreadHandler == null) {
            sMainThreadHandler = thread.getHandler();// 【1.2】
        }

        if (false) {
            Looper.myLooper().setMessageLogging(new
                    LogPrinter(Log.DEBUG, "ActivityThread"));
        }
        Looper.loop(); //【1.3】

        throw new RuntimeException("Main thread loop unexpectedly exited");
    }
【1.1】 用来关联AMS,通过Binder机制来与接受AMS的消息
【1.2】获取ActivityThread中的成员变量mH,(Handler)
   final H mH = new H(); // 作为Activity的成员变量,处理ActivityThread接受的消息
       private class H extends Handler {
        public static final int LAUNCH_ACTIVITY         = 100;
        public static final int PAUSE_ACTIVITY          = 101;
        public static final int PAUSE_ACTIVITY_FINISHING= 102;
        public static final int STOP_ACTIVITY_SHOW      = 103;
        public static final int STOP_ACTIVITY_HIDE      = 104;
        public static final int SHOW_WINDOW             = 105;
        ...

        String codeToString(int code) {
            if (DEBUG_MESSAGES) {
                switch (code) {
                    case LAUNCH_ACTIVITY: return "LAUNCH_ACTIVITY";
                    case PAUSE_ACTIVITY: return "PAUSE_ACTIVITY";
                    case PAUSE_ACTIVITY_FINISHING: return "PAUSE_ACTIVITY_FINISHING";
                    case STOP_ACTIVITY_SHOW: return "STOP_ACTIVITY_SHOW";
                    case STOP_ACTIVITY_HIDE: return "STOP_ACTIVITY_HIDE";
                     ...

                }
            }
            return Integer.toString(code);
        }
        public void handleMessage(Message msg) {
            if (DEBUG_MESSAGES) Slog.v(TAG, ">>> handling: " + codeToString(msg.what));
            switch (msg.what) {
                case LAUNCH_ACTIVITY: {

                    final ActivityClientRecord r = (ActivityClientRecord) msg.obj;

                    r.packageInfo = getPackageInfoNoCheck(
                            r.activityInfo.applicationInfo, r.compatInfo);
                    handleLaunchActivity(r, null, "LAUNCH_ACTIVITY");

                } break;

                case PAUSE_ACTIVITY: {
                    SomeArgs args = (SomeArgs) msg.obj;
                    handlePauseActivity((IBinder) args.arg1, false,
                            (args.argi1 & USER_LEAVING) != 0, args.argi2,
                            (args.argi1 & DONT_REPORT) != 0, args.argi3);
                    maybeSnapshot();

                } break;
                ...
        }
【1.3】开始循环获取MessageQueue(存储Message的一个类似栈的数据结构)
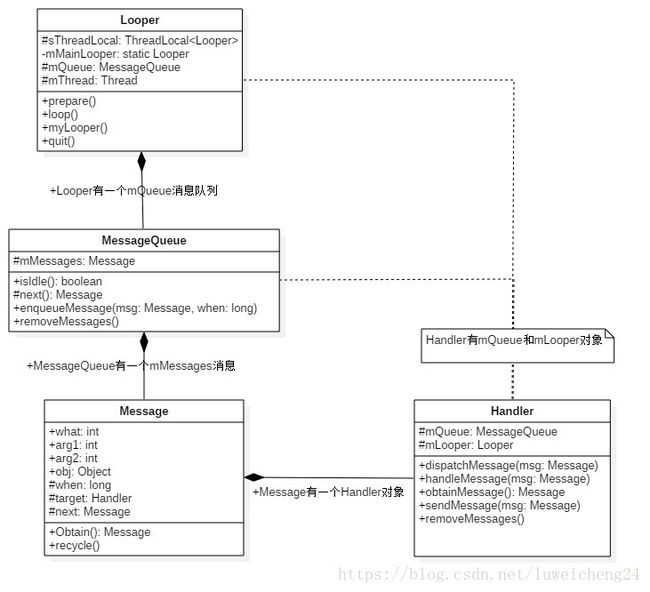
开始分析循环前,来了解一下这几个类之间的关系:
Looper:
轮询器,该对象每个Thread最多存在一个,UI线程在App创建时在ActivityThread中自动完成,其他线程需要调用Looper.prepare()来为当前线程创建一个Looper,如果该线程已经存在,则不会再创建。
MessageQueue
消息队列,作为消息(Message)的承载体,内部维持一个类似栈的Message集合
Message
消息 ,发送体对象,持有发送者(Handler)的引用,内部含有几个成员变量(arg1,arg2
,what…)内部包含一个Message缓存池,通过obtain()来获取空闲的Message对象,避免重复创建对象
Handler
处理器,消息的发送者,内部持有Looper和MessageQueue对象,创建Handler对象的时候会判断该线程是否存在Lopper和MessageQueue,其实有Lopper就一定存在MessageQueue,因为在创建Looper时候就创建了Looper:
    private Looper(boolean quitAllowed) {
        mQueue = new MessageQueue(quitAllowed);
        mThread = Thread.currentThread();
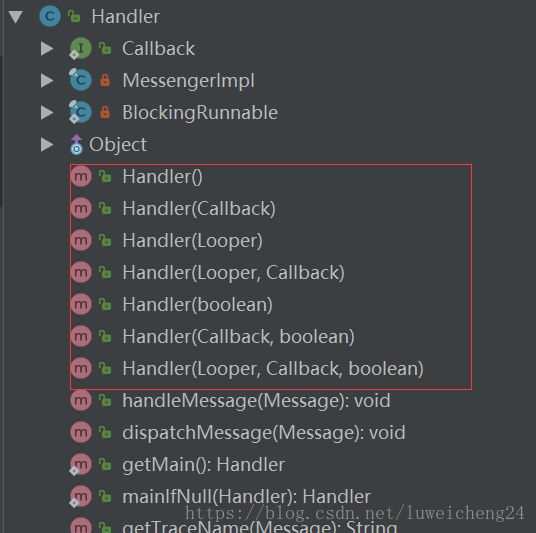
}其实就是包含三个参数,1:Looper 可以指定一个特定线程持有的Looper,发送的消息将发送到该Looper的MessageQueue 2:CallBack 消息的回调接口
    public interface Callback {
        public boolean handleMessage(Message msg);
    }
3:Boolean 表示是否消息是否异步处理
这下看一下Loop.loop()到底做了什么:
public static void loop() {
    final Looper me = myLooper();  //获取TLS存储的Looper对象
    if (me == null) {
        throw new RuntimeException("No Looper; Looper.prepare() wasn't called on this thread.");
    }
    final MessageQueue queue = me.mQueue;  //获取Looper对象中的消息队列

    Binder.clearCallingIdentity();
    //确保在权限检查时基于本地进程,而不是基于最初调用进程。
    final long ident = Binder.clearCallingIdentity();

    for (;;) { //进入loop的主循环方法
        Message msg = queue.next(); //可能会阻塞
        if (msg == null) { //没有消息,则退出循环
            return;
        }

        Printer logging = me.mLogging;  //默认为null,可通过setMessageLogging()方法来指定输出,用于debug功能
        if (logging != null) {
            logging.println(">>>>> Dispatching to " + msg.target + " " +
                    msg.callback + ": " + msg.what);
        }
        msg.target.dispatchMessage(msg); //用于分发Message
        if (logging != null) {
            logging.println("<<<<< Finished to " + msg.target + " " + msg.callback);
        }

        final long newIdent = Binder.clearCallingIdentity(); //确保分发过程中identity不会损坏
        if (ident != newIdent) {
             //打印identity改变的log,在分发消息过程中是不希望身份被改变的。
        }
        msg.recycleUnchecked();  //将Message放入消息池
}
