一,如图所示: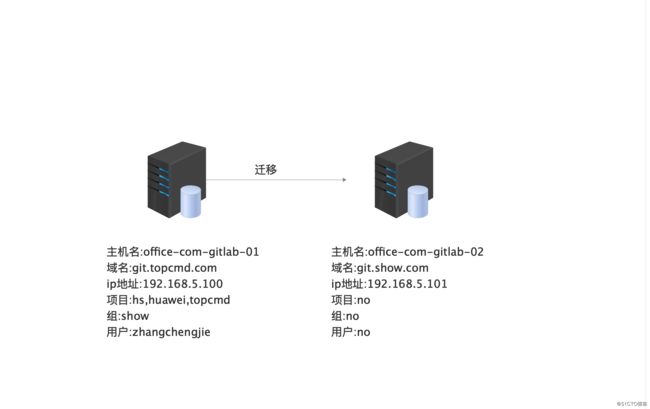
二,office-com-gitlab-01安装
[root@office-com-gitlab-01 ~]# systemctl stop firewalld
[root@office-com-gitlab-01 ~]# systemctl disable firewalld
[root@office-com-gitlab-01 ~]# setenforce 0
[root@office-com-gitlab-01 ~]# sed -i 's/SELINUX=enforcing/SELINUX=disabled/g'/etc/sysconfig/selinux
[root@office-com-gitlab-01 ~]# yum install iptables*
[root@office-com-gitlab-01 ~]# iptables -F;iptables -X;iptables -Z;iptables -t nat -F;iptables -t nat -X;iptables -t nat -Z
[root@office-com-gitlab-01 ~]# service iptables save
[root@office-com-gitlab-01 ~]# yum install -y curl policycoreutils openssh-server openssh-clients postfix cronie policycoreutils-python python wget
[root@office-com-gitlab-01 ~]# yum install git patch
[root@office-com-gitlab-01 ~]# wget https://mirrors.tuna.tsinghua.edu.cn/gitlab-ce/yum/el7/gitlab-ce-11.9.12-ce.0.el7.x86_64.rpm
[root@office-com-gitlab-01 ~]# rpm -ivh gitlab-ce-11.9.12-ce.0.el7.x86_64.rpm
[root@office-com-gitlab-01 ~]# cat /etc/gitlab/gitlab.rb |grep -E "^external_url"
external_url 'http://gitlab2.hs.com' 修改http://后面的网址
[root@office-com-gitlab-01 ~]# gitlab-ctl reconfigure
[root@office-com-gitlab-01 ~]# gitlab-ctl start 在客户端上浏览器访问http://git.topcmd.com
三,office-com-gitlab-02安装和office-com-gitlab-01同样
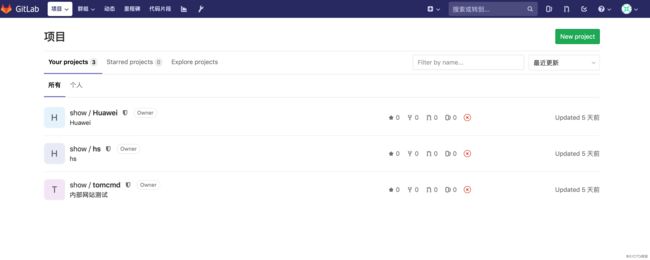
四,office-com-gitlab-01建立用户,组,项目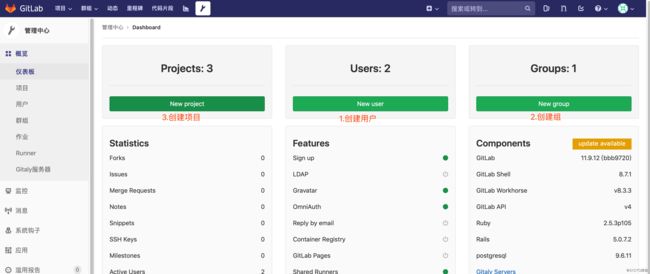
五,Home Page URL设定(提前说一下,A服务器把数据备份还原到B 此时B的Home Page URL还是A的,二种情况,1.原来url不变继续使用2.更换url下面会说如何处理)
六,备份office-com-gitlab-01数据
[root@office-com-gitlab-01 ~]# vim /etc/gitlab/gitlab.rb //修改备份目录
gitlab_rails['manage_backup_path'] = true
gitlab_rails['backup_path'] = "/home/gitlab/backups"    //gitlab备份目录
gitlab_rails['backup_archive_permissions'] = 0644       //生成的备份文件权限
gitlab_rails['backup_keep_time'] = 7776000              //备份保留天数为3个月(即90天,这里是7776000秒)
[root@office-com-gitlab-01 ~]# mkdir -p /home/gitlab/backups
[root@office-com-gitlab-01 ~]# chown -R git.git /home/gitlab/backups
[root@office-com-gitlab-01 ~]# chmod -R 777 /home/gitlab/backups
[root@office-com-gitlab-01 ~]# gitlab-ctl reconfigure
[root@office-com-gitlab-01 ~]# gitlab-rake gitlab:backup:create RAILS_ENV=production //备份数据
[root@office-com-gitlab-01 ~]# ls /home/gitlab/backups/
1560497018_2019_06_14_11.9.12_gitlab_backup.tar
[root@office-com-gitlab-01 ~]# scp -r 1560497018_2019_06_14_11.9.12_gitlab_backup.tar root@office-com-gitlab-02:/home/gitlab/backups //拷贝到office-com-gitlab-02上还原
七,还原数据到office-com-gitlab-02
[root@office-com-gitlab-02 ~]# cd /home/gitlab/backups/
[root@office-com-gitlab-02 backups]# ls
1560497018_2019_06_14_11.9.12_gitlab_backup.tar
[root@office-com-gitlab-02 backups]# gitlab-rake gitlab:backup:restore RAILS_ENV=production BACKUP=1560497018_2019_06_14_11.9.12  //还原只还原数字开头部分
八,验证数据
8.1当使用git.show.com登陆的时候直接跳转到git.topcmd.com上,这就是前面提到的Home Page URL,解决办法就是在域名解析或者host中修改解析。
8.2登陆office-com-gitlat-01主机上执行gitlab-ctl stop
8.3修改域名或者hosts记录192.168.5.101 → git.topcmd.com修改Home Page URL
8.4登陆使用office-com-gitlab-01的用户名密码比如root能登陆说明数据已经迁移过去了
8.5登陆修改Home Page URL会出现500错误处理如下
[root@office-com-gitlab-02 ~]# gitlab-rails c
irb(main):001:0> settings=ApplicationSetting.last
irb(main):001:0> settings.update_column(:runners_registration_token_encrypted,nil)
irb(main):001:0> exit
[root@office-com-gitlab-02 ~]# gitlab-ctl restart
[root@office-com-gitlab-02 ~]# tail-f/var/log/gitlab/gitlab-rails/production.log //在次登陆修改Home Page URL查看输出日志
产考资料:
gitlab备份:https://www.cnblogs.com/kevingrace/p/7821529.html
https://www.cnblogs.com/wenwei-blog/p/6362829.html
500错误处理:https://gitlab.com/gitlab-org/gitlab-ce/issues/56403