直方图均衡化Histogram Equalization
理论Theory
图像的直方图是什么What is an Image Histogram?
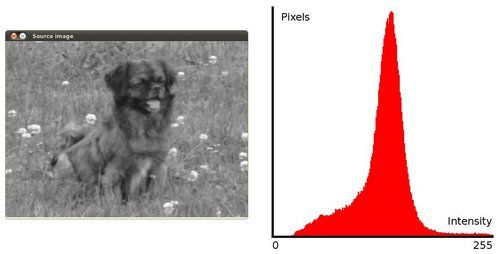
- 直方图是图像中像素强度分布的图形表达方式It is a graphical representation of the intensity distribution of an image。
-
它统计了每一个强度值所具有的像素个数It quantifies the number of pixels for each intensity value considered。
如上图的灰度图,右图统计显示了左图中所有像素值的分布。
直方图均衡化是什么?
- 直方图均衡化是通过拉伸像素强度分布范围来增强图像对比度的一种方法It is a method that improves the contrast in an image, in order to stretch out the intensity range。
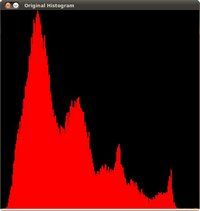
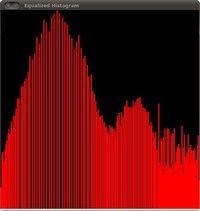
- 说得更清楚一些, 以上面的直方图为例, 你可以看到像素主要集中在中间的一些强度值上. 直方图均衡化要做的就是 拉伸 这个范围. 见下面左图: 绿圈圈出了 少有像素分布其上的 强度值. 对其应用均衡化后, 得到了中间图所示的直方图. 均衡化的图像见下面右图To make it clearer, from the image above, you can see that the pixels seem clustered around the middle of the available range of intensities. What Histogram Equalization does is to stretch out this range. Take a look at the figure below: The green circles indicate the underpopulated intensities. After applying the equalization, we get an histogram like the figure in the center. The resulting image is shown in the picture at right。
直方图均衡化是怎样做到的?How does it work?
- 均衡化指的是把一个分布 (给定的直方图) 映射 到另一个分布 (一个更宽更统一的强度值分布), 所以强度值分布会在整个范围内展开Equalization implies mapping one distribution (the given histogram) to another distribution (a wider and more uniform distribution of intensity values) so the intensity values are spreaded over the whole range。
- 要想实现均衡化的效果, 映射函数应该是一个 累积分布函数 (cdf) (更多细节, 参考学习OpenCV). 对于直方图H(i) , 它的 累积分布 H'(i)是:To accomplish the equalization effect, the remapping should be the cumulative distribution function (cdf) (more details, refer to Learning OpenCV). For the histogram H(i), its cumulative distribution H′(i) is:
理解
直方图均衡化的作用是图像增强。其过程是将图像的像素分布通过一种方法映射到另外一种分布上去,在该映射过程中主要使用了累积分布函数。累积分布函数用于描述随机变量的概率分布(F(x)=P(X
假设有如下图像:
得图像的统计信息如下图所示,并根据统计信息完成灰度值映射:
映射后的图像如下所示:
由上述实例我们可以看到,将像素值转换为另一个像素值,并且原来的大小关系并没有改变,但是直画出方图的话,会发现直方图变缓了。
例程Code
- 这个例程是用来干嘛的?What does this program do?
加载源图像Loads an image
把源图像转为灰度图Convert the original image to grayscale
使用OpenCV函数 EqualizeHist 对直方图均衡化Equalize the Histogram by using the OpenCV function cv::equalizeHist
在窗体中显示源图像和均衡化后图像Display the source and equalized images in a window. - 例程一瞥Code at glance:
#include "opencv2/imgcodecs.hpp"
#include "opencv2/highgui.hpp"
#include "opencv2/imgproc.hpp"
#include
using namespace cv;
using namespace std;
int main( int, char** argv )
{
    Mat src, dst;
    const char* source_window = "Source image";
    const char* equalized_window = "Equalized Image";
    src = imread( argv[1], IMREAD_COLOR );
    if( src.empty() )
    {
        cout<<"Usage: ./EqualizeHist_Demo "<
说明
1、声明原图和目标图以及窗体名称:Declare the source and destination images as well as the windows names:
Mat src, dst;
char* source_window = "Source image";
char* equalized_window = "Equalized Image";
2、加载源图像:Load the source image:
src = imread( argv[1], 1 );
if( !src.data )
{
    cout<<"Usage: ./Histogram_Demo "<
3、转为灰度图:Convert it to grayscale:
cvtColor( src, src, CV_BGR2GRAY );
4、利用函数 equalizeHist 对上面灰度图做直方图均衡化:Apply histogram equalization with the function cv::equalizeHist :
equalizeHist( src, dst );
可以看到, 这个操作的参数只有源图像和目标 (均衡化后) 图像.As it can be easily seen, the only arguments are the original image and the output (equalized) image。
5、显示这两个图像 (源图像和均衡化后图像) :Display both images (original and equalized) :
namedWindow( source_window, CV_WINDOW_AUTOSIZE );
namedWindow( equalized_window, CV_WINDOW_AUTOSIZE );
imshow( source_window, src );
imshow( equalized_window, dst );
6、等待用户案件退出程序Wait until user exists the program
waitKey(0);
return 0;
结果
1、为了更好地观察直方图均衡化的效果, 我们使用一张对比度不强的图片作为源图像输入, 如下图:To appreciate better the results of equalization, let's introduce an image with not much contrast, such as:
它的直方图为:which, by the way, has this histogram:
注意到像素大多集中在直方图中间的强度上.notice that the pixels are clustered around the center of the histogram.
2、使用例程进行均衡化后, 我们得到下面的结果After applying the equalization with our program, we get this result:
这幅图片显然对比度更强. 再验证一下均衡化后图片的直方图this image has certainly more contrast. Check out its new histogram like this:
注意到现在像素在整个强度范围内均衡分布Notice how the number of pixels is more distributed through the intensity range.
翻译者
zhlifly@ OpenCV中文网站
参考
直方图均衡化的数学原理


