一、前言
关于类加载器,前面写了三篇,这篇是第四篇。
实战分析Tomcat的类加载器结构(使用Eclipse MAT验证)
还是Tomcat,关于类加载器的趣味实验
本篇写个简单的例子,来说说类的热替换。
先说个原则,在同一个类加载器内,不能重复加载同一个类(因为 classloader 在 loadClass 一次后会缓存在类加载器内部,此时如果再次加载,其实是直接从缓存取,我意思的加载,是指真正去调用 defineClass 去加载。)。所以,要热替换一个类,必须连其类加载器一起换掉。
二、步骤
1、源码
一共两个工程,工程1,只有下面这一个类
测试类,TestSample.java,这个类的用处就是,我们不断改变其 printClassLoader 的代码,并重新编译后,放到指定位置:
/**
 * desc:
 *
 * @author : caokunliang
 * creat_date: 2019/6/15 0015
 * creat_time: 14:01
 **/
public class TestSample {

    public void printClassLoader(TestSample testSample) {
        System.out.println(testSample.getClass().getClassLoader());
    }
}
工程2,两个类:
ReloadMainTest.java,主要是启动一个定时任务,定时任务会每隔3s,用一个自定义的类加载器,去指定位置(为了简单,直接路径写死了)加载 TestSample.class,并调用其方法进行打印,查看是否热替换成功:
import java.lang.reflect.Method;
import java.util.concurrent.Executors;
import java.util.concurrent.TimeUnit;

/**
 * desc:
 *
 * @author : caokunliang
 * creat_date: 2019/6/14 0014
 * creat_time: 17:04
 **/
public class ReloadMainTest {
    public static void reload()throws Exception{

        String className = "TestSample";
        MyClassLoader classLoader = new MyClassLoader("/home/test/TestSample.class", className);
        Class loadClass = classLoader.findClass(className);
        Object instance = loadClass.newInstance();
        Method method = instance.getClass().getMethod("printClassLoader", new Class[]{loadClass});
        method.invoke(instance,instance);


    }


    public static void main(String[] args) throws Exception {
          testReload();
    }

    public static void testReload(){
        //创建一个2s执行一次的定时任务
        Executors.newScheduledThreadPool(1).scheduleAtFixedRate(new Runnable() {
            @Override
            public void run() {
                try {
                    reload();
                } catch (Exception e) {
                    e.printStackTrace();
                }
            }
        },0,3, TimeUnit.SECONDS);


    }
}
MyClassLoader.java,自定义的类加载器:
import java.io.ByteArrayOutputStream;
import java.io.FileInputStream;
import java.io.UnsupportedEncodingException;

/**
 * desc:
 *
 * @author : caokunliang
 * creat_date: 2019/6/13 0013
 * creat_time: 10:19
 **/
public class MyClassLoader extends ClassLoader {
    private String classPath;
    private String className;


    public MyClassLoader(String classPath, String className) {
        this.classPath = classPath;
        this.className = className;
    }

    @Override
    protected Class findClass(String name) throws ClassNotFoundException {
        byte[] data = getData();
        return defineClass(className,data,0,data.length);
    }

    private byte[] getData(){
        String path = classPath;

        try {
            FileInputStream inputStream = new FileInputStream(path);
            ByteArrayOutputStream byteArrayOutputStream = new ByteArrayOutputStream();
            byte[] bytes = new byte[2048];
            int num = 0;
            while ((num = inputStream.read(bytes)) != -1){
                byteArrayOutputStream.write(bytes, 0,num);
            }

            return byteArrayOutputStream.toByteArray();
        } catch (Exception e) {
            e.printStackTrace();
        }

        return null;
    }
}
2、测试
我这边的测试路径为:/home/test, MyClassLoader.java已经编译
[root@localhost test]# pwd
/home/test
[root@localhost test]# ll MyClassLoader.*
-rw-r--r--. 1 root root 1175 Jun 13 11:25 MyClassLoader.class
-rw-r--r--. 1 root root 1242 Jun 13 11:25 MyClassLoader.java
我的工程2 的代码放在另一个目录下:
[root@localhost test-reload]# pwd
/home/test/test-reload
[root@localhost test-reload]# ll
total 20
-rw-r--r--. 1 root root 1464 Jun 15 17:55 MyClassLoader.class
-rw-r--r--. 1 root root 1458 Jun 15 17:55 MyClassLoader.java
-rw-r--r--. 1 root root  511 Jun 15 17:55 ReloadMainTest$1.class
-rw-r--r--. 1 root root 1531 Jun 15 17:55 ReloadMainTest.class
-rw-r--r--. 1 root root 1218 Jun 15 17:52 ReloadMainTest.java
执行 java ReloadMainTest,启动测试类,就会每个3s,执行 TestSample 的方法:
此时,我们在另一个窗口中,去修改 TestSample.java,并重新编译之:
此时,我们切回原窗口,可以发现输出发生了变化:
3、测试进阶
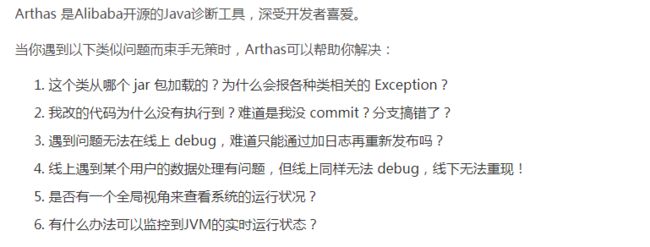
这里要介绍一个工具,阿里开源的arthas。 (https://alibaba.github.io/arthas/en/install-detail.html)
这款工具,功能很强,下图是其简单介绍:
这里,我打算使用其 类搜索功能,通过搜索 TestSample 类,来查看该类是从哪个类加载器加载而来,使用方式极其简单,直接java 启动 arthas,然后选择要attach的java 应用。
[root@localhost test]# java -jar arthas-boot.jar
[INFO] arthas-boot version: 3.1.1
[INFO] Found existing java process, please choose one and hit RETURN.
* [1]: 10100 org.apache.catalina.startup.Bootstrap
  [2]: 25517 ReloadMainTest
2
[INFO] arthas home: /root/.arthas/lib/3.1.1/arthas
[INFO] Try to attach process 25517
[INFO] Attach process 25517 success.
[INFO] arthas-client connect 127.0.0.1 3658
  ,---.  ,------. ,--------.,--.  ,--.  ,---.   ,---.
 /  O  \ |  .--. ''--.  .--'|  '--'  | /  O  \ '   .-'
|  .-.  ||  '--'.'   |  |   |  .--.  ||  .-.  |`.  `-.
|  | |  ||  |\  \    |  |   |  |  |  ||  | |  |.-'    |
`--' `--'`--' '--'   `--'   `--'  `--'`--' `--'`-----'


wiki      https://alibaba.github.io/arthas
tutorials https://alibaba.github.io/arthas/arthas-tutorials
version   3.1.1
pid       25517
time      2019-06-15 19:16:59
下面我们搜索下TestSample类,(直接输入:sc -df TestSample):
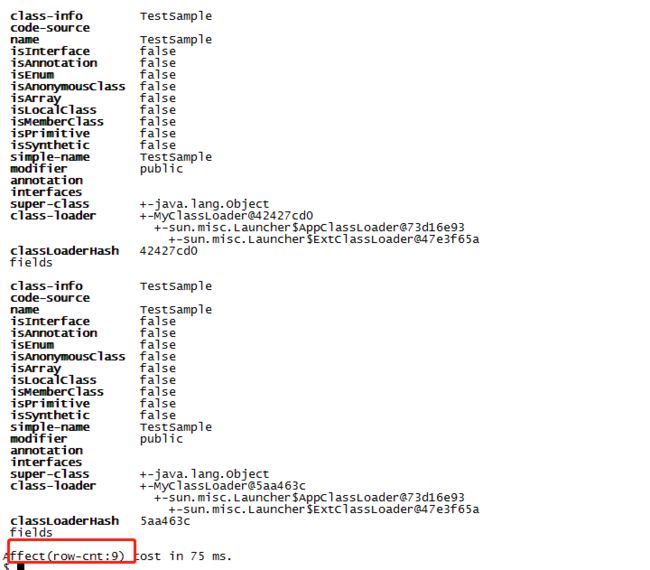
是不是看到类加载器了,但这只是我截了一部分的图而已,这个命令会把 当前java进程中所有的匹配这个类的都搜出来。我们看看到底搜出来多少:
这里显示了,一共有9行,也就是说,在我们的定时器线程的不断运行下,每隔3s就用一个新的类加载器去加载 TestSample,目前java 进程中,已经有9个 TestSample 类了。
多个同名类,(但不同类加载器),会不会有问题?按理说应该不会,因为假设另一个类B引用该类,那么类B默认就会用它自己的类加载器来加载该类,按理说,是加载不到的,直接就报错了。(存疑。。。)
说回来(实在是编不下去了。。),这里我们的 ReloadMainTest,都是 把一个classloader 用完即弃,包括 该classloader 加载的类,以及用加载的类new出来的对象,都是在一个方法内,属于局部变量,跑完一次循环,就没人持有他们的引用了。
但是,为什么我们还看到有9个类存在呢? 这个主要还是因为,class 相关的数据都是存放在 永久代,永久代平时一般不进行垃圾回收,所以我们才能看到那些废弃类的尸体。我们可以试试调用垃圾回收,通过jmap就可以触发。
[root@localhost test]# jmap -dump:live,format=b,file=heap23.bin  25517
Dumping heap to /home/test/heap23.bin ...
Heap dump file created
此时再看类的数量,是不是变了:
三、简单总结
这篇简单介绍了如何进行类的热替换。这里的热替换,建立在这样的基础上:我们加载了新的class,然后new了对象,调用了对象的方法后,整个过程就结束了,没涉及到和其他类的交互。正因为如此,新生成的对象没有被任何地方引用,所以可以进行垃圾回收;对象被回收后,perm区的class对象也就可以进行回收了,于是,classloader也没被任何地方引用,也可以进行回收,所以最后的那个测试才能出现上述的结果(即:jmap触发full gc后,TestSample的数量变回1)。
客观来说,暂时还没发现在真实环境里能发挥出什么作用,但是作为学习案例,是够了的。为什么在真实环境没用(比如 java web项目),在这类项目中,应用被打成一个war包(jar包的spring boot方式还没研究内部的类加载器结构,不能乱说),应用的WEB-INF下的classes和lib目录下的 jar 包,都是由同一个类加载器(也就是webappclassloader)加载。如果要替换的话,只能整个 webappclassloader 全部换掉才可能。能不能单独换一个类呢,我感觉是不行的,假设 ControllerA 里面引用了 AService,AServiceImpl实现AService,你说我现在想换掉 AServiceImpl,假设我们重新用自定义的类加载器 去某个位置加载 了新的 AServiceImpl ,那么我们要怎么才能让 AService 引用到这个新的 实现类呢? 且不说这二者由不同的类加载器加载,其次,还得把之前的旧的实现的被别处引用的地方给换掉。。。想想还是很不好搞。。。
这里预告一下,下一篇会是一个黑科技,尤其是对java web、java 后台开发人员而言,主要是给后台程序开个后门,执行我们的任意代码,在程序不重启的情况下进行调试、全局参数查看、方法执行等,给同事们演示了一下,效果还是很不错的。


