wordpress搭建(LNMP)
wordpress搭建
(搭建环境:CentOS 6 + LNMP)
一、LNMP环境搭建
1、清空防火墙规则 ,暂时关闭防火墙
setenforce 0
iptables -F
service iptables save
2、安装epel源、wget工具(一般云服务器都已经默认安装)
yum install epel-release -y
yum install wget -y
3、安装mysql
yum install mysql mysql-server -y
chkconfig mysqld on
service mysqld start
4、安装php-fpm
yum install -y php lighttpd-fastcgi php-cli php-mysql php-gd php-imap php-ldap php-odbc php-pear php-xml php-xmlrpc php-mbstring php-mcrypt php-mssql php-snmp php-soap php-tidy php-common php-devel php-fpm
chkconfig php-fpm on
service php-fpm start
5、安装nginx
yum install -y nginx
chkconfig nginx on
service nginx start
6、配置nginx支持php
(1)修改nginx配置文件
mv /etc/nginx/nginx.conf /etc/nginx/nginx.confbak
cp /etc/nginx/nginx.conf.default /etc/nginx/nginx.conf
vi /etc/nginx/nginx.conf
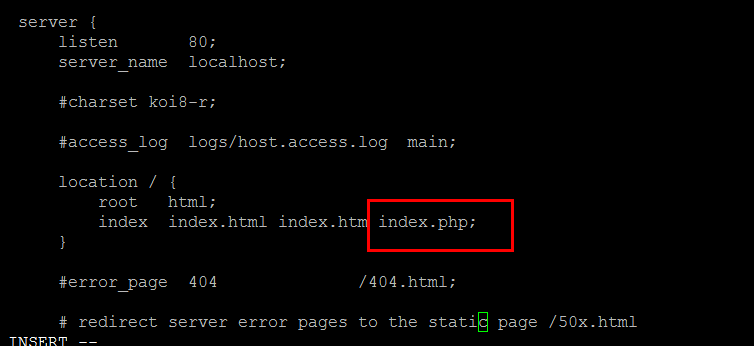
搜索index,找到如下字段,在index.htm后面添加index.php,添加完成后如图所示:
location / {
root html;
index index.html index.htm;
}
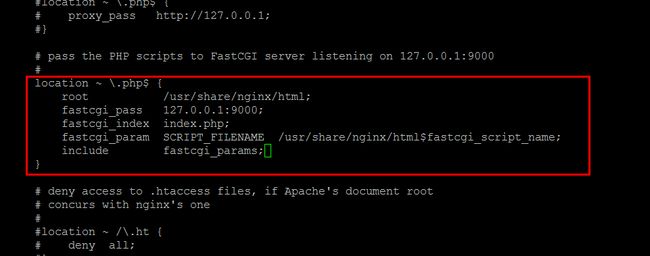
搜索php,找到如下字段,将注释符号去掉,并修改html为/usr/share/nginx/html,/scripts修改为/usr/share/nginx/html,修改后效果如下图所示:
location ~ \.php$ {
root html;
fastcgi_pass 127.0.0.1:9000;
fastcgi_index index.php;
fastcgi_param SCRIPT_FILENAME /scripts$fastcgi_script_name;
include fastcgi_params;
}
重启nginx服务:
service nginx restart
(2)测试php是否能正常解析
建立info.php测试文件:
vi /usr/share/nginx/html/info.php
phpinfo();
?>
输入:192.168.11.7/info.php (主机IP/info.php)
显示php界面,则说明解析成功:
二、wordpress搭建
(1)下载最新wordpress
cd /usr/local/src
wget https://cn.wordpress.org/wordpress-4.9.4-zh_CN.tar.gz
tar -zxvf wordpress-4.9.4-zh_CN.tar.gz
mkdir -p /data/www
mv wordpress /data/www
(2)配置nginx:
vi /etc/nginx/nginx.conf
搜索server,(只有一个未注释的)做如下修改:
server {
listen 80;
server_name www.abc.com; //博客域名
location / {
root /data/www/wordpress;
index index.html index.htm index.php;
}
location ~ \.php$ {
root /data/www/wordpress;
fastcgi_pass 127.0.0.1:9000;
fastcgi_index index.php;
fastcgi_param SCRIPT_FILENAME /data/www/wordpress$fastcgi_script_name;
include fastcgi_params;
}
}
保存后重启nginx服务:
service nginx restart
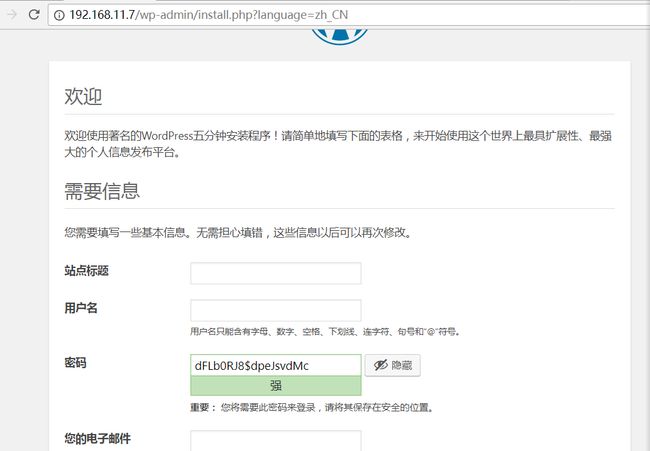
(3)浏览器访问主机IP,进行wordpress安装:
配置wordpress数据库,创建数据库wordpress,并创建同时授权用户 wordpess,设置密码123456:
mysql -uroot
create database wordpress;
grant all on wordpress.* to 'wordpress'@'localhost' identified by '123456';
将数据库名、用户、密码对应填入:
按照提示手工创建wp-config.php文件 :
vi /data/www/wordpress/wp-config.php,将提示的文字粘贴进去、保存即可。
点击安装,填写站点信息:
填写完成,点击确定,就可以登录,基础部分到此已经安装完成:
三、补充
1、worlpress禁止加载google字体插件的设置
cd /data/www/wordpress/wp-content/plugins
wget https://downloads.wordpress.org/plugin/remove-open-sans-font-from-wp-core.1.2.2.zip
wget https://downloads.wordpress.org/plugin/disable-google-fonts.1.3.zip
unzip remove-open-sans-font-from-wp-core.1.2.2.zip
unzip disable-google-fonts.1.3.zip
刷新浏览器,在浏览器插件列表就可以看到新装的两个插件,点击启用即可:
2、网站安全相关(待补充)


