SpringBoot-控制器篇
快速构建一个SpringBoot项目,并添加以下pom依赖
>
>org.springframework.boot >
>spring-boot-starter-thymeleaf >
>
>
>org.springframework.boot >
>spring-boot-starter-web >
>
- spring-boot-starter-thymeleaf
一种用于Web和独立环境的现代服务器端的Java模板引擎,这一节内容重点不是这个模板引擎,只为演示Controller层返回视图解析。 - spring-boot-starter-web
web的场景,自动帮我们引入了web模块开发需要的相关jar包
返回模板视图Controller
新建ViewModelController存放于controller包下,在类上面加入两个注解:
@Controller 让Controller有能力处理http请求
@RequestMapping 配置URL映射,可以写在类或者方法上面
@Controller
@RequestMapping("/view")
public class ViewModelController {

    @RequestMapping("/index")
    public String index(Map<String,Object> map){
        map.put("name","james");
        return "index";
    }
}
至此,我们已经写好了一个可以处理请求的Controller,在Contrller中index方法的入参是一个map,这个map中添加的值,可以直接在视图中通过thymeleaf特有的标签解析输出,和jsp页面输出值类似。方法返回值是一个String类型的字符串,SpringBoot视图解析器在收到这个方法的返回值后,会将请求转发到resources/templates/index.html中。
<html lang="en" xmlns:th="http://www.w3.org/1999/xhtml">
<head>
    <meta charset="UTF-8">
    <title>indextitle>
head>
<body>
    <p th:text="${name}">p>
body>
html>
启动项目,浏览器访问:http://localhost:8088/chapter03/view/index
- 通过Model对象传值到对应的返回页面
@RequestMapping("/hello")
public String hello(Model model){
    model.addAttribute("name","jack");
    return "hello";
}
<html lang="en" xmlns:th="http://www.w3.org/1999/xhtml">
<head>
    <meta charset="UTF-8">
    <title>hellotitle>
head>
<body>
    <p th:text="${name}">p>
body>
html>
- 通过自定义Bean传值到对应的页面
创建User类,存放于bean包下
@Data
public class User {
    private String name;
    private String email;
    private String phone;
    public User(String name, String email, String phone) {
        this.name = name;
        this.email = email;
        this.phone = phone;
    }
    public User() {}
}
在Controller中写一个users方法,将我们自定义的User类作为方法入参,转发到user视图中
@RequestMapping("/user")
public String users(User user){
	user.setName("alis");
	user.setPhone("18000000000");
	user.setEmail("[email protected]");
	return "user";
}
这里需要我们通过对象名点属性的方法获取值
<html lang="en" xmlns:th="http://www.w3.org/1999/xhtml">
<head>
    <meta charset="UTF-8">
    <title>usertitle>
head>
<body>
<p th:text="${user.name}">p>
<p th:text="${user.email}">p>
<p th:text="${user.phone}">p>
body>
html>
模板视图Controller接受参数
@RequestMapping("/demo1/{id}")
public String demo1(@PathVariable(name = "id")String id){
    System.out.println("id="+id);
    return "demo1";
}
@PathVariable :获取路径参数,即url/{id}这种形式。
@RequestMapping("/demo2")
public String demo2(@RequestParam(name="name")String name,Model model){
    model.addAttribute("name",name);
    System.out.println("name="+name);
    return "demo2";
}
@RequestParam :获取查询参数,即url?name=这种形式
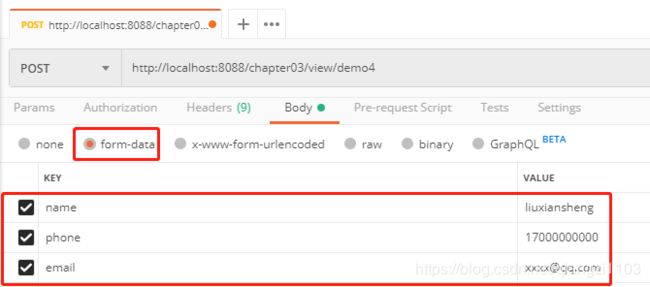
 @RequestMapping("/demo4")
    public String demo4(User user){
        System.out.println(user.toString());
        return "demo4";
    }
返回JSON数据Controller
新建RestApiController存放于controller包下,在类上面加入两个注解:
@RestController:
Spring框架4版本之后出来的注解,之前版本返回json数据需要@ResponseBody配合@Controller
@RestController = @Controller+@ResponseBody的组合
@RequestMapping:配置URL映射,可以写在类或者方法上面
@RestController
//@Controller
//@ResponseBody
@RequestMapping("/api")
public class RestApiController {

    @RequestMapping(value = "/getUser" ,method = RequestMethod.GET)
    //@GetMapping("/getUser")
    public User getUser(){
        User user = new User();
        user.setPhone("18000000000");
        user.setName("tom");
        user.setEmail("[email protected]");
        return user;
    }
}
@GetMapping:组合注解,只允许以get方式访问
@GetMapping = @RequestMapping(value = “/getUser” ,method = RequestMethod.GET)
启动项目,浏览器访问地址:http://localhost:8088/chapter03/api/getUser 返回如下结果:
{“name”:“tom”,“email”:“[email protected]”,“phone”:“18000000000”}
Controller接受JSON数据入参
@PostMapping("/mapDemo")
public Map<String,Object> mapDemo(@RequestBody Map<String,Object> map){
    System.out.println(map.toString());
    return map;
}
@RequestBody:用来接收前端传递给后端的json字符串数据,GET方式无请求体,所以使用@RequestBody接收数据时,前端不能使用GET方式提交数据,而是用POST方式进行提交。
@PostMapping:组合注解,以POST方式访问路径
@PostMapping = @RequestMapping(value = “/mapDemo”,method = RequestMethod.POST)
点击这里获取示例源码

