MySQL的初始化,密码,授权
关防火墙、selinux:
vim /etc/selinux/config
把selinux改为disabled
-
- 关于MySQL的初始化
- 关于MySQL的密码
- 设置密码
- 忘记密码时
- 安装MySQL 57
- 建立一个用户能远程登录
- 学习环境的示例数据库搭建
- MySQL下的系统数据库
- mysql里面的help命令的使用
- show 命令的使用
- mysql 认证及权限结构介绍
- 用户安全
- mysql 修改密码
- mysql 里面破解密码
- grant权限类型和revoke命令的使用
- 远程访问
- 1修改localhost
- 2指定授权
- 3泛授权
关于MySQL的初始化
停止数据库:service mysqld stop
mysql启动之前要先 service mysqld start –》初始化数据库
关于MySQL的密码
设置密码
①mysql>set password for root@localhost=password(‘123123’);
②mysqldadmin -uroot -p123123 password456456;
③mysql>use mysql;
mysql>update user set password=password(‘123123’);
刷新权限:flush privilege;(必须刷新!!)
忘记密码时:
在dos中进入mysql\bin目录,
输入mysqld –skip-grant-tables回车,–skip-grant-tables是启动mysql时跳过权限表认证。
再开一个dos窗口,输入mysql,然后连接权限数据库:mysql>use mysql;
改密码。同③
安装MySQL 5.7
(保证yum源是好的)
yum localinstall *.rpm
数据库的初始密码在/var/log/mysql.log里面
A temporary password is generated for
搜索这个关键字,根据初始化数据库的时间,找到初始密码,然后进行修改。
可以将密码策略给关闭:
vim /etc/my.cnf
添加:validate_password=off
关闭,重启服务;
mysql>set password=password(‘123123’);
成功修改密码。
建立一个用户,能远程登录
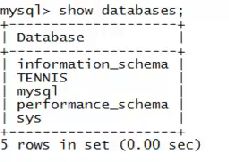
mysql>show databases;
mysql>use mysql;
mysql>show tables;
mysql>select * from user \G
(没有分号!!) –》可以查看当前数据库能从哪里登录
此时发现,数据库的用户root,只能通过localhost,也就是本机登录
我们需要可以从任何一台机器登录,需要做一个grant操作
mysql>create user ‘root’@’%’ identified by ‘123456’;
mysql>grant all on . to ‘root’@’%’;
学习环境的示例数据库搭建
mysql> create user ‘booksql’@’%’ identified by ‘123456’;
mysql> grant all privileges on . to ‘booksql’@’%’ with grant option;
大小写很敏感:
mysql>show variables like ‘lower_case%’;
(查看变量)
mysql里面的数据库在哪里?
/var/lib/mysql 里!!
MySQL下的系统数据库

(注:TENNIS数据库是后来我们自己建的!)
(1)information_schema
这张数据表保存了MySQL服务器所有数据库的信息。如数据库名,数据库的表,表栏的数据类型与访问权限等。再简单点,这台MySQL服务器上,到底有哪些数据库、各个数据库有哪些表,每张表的字段类型是什么,各个数据库要什么权限才能访问,等等信息都保存在information_schema表里面。
(2)performance_schema
- 提供进程等待的详细信息,包括锁、互斥变量、文件信息;
- 保存历史的事件汇总信息,为提供MySQL服务器性能做出详细的判断;
- 对于新增和删除监控事件点都非常容易,并可以随意改变mysql服务器的监控周期,例如(CYCLE、MICROSECOND)
(3)sys:
下面有session表:连接的会话等等。。
mysql>desc session;
mysql>select user,db,conn_id from session;
(会看到当前有哪些连接,连接到了本mysql数据库)
(4)mysql:
下面有user表:有哪些用户
mysql里面的help命令的使用
mysql>help
mysql>help contents (目录)
mysql>help 一层层的往里进。。
eg:help show–》就会把show命令详细列出来~
show 命令的使用
mysql>help show –》可以看show命令怎么用
(1)show create 系列
–》展示当年建立东西的时候所输入的命令、语句
(2)show columns from 表名
–》展示对应表的列的情况
mysql 认证及权限结构介绍
认证什么?–》用户名、密码、登录的客户端信息
授权 –》
- 系统权限
- 针对某一个/某几个数据库
- 某一个/几个数据库里面的某张表
- 某一个/几个数据库里面的某张表的某个列
用户安全
建立一个用户
mysql>CREATE USER ‘u1’@’192.168.60.1’ identified by ‘123456’;
用登录工具登录:
-uu1 -p123456 -h192.168.60.2
用户建立完了,要进行授权
grant 权限 (列名) on table 库名.表名 to ‘用户’@’登录主机地址’;
1.u1可以访问所有数据库的所有表,可以select
2.u1可以访问test数据库的所有表,insert
3.u3可以访问test数据库里面的t1
4.u4可以访问test数据库里面的t1(name列)
==》
(1)grantselect ontable *.* to ‘u1’@’192.168.56.1’ ;
*.*==》第一个*是指所有数据库,第二个*指所有表
(2)grant insert on table test.* to ‘u1’@’192.168.56.1’;
(3)create user ‘u3’@’%’ identified by ‘123456’;
grant all on table test.t1 to ‘u3’@’%’;
(4)grant all (name) on table test.t1 to ‘u4’@’%’;
with grant option 特点:
grant all on *.* to ‘root’@’%’ with grant option;
grant 建立用户的限制和特点:
grant all on *.* to ‘u10’@’%’ with grant option identified by ‘12346’;
mysql 修改密码:
(1)grant all on *.* to 'u1'@'%' identified by '123';
会出现警告,因为grant一般用来授权,而不是修改属性(密码属于属性),所以会被废弃,不建议这样改密码。
(2)alter user 'u1'@'%' identified by '123';
建议用法。
(3)set password for 'u1'@'%' = password('123');
mysql 里面破解密码
mysql安装完成后,一般情况:
- ①空
- ②在/var/log/mysql.log 临时密码
- ③在.secure文件 密码
破解密码的原理:
1.需要重启mysql,重启时需要写参数:
2.启动mysql,此前需要需要/etc/my.cnf,注释掉密码策略参数
mysqld_safe --skip-grant-tables3.mysql -uroot 不用密码就能登录了
然后:mysql>flush privileges;
4.新开一个终端,
mysql>alter user ‘root’@’localhost’ identified by ‘123456’;
mysql>flush tables;
mysql>service mysqld stop;
mysql>service mysql start;
mysql>mysql -uroot -p123456
grant权限类型和revoke命令的使用
mysql>revoke all on *.* from 'u10'@'%';远程访问
1、修改localhost
更改 “mysql” 数据库里的 “user” 表里的 “host” 项,从”localhost”改成”%”
mysql>use mysql;
mysql>update user set host = '%' where user = 'root';
mysql>select host, user from user;
mysql>FLUSH PRIVILEGES;
2、指定授权
使用myuser/mypassword从任何主机连接到mysql服务器:
GRANT ALL PRIVILEGES ON *.* TO 'myuser'@'%' IDENTIFIED BY 'mypassword' WITH GRANT OPTION;使用myuser/mypassword从ip为192.168.225.166的主机连接到mysql服务器:
GRANT ALL PRIVILEGES ON *.* TO 'myuser'@'192.168.225.166' IDENTIFIED BY 'mypassword' WITH GRANT OPTION;3、泛授权
mysql -h localhost -u root
mysql>GRANT ALL PRIVILEGES ON *.* TO 'root'@'%' WITH GRANT OPTION; //赋予任何主机上以root身份访问数据的权限
mysql>FLUSH PRIVILEGES;