Tensorflow快速入门
前言:目前,深度学习已经广泛应用于各个领域(我在前一节稍微了总结下),比如图像识别,图形定位与检测,无人驾驶,语音识别,情感分析,机器翻译等等,对于这个神奇的领域,很多同学都很向往,作为基础,这里简单介绍下最火的深度学习开源框架 tensorflow。
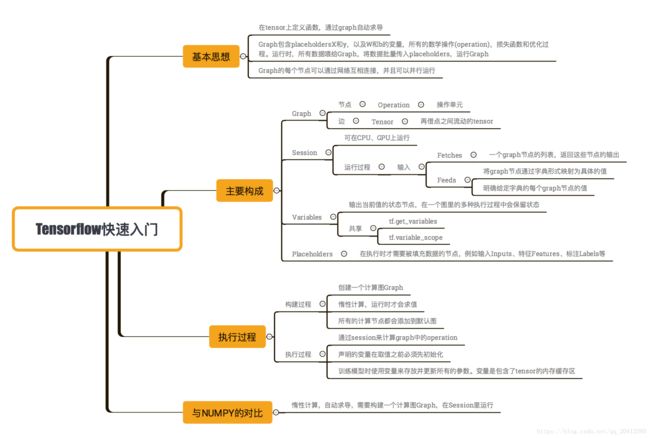
1、Tensorflow快速入门图解
2、Tensorflow快速入门
2.1Tensorflow的大体认识
Tensorflow:由较低级别的符号计算库(如 Theano)与较高级别的网络规范库(如 Blocks 和 Lasagne)组合而成。
优点:
由谷歌开发、维护,因此可以保障支持、开发的持续性。巨大、活跃的社区网络训练的低级、高级接口「Tensorboard」是一款强大的可视化套件,旨在跟踪网络拓扑和性能,使调试更加简单。用 Python 编写(尽管某些对性能有重要影响的部分是用 C++实现的),这是一种颇具可读性的开发语言支持多 GPU。因此可以在不同的计算机上自由运行代码,而不必停止或重新启动程序比基于 Theano 的选项更快的模型编译编译时间比 Theano 短TensorFlow 不仅支持深度学习,还有支持强化学习和其他算法的工具。
缺点:
计算图是纯 Python 的,因此速度较慢图构造是静态的,意味着图必须先被「编译」再运行
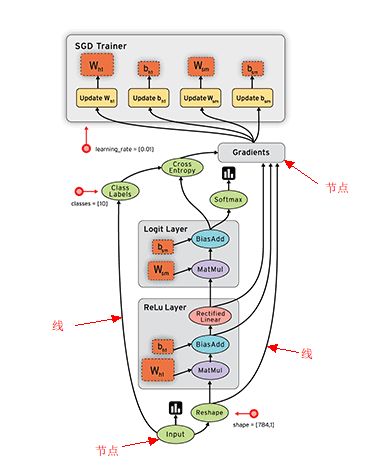
因为TensorFlow是采用数据流图(data flow graphs)来计算, 所以首先我们得创建一个数据流流图, 然后再将我们的数据(数据以张量(tensor)的形式存在)放在数据流图中计算. 节点(Nodes)在图中表示数学操作,图中的线(edges)则表示在节点间相互联系的多维数据数组, 即张量(tensor). 训练模型时tensor会不断的从数据流图中的一个节点flow到另一节点, 这就是TensorFlow名字的由来.
Tensorflow是一个编程系统,使用图(graphs)来表示计算任务,图(graphs)中的节点称之为op(operation),一个 op 获得 0个或多个Tensor,执行计算产生 0个Tensor。Tensor 看作是 一个 n 维的数组或列表。图必须在会话(Session)里被启动。
(动图效果请点击这里)
概念说明:
- 使用图 (graph) 来表示计算任务------>graph:一张有边与点的图,其表示了需要进行计算的任务
- 在被称之为 会话 (Session) 的上下文 (context) 中执行图.
- 使用 张量(tensor) 表示数据.------->tensor:类型化的多维数组,图的边
- 通过 变量 (Variable) 维护状态.
- 使用 feed 和 fetch 可以为任意的操作(arbitrary operation) 赋值或者从其中获取数据.
- Operation:执行计算的单元,图的节点
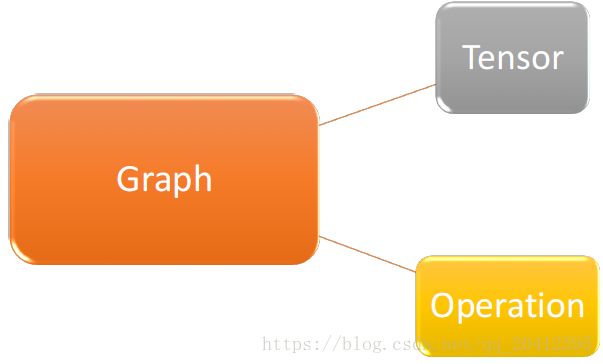
Graph仅仅定义了所有 operation 与 tensor 流向,没有进行任何计算。而session根据 graph 的定义分配资源,计算 operation,得出结果。既然是图就会有点与边,在图计算中 operation 就是点而 tensor 就是边。Operation 可以是加减乘除等数学运算,也可以是各种各样的优化算法。每个 operation 都会有零个或多个输入,零个或多个输出。 tensor 就是其输入与输出,其可以表示一维二维多维向量或者常量。
三大基本概念
2.2 Graph对象
创建Graph非常简单,它的构造方法不需要接受任何参数(其实没有必要,tensorflow会默认定义一个)
import tensorflow as tf
#创建一个新的数据流图
g = tf.Graph()
with g.as_default():
    #像往常一样的创建一些OP;它们将被添加到Graph的对象g中
    a = tf.mul(2,3)
    ...
那在之前的例子中并没有指定将Op添加到哪个Graph中?原因是,为了方便起见,当Tensorflow库被加载时,它会自动的创建一个Graph对象,并将 其作为默认的数据流图。因此在Graph.as_default上下文管理器之外定义的任何的Op、Tensor对象都会被自动放置在默认的数据流图中。
#放置在默认的数据流图
in_default_graph = tf.add(1,2)
#放置在数据流图g中
with g.as_default():
    in_graph_g = tf.mul()
#由于不在with块中,下面的OP将放置在默认的数据流图中
also_in_default_graph = tf.sub(5,1)
# 如果希望获取默认的数据流图的句柄,可以使用tf.get_default_graph
default_graph = tf.get_default_graph
2.3 Session
Session类负责数据流图的执行
构造方法tf.Session()接收3给可选参数
- target指定了所要使用的执行引擎。对于大多数应用,该参数取为默认的空字符串。在分布式设置中使用Session对象时,该参数用于连接不同的tf.train.Server实例
- graph参数指定了将要在Session对象中加载的Graph对象,其默认值为None,表示使用当前默认数据流图。当使用多个数据流图时,最好的方法是显式传入你希望运行的Graph对象(而非在一个with语句块内创建Session对象)
- config参数允许用户指定配置Session对象所需的项目,如限制CPU或GPU是使用数目,为数据流图设置优化参数以及日志选项等。
Seesion.run()方法接受一个fetches,以及其他三个可选参数:feed_dict、options和run_metadata。
2.4 Variables
当训练模型时,需要使用Variables保存与更新参数。Variables会保存在内存当中,所有tensor一旦拥有Variables的指向就不会在session中丢失。其必须明确的初始化而且可以通过Saver保存到磁盘上。Variables可以通过Variables初始化。
weights  = tf.Variable(tf.random_normal([784, 200], stddev=0.35),name="weights")

biases  = tf.Variable(tf.zeros([200]), name="biases")
其中,tf.random_normal是随机生成一个正态分布的tensor,其shape是第一个参数,stddev是其标准差。tf.zeros是生成一个全零的tensor。之后将这个tensor的值赋值给Variable。
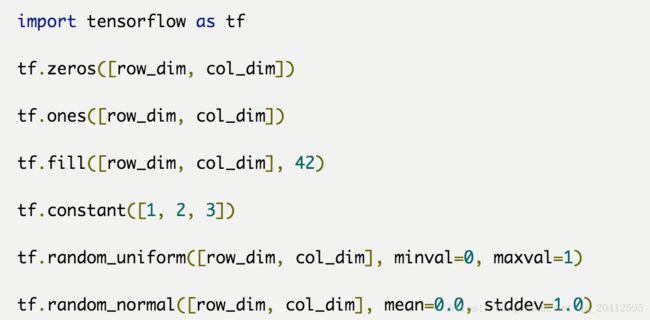
Variable对象的初值通常是全0、全1或用随机数填充的阶数较高的张量。为使创建具有这些常见类型初值的张量更加容易,Tensorflow提供了大量的辅助Op
#2X2的0矩阵
zeros = tf.zeros([2,2])
#长度为6的全1向量
ones = tf.ones([6])----------------------------------------这里是行向量
#3X3X3的张量,其元素服从0~10的均匀分布
uniform = tf.random_uniform([3,3,3],minval=0,maxval=10)
#3X3X3的张量,其元素服从0均值、标准差为2的正态分布
normal = tf.random_normal([3,3,3],mean=0.0,stddev=2.0)
Variable对象的初始化
为了使用Variable,必须在一个Session中进行初始化
init = tf.global_variables_initializer()
sess = tf.Session()
sess.run(init) 如果需要对Variable的子集进行初始化,可以使用tf.variables_initializer().该函数可以接收一个要进行初始化的Variable的对象
var1 = tf.Variable(0,name="initialize_me")
var2 = tf.Variable(1,name="no_initialization")
init = tf.variables_initializer([var1],name="init_var1")
sess = tf.Session()
sess.run(init)2.5、placeholders与feed_dict
当我们定义一张graph时,有时候并不知道需要计算的值,比如模型的输入数据,其只有在训练与预测时才会有值。这样便可以对数据流图中所描述的变换以各种不同类型数值进行复用,借助占位符可以达到目的。利用tf.placeholder Op可以创建占位符。
这时就需要placeholder与feed_dict的帮助。
tf.placeholder(dtype, shape=None, name=None)
此函数可以理解为形参,用于定义过程,在执行的时候再赋具体的值
参数:
dtype:数据类型。常用的是tf.float32,tf.float64等数值类型
shape:数据形状。默认是None,就是一维值,也可以是多维,比如[2,3], [None, 3]表示列是3,行不定
name:名称。
import tensorflow as tf
import numpy as np

x = tf.placeholder(tf.float32, shape=(10, 10)) ------------------10行10列
y = tf.matmul(x, x)  --------------------------------------------矩阵乘

with tf.Session() as sess:
      #print(sess.run(y))  # ERROR: 此处x还没有赋值.

      rand_array = np.random.rand(1024, 1024)
      print(sess.run(y, feed_dict={x: rand_array}))  # Will succeed.
feed 只在调用它的方法内有效, 方法结束, feed 就会消失. 最常见的用例是将某些特殊的操作指定为 "feed" 操作, 标记的方法是使用 tf.placeholder() 为这些操作创建占位符.
input1 = tf.placeholder(tf.types.float32)
input2 = tf.placeholder(tf.types.float32)
output = tf.mul(input1, input2)

with tf.Session() as sess:
  print sess.run([output], feed_dict={input1:[7.], input2:[2.]})

# 输出:
# [array([ 14.], dtype=float32)]
3 、Tensor的小结
- N维矩阵
- 创建方法
- 三个属性:rank、shape、data_type
3.1Tensor创建方法
1) Variables创建
2)变量的初始化
全局初始化:
init = tf.global_variables_initializer()
sess = tf.Session()
sess.run(init)
局部初始化:
var1 = tf.Variable(0,name="initialize_me")
var2 = tf.Variable(1,name="no_initialization")
init = tf.variables_initializer([var1],name="init_var1")
sess = tf.Session()
sess.run(init)
3)变量的存储及加载
保存:用tf.train.Saver()创建一个Saver来管理模型中的所有变量。注意,保存前必须要初始化这步
v1 = tf.Variable(..., name="v1")
v2 = tf.Variable(..., name="v2")
init = tf.initialize_all_variables()
# Add ops to save and restore all the variables.
saver = tf.train.Saver()

# Later, launch the model, initialize the variables, do some work, save the variables to disk.
with tf.Session() as sess:
  sess.run(init)
  save_path = saver.save(sess, "/tmp/model.ckpt")
print "Model saved in file: ", save_path加载:用同一个Saver对象来恢复变量。注意,当你从文件中恢复变量时,不需要事先对它们做初始化。类似于从文件中读取
v1 = tf.Variable(..., name="v1")
v2 = tf.Variable(..., name="v2")
saver = tf.train.Saver()

# Later, launch the model, use the saver to restore variables from disk, and
# do some work with the model.
with tf.Session() as sess:
  saver.restore(sess, "/tmp/model.ckpt")
  print "Model restored."
3.2Tensor属性
1)Tensor中Rank
tf.rank(input, name=None),返回tensor的rank。
注意:此rank不同于矩阵的rank,tensor的rank表示一个tensor需要的索引数目来唯一表示任何一个元素也就是通常所说的 “order”, “degree”或”ndims”
#’t’ is [ [[1, 1, 1], [2, 2, 2]], [[3, 3, 3], [4, 4, 4]] ]
# shape of tensor ‘t’ is [2, 2, 3]
rank(t) ==> 3
2)rank中的切片
tf.slice(input_, begin, size, name=None):按照指定的下标范围抽取连续区域的子集
输出:
input = [[[1, 1, 1], [2, 2, 2]],
         [[3, 3, 3], [4, 4, 4]],
         [[5, 5, 5], [6, 6, 6]]]
tf.slice(input, [1, 0, 0], [1, 1, 3]) ==> [[[3, 3, 3]]]
tf.slice(input, [1, 0, 0], [1, 2, 3]) ==> [[[3, 3, 3],
                                            [4, 4, 4]]]
tf.slice(input, [1, 0, 0], [2, 1, 3]) ==> [[[3, 3, 3]],
                                           [[5, 5, 5]]]
假设我们要从input中抽取[[[3, 3, 3]]],这个输出在inputaxis=0的下标是1,axis=1的下标是0,axis=2的下标是0-2,所以begin=[1,0,0],size=[1,1,3]。
假设我们要从input中抽取[[[3, 3, 3], [4, 4, 4]]],这个输出在inputaxis=0的下标是1,axis=1的下标是0-1,axis=2的下标是0-2,所以begin=[1,0,0],size=[1,2,3]。
假设我们要从input中抽取[[[3, 3, 3], [5, 5, 5]]],这个输出在inputaxis=0的下标是1-2,axis=1的下标是0,axis=2的下标是0-2,所以begin=[1,0,0],size=[2,1,3]。其实和numpy中切片类似的,还有简单的容易理解的做法。
my_scaler= tf.Variable([3,5],tf.int32)
my_scaler_slice = my_scaler[1]------------------------------5
my_matirx = tf.Variable([[3,4],[6,8]])
my_matrix_slice = my_matrix[1]------------------------------[6,8]
3)Tensor的shape
shape的两种调用方法
- 不调用session,直接使用 变量名.shape
- 调用session,使用tf.shape(变量名)
import tensorflow as tf

scal = tf.Variable(1)
one = tf.Variable([3,4],tf.int32)
two = tf.Variable([[1],[2]])

第一种方法:
print(scal.shape)
print(one.shape)
print(two.shape)

结果:
()
(2,)
(2, 1)

Process finished with exit code 0
import tensorflow as tf
scal = tf.Variable(1)
one = tf.Variable([3,4],tf.int32)
two = tf.Variable([[1],[2]],tf.int32)
init = tf.global_variables_initializer()
sess = tf.Session()
sess.run(init)
print(sess.run(one))
print("shape:",sess.run(tf.shape(scal)))
print("shape:",sess.run(tf.shape(one)))
print("shape:",sess.run(tf.shape(two)))
结果:
[3 4]
shape: []
shape: [2]
shape: [2 1]
Process finished with exit code 0改用Tensor的shape----------类似于numpy中的reshape
rank_three_tensor = tf.ones([3,4,5])
改变他的形状
matrix = tf.reshape(rank_three_tensor,[6,10])
同样可以用-1自动计算
matrix3 = tf.reshape(matrix,[3,-1])
参考资料:
tensorflow基础:https://blog.csdn.net/ggwcr/article/details/77511856
TensorFlow快速入门:https://blog.csdn.net/lc0817/article/details/55000553


