数据挖掘工具-weka代码解析之决策树
1、weka来源
WEKA的全名是怀卡托智能分析环境(Waikato Environment for Knowledge Analysis),同时weka也是新西兰的一种鸟名,而WEKA的主要开发者来自新西兰。WEKA作为一个公开的数据挖掘工作平台,集合了大量能承担数据挖掘任务的机器学习算法,包括对数据进行预处理,分类,回归、聚类、关联规则以及在新的交互式界面上的可视化。
2、weka决策树测试代码
WEKA决策树算法很经典,但是实现过程也非常复杂,本期将以决策树为中心展开讲解weka中决策树算法的一些实现,便于理解决策树算法在现实应用中的代码实现。
首先,先写上如下的测试代码:
public class Test {

	public static void main(String[] args) throws Exception {
		// TODO Auto-generated method stub

		Instances inss = DataSource.read("C:\\Program Files\\Weka-3-8\\data\\iris.arff");
		Classifier cls = new J48();
		inss.setClassIndex(inss.numAttributes()-1);
		cls.buildClassifier(inss);
		cls.classifyInstance(inss.firstInstance());
		System.out.print(cls.toString());

	}

}
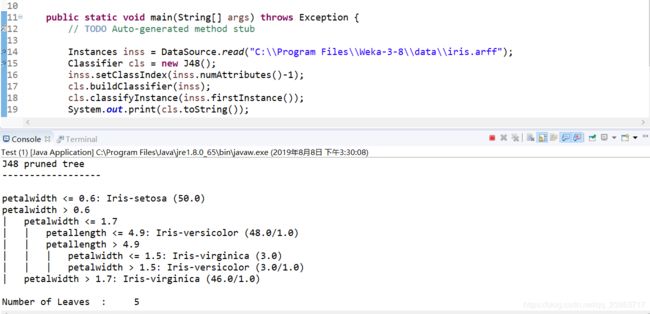
接着,可以直接先看下输出的结果:
J48 pruned tree
------------------

petalwidth <= 0.6: Iris-setosa (50.0)
petalwidth > 0.6
|   petalwidth <= 1.7
|   |   petallength <= 4.9: Iris-versicolor (48.0/1.0)
|   |   petallength > 4.9
|   |   |   petalwidth <= 1.5: Iris-virginica (3.0)
|   |   |   petalwidth > 1.5: Iris-versicolor (3.0/1.0)
|   petalwidth > 1.7: Iris-virginica (46.0/1.0)

Number of Leaves  : 	5

Size of the tree : 	9
然后,开启上帝视角(debug模式):
- 创建决策树类,J48,这个直接new就可以,比较简单,不详述
- 创建Instances数据集,weka默认将数据以Instances的格式存取,这个格式记录了数据所有详细的信息,可以看的后面在生成决策树的时候,基本都是通过传递Instances集合来进行计算和分类的,最终下面的result就是形成的数据集,这个过程其实就是读取字节流,然后拼接为Instances的过程,细节较为复杂,可以略过
    public static Instances read(String location) throws Exception {
      DataSource source;
      Instances result;

      source = new DataSource(location);
      result = source.getDataSet();

      return result;
    }
3.最重要也是最关键的一步就是cls.buildClassifier(inss),这一步是开始构建决策树,下面详细讲解
3、构建决策树
开始上帝视角后,可以跟着代码走,下面先将一些简单的流程:
-
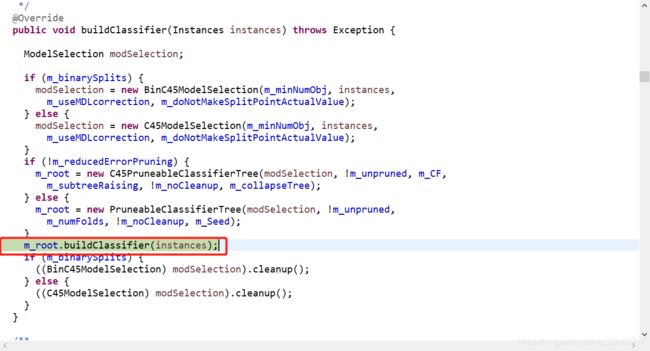
进来代码后,首先是J48下一个重写的buildClassifier方法:
  @Override
  public void buildClassifier(Instances instances) throws Exception {

    ModelSelection modSelection;

    if (m_binarySplits) {
      modSelection = new BinC45ModelSelection(m_minNumObj, instances,
        m_useMDLcorrection, m_doNotMakeSplitPointActualValue);
    } else {
      modSelection = new C45ModelSelection(m_minNumObj, instances,
        m_useMDLcorrection, m_doNotMakeSplitPointActualValue);
    }
    if (!m_reducedErrorPruning) {
      m_root = new C45PruneableClassifierTree(modSelection, !m_unpruned, m_CF,
        m_subtreeRaising, !m_noCleanup, m_collapseTree);
    } else {
      m_root = new PruneableClassifierTree(modSelection, !m_unpruned,
        m_numFolds, !m_noCleanup, m_Seed);
    }
    m_root.buildClassifier(instances);
    if (m_binarySplits) {
      ((BinC45ModelSelection) modSelection).cleanup();
    } else {
      ((C45ModelSelection) modSelection).cleanup();
    }
  }
m_binarySplits=false,走入下面代码:
-
modSelection = new C45ModelSelection(m_minNumObj, instances, m_useMDLcorrection, m_doNotMakeSplitPointActualValue);

这部分只是赋予了一些基础数值,这部分是分割点,其实就是树节点:
  public C45ModelSelection(int minNoObj, Instances allData,
    boolean useMDLcorrection, boolean doNotMakeSplitPointActualValue) {
    m_minNoObj = minNoObj;
    m_allData = allData;
    m_useMDLcorrection = useMDLcorrection;
    m_doNotMakeSplitPointActualValue = doNotMakeSplitPointActualValue;
  }
然后,创建了一个树的类,这部分是树生长的部分了,先生成了一个根:
    if (!m_reducedErrorPruning) {
      m_root = new C45PruneableClassifierTree(modSelection, !m_unpruned, m_CF,
        m_subtreeRaising, !m_noCleanup, m_collapseTree);
    }
  public void buildClassifier(Instances data) throws Exception {

    // can classifier tree handle the data?
    getCapabilities().testWithFail(data);

    // remove instances with missing class
    data = new Instances(data);
    data.deleteWithMissingClass();

   buildTree(data, m_subtreeRaising || !m_cleanup);
   if (m_collapseTheTree) {
     collapse();
   }
   if (m_pruneTheTree) {
     prune();
   }
   if (m_cleanup) {
     cleanup(new Instances(data, 0));
   }
  }
下面的代码是最常用也就是最关键的代码,后面多数代码都在不断重复这个过程,其实就是从m_root开始逐步形成自己的孩子节点,这个过程有两个很主要的点,一个是选什么特征作为分割属性,另一个是选该属性的什么值作为该节点左右分支的分割数值点:
  public void buildTree(Instances data, boolean keepData) throws Exception {

    Instances[] localInstances;

    if (keepData) {
      m_train = data;
    }
    m_test = null;
    m_isLeaf = false;
    m_isEmpty = false;
    m_sons = null;
    m_localModel = m_toSelectModel.selectModel(data);
    if (m_localModel.numSubsets() > 1) {
      localInstances = m_localModel.split(data);
      data = null;
      m_sons = new ClassifierTree[m_localModel.numSubsets()];
      for (int i = 0; i < m_sons.length; i++) {
        m_sons[i] = getNewTree(localInstances[i]);
        localInstances[i] = null;
      }
    } else {
      m_isLeaf = true;
      if (Utils.eq(data.sumOfWeights(), 0)) {
        m_isEmpty = true;
      }
      data = null;
    }
  }
用于选择哪个属性来作为分割点的:
m_localModel = m_toSelectModel.selectModel(data);
用于生成该数据集的分布:
checkDistribution = new Distribution(data);
用于生成叶子节点:
noSplitModel = new NoSplit(checkDistribution);
判断下当前分类下究竟有多少个样本,如果样本数很少就直接划分成叶子节点,要是很多,则往后跳转,继续划分:
if (Utils.sm(checkDistribution.total(), 2 * m_minNoObj) || Utils.eq(checkDistribution.total(),
checkDistribution.perClass(checkDistribution.maxClass()))) {
return noSplitModel;
}很明显,[50,50,50],三个类别分别为50且都大于4,不能直接当叶子,继续往下划分:
currentModel = new C45Split[data.numAttributes()];
sumOfWeights = data.sumOfWeights();
样本如下(部分):
@RELATION iris
@ATTRIBUTE sepallength REAL
@ATTRIBUTE sepalwidth REAL
@ATTRIBUTE petallength REAL
@ATTRIBUTE petalwidth REAL
@ATTRIBUTE class {Iris-setosa,Iris-versicolor,Iris-virginica}
@DATA
5.1,3.5,1.4,0.2,Iris-setosa
4.9,3.0,1.4,0.2,Iris-setosa
4.7,3.2,1.3,0.2,Iris-setosa
4.6,3.1,1.5,0.2,Iris-setosa
5.0,3.6,1.4,0.2,Iris-setosa
5.4,3.9,1.7,0.4,Iris-setosa
...
...
...
于是,当前这个节点要继续buildClassifer,并且传入整个data数据:
currentModel[i] = new C45Split(i, m_minNoObj, sumOfWeights,m_useMDLcorrection);
currentModel[i].buildClassifier(data);
下面开始生成新节点:
@Override
public void buildClassifier(Instances trainInstances) throws Exception {
// Initialize the remaining instance variables.
m_numSubsets = 0;
m_splitPoint = Double.MAX_VALUE;
m_infoGain = 0;
m_gainRatio = 0;
// Different treatment for enumerated and numeric
// attributes.
if (trainInstances.attribute(m_attIndex).isNominal()) {
m_complexityIndex = trainInstances.attribute(m_attIndex).numValues();
m_index = m_complexityIndex;
handleEnumeratedAttribute(trainInstances);
} else {
m_complexityIndex = 2;
m_index = 0;
需要对该节点进行排序,便于后期寻找分割点划分左右分支
trainInstances.sort(trainInstances.attribute(m_attIndex));
handleNumericAttribute(trainInstances);
}
}
每个属性都会计算信息增益:
// For each attribute.
for (i = 0; i < data.numAttributes(); i++) {
// Apart from class attribute.
if (i != (data).classIndex()) {
// Get models for current attribute.
currentModel[i] = new C45Split(i, m_minNoObj, sumOfWeights,
m_useMDLcorrection);
currentModel[i].buildClassifier(data);
// Check if useful split for current attribute
// exists and check for enumerated attributes with
// a lot of values.
if (currentModel[i].checkModel()) {
if (m_allData != null) {
if ((data.attribute(i).isNumeric())
|| (multiVal || Utils.sm(data.attribute(i).numValues(),
(0.3 * m_allData.numInstances())))) {
averageInfoGain = averageInfoGain + currentModel[i].infoGain();
validModels++;
}
} else {
averageInfoGain = averageInfoGain + currentModel[i].infoGain();
validModels++;
}
}
} else {
currentModel[i] = null;
}
}
然后选出最好的属性作为节点:
for (i = 0; i < data.numAttributes(); i++) {
if ((i != (data).classIndex()) && (currentModel[i].checkModel())) {
// Use 1E-3 here to get a closer approximation to the original
// implementation.
if ((currentModel[i].infoGain() >= (averageInfoGain - 1E-3))
&& Utils.gr(currentModel[i].gainRatio(), minResult)) {
bestModel = currentModel[i];
minResult = currentModel[i].gainRatio();
}
}
}
节点选完以后,还要选出,该节点继续往下生长,左右分支以哪个数值分开最好:
public final void setSplitPoint(Instances allInstances) {
double newSplitPoint = -Double.MAX_VALUE;
double tempValue;
Instance instance;
if ((allInstances.attribute(m_attIndex).isNumeric()) && (m_numSubsets > 1)) {
Enumeration enu = allInstances.enumerateInstances();
while (enu.hasMoreElements()) {
instance = enu.nextElement();
if (!instance.isMissing(m_attIndex)) {
tempValue = instance.value(m_attIndex);
if (Utils.gr(tempValue, newSplitPoint)
&& Utils.smOrEq(tempValue, m_splitPoint)) {
newSplitPoint = tempValue;
}
}
}
m_splitPoint = newSplitPoint;
}
}
属性选完了,下面开始用该属性把数据集分成两部分:
localInstances = m_localModel.split(data);
继续往下,开始生成孩子节点:
m_sons = new ClassifierTree[m_localModel.numSubsets()];
左右分支用循环:
for (int i = 0; i < m_sons.length; i++) {
m_sons[i] = getNewTree(localInstances[i]);
localInstances[i] = null;
}
生成循环中一个分支:
protected ClassifierTree getNewTree(Instances data) throws Exception {
C45PruneableClassifierTree newTree =
new C45PruneableClassifierTree(m_toSelectModel, m_pruneTheTree, m_CF,
m_subtreeRaising, m_cleanup, m_collapseTheTree);
newTree.buildTree((Instances)data, m_subtreeRaising || !m_cleanup);
return newTree;
}
下面,你又熟悉了,开始调用前面讲的这段代码:
public void buildTree(Instances data, boolean keepData) throws Exception {
Instances[] localInstances;
if (keepData) {
m_train = data;
}
m_test = null;
m_isLeaf = false;
m_isEmpty = false;
m_sons = null;
m_localModel = m_toSelectModel.selectModel(data);
if (m_localModel.numSubsets() > 1) {
localInstances = m_localModel.split(data);
data = null;
m_sons = new ClassifierTree[m_localModel.numSubsets()];
for (int i = 0; i < m_sons.length; i++) {
m_sons[i] = getNewTree(localInstances[i]);
localInstances[i] = null;
}
} else {
m_isLeaf = true;
if (Utils.eq(data.sumOfWeights(), 0)) {
m_isEmpty = true;
}
data = null;
}
}
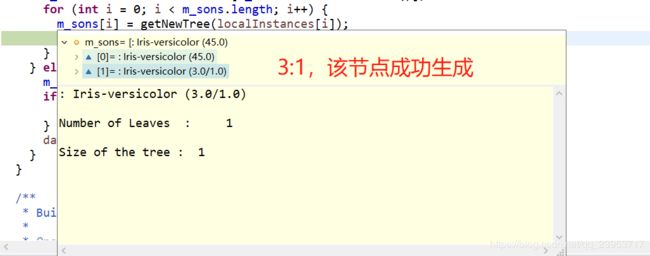
有意思的是,这一次循环正好生成了叶子:
: Iris-setosa (50.0)
Number of Leaves : 1
Size of the tree : 1
接着,数据集变成对下面的样本进行分割:
@data
6.3,3.3,4.7,1.6,Iris-versicolor
6,3.4,4.5,1.6,Iris-versicolor
4.9,2.5,4.5,1.7,Iris-virginica
然后继续跟着代码走:


