Vmware虚拟机使用常见问题
用了很久VMware,没怎么学会,今天跑程序,造成虚拟机死掉,幸好查资料有成功复活了,下来记下
问题1、最常见的是系统突然死机,造成有文件没有来得及保存,而造成虚拟机无法打开
解决方法:找到虚拟机的存储目录,搜索*.lck,将查到的文件或文件夹删除即可
问题2、提示“Vmware workstation打开虚拟机失败,提示xxx.vmx文件不是有效的配置文件”
这个时候虚拟机无法启动,且*.vmx文件已经变成空文件,自然无法打开虚拟机,这个时候需要使用vmware.log文件中的一些信息对虚拟机进行恢复,从而可以打开虚拟机。
网址:http://blog.csdn.net/kang389110772/article/details/51024126
即新建一个txt文件,在开头加一行.encoding = "GBK"
然后复制log文件中I120: DICT --- CONFIGURATION节点后(不包括)到DICT --- USER DEFAULTS节点前(不包括)的内容到该txt文件中。再删除每行前面的时间信息和头得到类似下面信息:
.encoding = "GBK"
config.version = "8"
virtualHW.version = "10"
numvcpus = "4"
cpuid.coresPerSocket = "4"
vcpu.hotadd = "TRUE"
scsi0.present = "TRUE"
scsi0.virtualDev = "lsilogic"
sata0.present = "TRUE"
memsize = "1552"
mem.hotadd = "TRUE"
scsi0:0.present = "TRUE"
scsi0:0.fileName = "Ubuntu 64 λ.vmdk"
sata0:0.present = "TRUE"
sata0:0.fileName = "D:\Program Files (x86)\VMware10.0\linux.iso"
sata0:0.deviceType = "cdrom-image"
sata0:1.present = "TRUE"
sata0:1.fileName = "auto detect"
sata0:1.deviceType = "cdrom-raw"
floppy0.fileType = "device"
floppy0.fileName = ""
floppy0.clientDevice = "FALSE"
ethernet0.present = "TRUE"
ethernet0.virtualDev = "e1000"
ethernet0.wakeOnPcktRcv = "FALSE"
ethernet0.addressType = "generated"
usb.present = "TRUE"
ehci.present = "TRUE"
ehci.pciSlotNumber = "35"
sound.present = "TRUE"
sound.fileName = "-1"
sound.autodetect = "TRUE"
mks.enable3d = "TRUE"
serial0.present = "TRUE"
serial0.fileType = "thinprint"
pciBridge0.present = "TRUE"
pciBridge4.present = "TRUE"
pciBridge4.virtualDev = "pcieRootPort"
pciBridge4.functions = "8"
pciBridge5.present = "TRUE"
pciBridge5.virtualDev = "pcieRootPort"
pciBridge5.functions = "8"
pciBridge6.present = "TRUE"
pciBridge6.virtualDev = "pcieRootPort"
pciBridge6.functions = "8"
pciBridge7.present = "TRUE"
pciBridge7.virtualDev = "pcieRootPort"
pciBridge7.functions = "8"
vmci0.present = "TRUE"
hpet0.present = "TRUE"
usb.vbluetooth.startConnected = "TRUE"
displayName = "Ubuntu 64 λforTegra"
guestOS = "ubuntu-64"
nvram = "Ubuntu 64 λ.nvram"
virtualHW.productCompatibility = "hosted"
powerType.powerOff = "soft"
powerType.powerOn = "soft"
powerType.suspend = "soft"
powerType.reset = "soft"
extendedConfigFile = "Ubuntu 64 λ.vmxf"
uuid.bios = "56 4d 99 06 01 f5 bf e0-b7 31 75 b7 8d ee 09 30"
uuid.location = "56 4d 99 06 01 f5 bf e0-b7 31 75 b7 8d ee 09 30"
replay.supported = "FALSE"
replay.filename = ""
scsi0:0.redo = ""
pciBridge0.pciSlotNumber = "17"
pciBridge4.pciSlotNumber = "21"
pciBridge5.pciSlotNumber = "22"
pciBridge6.pciSlotNumber = "23"
pciBridge7.pciSlotNumber = "24"
scsi0.pciSlotNumber = "16"
usb.pciSlotNumber = "32"
ethernet0.pciSlotNumber = "33"
sound.pciSlotNumber = "34"
vmci0.pciSlotNumber = "36"
sata0.pciSlotNumber = "37"
ethernet0.generatedAddress = "00:0c:29:ee:09:30"
ethernet0.generatedAddressOffset = "0"
vmci0.id = "-425345474"
monitor.phys_bits_used = "40"
vmotion.checkpointFBSize = "134217728"
cleanShutdown = "FALSE"
softPowerOff = "FALSE"
usb:1.speed = "2"
usb:1.present = "TRUE"
usb:1.deviceType = "hub"
usb:1.port = "1"
usb:1.parent = "-1"
tools.syncTime = "FALSE"
floppy0.autodetect = "TRUE"
sata0:0.autodetect = "TRUE"
sata0:1.autodetect = "TRUE"
tools.remindInstall = "FALSE"
toolsInstallManager.updateCounter = "3"
unity.wasCapable = "FALSE"
gui.exitOnCLIHLT = "TRUE"
floppy0.present = "FALSE"
sata0:1.startConnected = "FALSE"
sata0:0.startConnected = "FALSE"
ethernet0.linkStatePropagation.enable = "TRUE"
ethernet0.connectionType = "bridged"
usb:0.present = "TRUE"
usb:0.deviceType = "hid"
usb:0.port = "0"
usb:0.parent = "-1"
将上述信息保存并修改名称为原来的vmx文件的名称,删除原先的,重新打开虚拟机即可。
问题3、虚拟机整理碎片
虚拟机使用时间久了也会产生碎片化的问题,但整理碎片无法解决虚拟机越用越大的问题
菜单栏:虚拟机->设置->硬件->硬盘->实用工具->碎片整理
问题4、虚拟机越用越大
网址:https://www.cnblogs.com/5201351/p/4290401.html
使用vmware-toolbox对虚拟机硬盘压缩(shrink)
安装好vmware-tools后执行
vmware-toolbox-cmd disk shrink /
等待即可
问题5、执行问题4解决方法时出现
Shrink disk is disabled for this virtual machine.

Shrinking is disabled for linked clones, parents of linked clones,
pre-allocated disks, snapshots, or due to other factors.
See the User's manual for more information.
原因是在某些情况下(预分配内存,存在快照,克隆虚拟机等),是无法使用shrink功能的。
我遇到的问题是虚拟机有快照,于是删除了快照(删除后虚拟机文件夹大约40GB文件),成功执行了问题4中的shrink,执行完成后文件夹占27.7GB。
问题6、删除快照的方法(快照对于恢复虚拟机之前的状态非常有用,但是是以大量内存为代价的。)
删除快照也能节省大量内存。同时只有删除了快照后才能成功shrink虚拟机
菜单栏:虚拟机->快照->快照管理器->选中需要删除的快照->删除。等待即可。
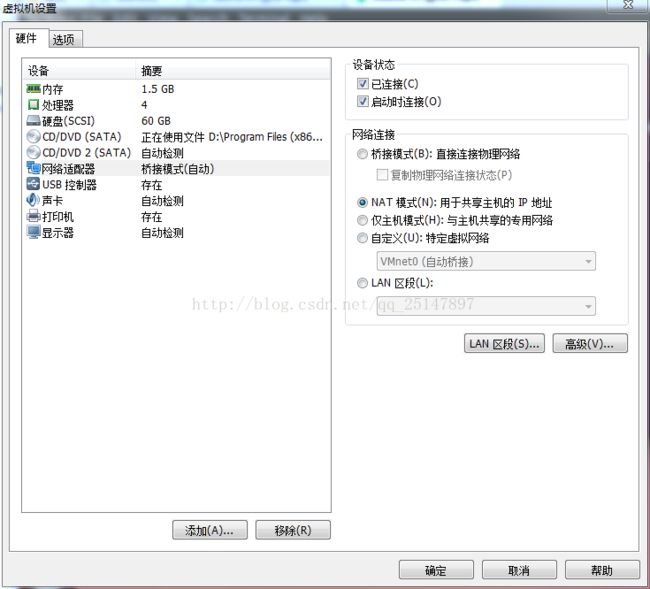
问题7、网络连接问题
使用宽带连接自动获取ip时
虚拟机联网设置
菜单栏:虚拟机->设置->硬件->硬盘->网络适配器
如下配置,同时虚拟机器使用DHCP方式获取IP即可
使用本机固定ip时,使用如下配置,并且虚拟机器使用固定IP且在能访问互联网的IP地址(如与本机IP在同一网段(并且本机以固定IP方式能够上网))即可
转载:
安装vmware-tools:https://jingyan.baidu.com/article/1974b289b813dcf4b1f77411.html
虚拟机优化:http://www.jb51.net/article/95193.htm

