此文章单方面对 贝塞尔曲线画图 核心动画 图层相关 方面做下整理,方便查看!
概念简介
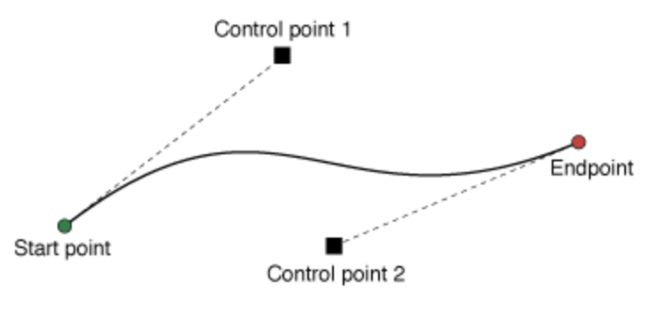
(贝塞尔曲线)是应用于二维图形应用程序的数学曲线,本来有一阶二阶三阶......,但是iOS系统为我们简化了这些,通过简单的接口就可以画出平时常见的线段
下面我们来讲一讲UIBezierPath, UIBezierPath是对Core Graphics框架的一个封装,通过简单的调用借口可以画出常见的直线、矩形、椭圆、圆、圆弧、常见曲线......
UIBezierPath.h
///实例化一个新的Path
+ (instancetype)bezierPath;
///根据rect创建一个矩形路径Path(画笔轨迹:以rect的origin为起点,顺时针方向一周)
+ (instancetype)bezierPathWithRect:(CGRect)rect;
///根据rect创建一个椭圆或者圆(画笔轨迹:0->2π,顺时针一周,作为动画路径需要注意下)
+ (instancetype)bezierPathWithOvalInRect:(CGRect)rect;
///创建一个圆角矩形,半径最大为矩形最小边长的一半(画笔轨迹:以rect的origin为起点,顺时针方向一周)
+ (instancetype)bezierPathWithRoundedRect:(CGRect)rect cornerRadius:(CGFloat)cornerRadius
/**
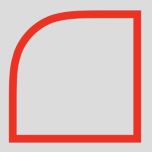
  * @brief 创建一个矩形路径,某一个角为圆角(画笔轨迹:顺时针方向)
  * @param rect         矩形路径的 Frame
  * @param corners      UIRectCorner 枚举类型, 指定矩形的哪个角变为圆角
  * @param cornerRadii  矩形的圆角半径
  */
+ (instancetype)bezierPathWithRoundedRect:(CGRect)rect
                        byRoundingCorners:(UIRectCorner)corners
                              cornerRadii:(CGSize)cornerRadii;
/**
  *  @brief  创建圆或者圆弧路径(优势可以控制其实位置和画笔方向)
  *  @param  center      中心点
  *  @param  radius      半径
  *  @param  startAngle  开始位置(参照上面图:画圆的位置和角度(顺时针).png)
  *  @param  endAngle    结束位置(参照上面图:画圆的位置和角度(顺时针).png)
  *  @param  clockwise   是否顺时针
  */
+ (instancetype)bezierPathWithArcCenter:(CGPoint)center
                                 radius:(CGFloat)radius
                             startAngle:(CGFloat)startAngle
                               endAngle:(CGFloat)endAngle
                              clockwise:(BOOL)clockwise
///通过一个CGPathRef创建一个UIBezierPath对象
+ (instancetype)bezierPathWithCGPath:(CGPathRef)CGPath

///根据当前的UIBezierPath对象返回一个CGPathRef对象
@property(nonatomic) CGPathRef CGPath

用处:在CAShapeLayer上画图,需要的CGPathRef对象
/**
  *  @brief  将当前的path的currentPoint移到point这个点做为开始点
  *  如果当前有正在绘制的子路径, 该方法则会隐式的结束当前路径(closePath)
  *  对于大多数构造路径相关的方法而言, 在你绘制直线或曲线之前, 需要先调用这个方法
  */
- (void)moveToPoint:(CGPoint)point
/**
  *  @brief 该方法将会从currentPoint 到point链接一条直线
  *  注:在追加完这条直线后,该方法将会更新currentPoint为该点
  */
- (void)addLineToPoint:(CGPoint)point
/**
  * @brief  从 currentPoint到指定的endPoint追加一条二次贝塞尔曲线

  * 注意:调用该方法前,你要先设置currentPoint
        当添加完贝塞尔曲线后,该方法将会自动更新currentPoint为指定的结束点
  * @param  endPoint      终点
  * @param  controlPoint  控制点
  */
- (void)addQuadCurveToPoint:(CGPoint)endPoint
               controlPoint:(CGPoint)controlPoint
/**
  *  @brief 从currenPoint到指定的endPoint追加一条三次贝塞尔曲线

  *  注意:调用该方法前,你要先设置currentPoint
         当添加完贝塞尔曲线后,该方法将会自动更新currentPoint为指定的结束点
  *  @param  endPoint        终点
  *  @param  controlPoint1   控制点1
  *  @param  controlPoint2   控制点2
  */
- (void)addCurveToPoint:(CGPoint)endPoint
          controlPoint1:(CGPoint)controlPoint1
          controlPoint2:(CGPoint)controlPoint2
///闭合路径
- (void)closePath
///删除当前路径中所有的点
- (void)removeAllPoints
///追加一段路劲
- (void)appendPath:(UIBezierPath *)bezierPath
///绘图路径中当前的起点
@property(nonatomic,readonly) CGPoint currentPoint
///绘图的线宽
@property(nonatomic) CGFloat lineWidth
///path线的首尾边幅样式
@property(nonatomic) CGLineCap lineCapStyle
///曲线连接点样式
@property(nonatomic) CGLineJoin lineJoinStyle
///内角和外角距离,只有当连接点样式为 kCGLineJoinMiter时才会生效,最大限制为10
@property(nonatomic) CGFloat miterLimit

/**
  *  @brief  渲染精度 默认值为 0.6
  *  该属性的值用来测量真实曲线的点和渲染曲线的点的最大允许距离
     值越小,渲染精度越高,会产生相对更平滑的曲线,但是需要花费更多的计算时间
     值越大导致则会降低渲染精度,这会使得渲染的更迅速

  *  注意:我们需要渲染速度的时候,可以适当增大该值
  */
@property(nonatomic) CGFloat flatness
/**
  * @param pattern  该属性是一个C语言的数组,其中每一个元素都是 CGFloat
  *  数组中的元素代表着线段每一部分的长度,第一个元素代表线段的第一条线,第二个元素代表线段中的第一个间隙.
     这个数组中的值是轮流的,举个例子:
     声明一个数组 CGFloat pattern[] = @{3.0, 1.0, 4.0, 1.5};
     实际画出来的虚线第一段长度为3.0,间隔1.0,第二段长度为4.0,间隔为1.5
     第三段重头再来一遍,依次类推

  * @param count  这个参数是 pattern 数组的个数
  * @param phase  这个参数代表着,虚线从哪里开始绘制
     举个例子:如果pattern[] = @{3.0, 1.0},我们想让以虚线间隔开头,可以这是phase为3.0
  */
- (void)setLineDash:(nullable const CGFloat *)pattern
              count:(NSInteger)count
              phase:(CGFloat)phase
///填充路径包裹的部分颜色,没有闭合会隐式闭合填充
- (void)fill
///填充画笔路径颜色
- (void)stroke
先来画几个路径来看下,画在drawRect里面
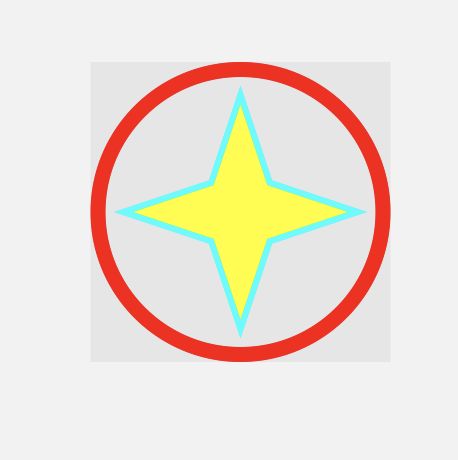
在屏幕中间添加一个正方形view,然后在view上画出这个图,本来想画个五角星的,但是坐标算起来实在麻烦,就画了个四角星凑合凑合,下面用两种方式来画,UIBezierPath和CGContextRef,两者差不多,下面上代码
- UIBezierPath画图
- (void)drawRect:(CGRect)rect {

    //圆环所在矩形的宽度
    float width = MIN(rect.size.width, rect.size.height);
    //圆环宽度
    float circleLW = 10;
    //星角距离圆环内边的距离
    float starEdgeC = 10.0;
    //星星线宽
    float starLW = 4.0;
    //星角距离圆环所在矩形边框的距离
    float starER = circleLW + starEdgeC + starLW * 0.5;
    //星星所在正方形宽度
    float starWidth = rect.size.width - starER * 2;
    //星星所在矩形宽度的1/8
    float partW = starWidth / 8;

    //1. 先画圆
    UIBezierPath *circlePath = [UIBezierPath bezierPathWithArcCenter:CGPointMake(width*0.5, width*0.5)
                                                              radius:(width-circleLW) * 0.5
                                                          startAngle:0
                                                            endAngle:2 * M_PI
                                                           clockwise:YES];
    circlePath.lineWidth = circleLW;
    [[UIColor redColor] setStroke];
    [circlePath stroke];

    //2. 再画四角星
    UIBezierPath *starPath = [UIBezierPath bezierPath];
    [starPath moveToPoint:CGPointMake(starER, width * 0.5)];
    [starPath addLineToPoint:CGPointMake(width*0.5-partW, width*0.5-partW)];
    [starPath addLineToPoint:CGPointMake(width*0.5, starER)];
    [starPath addLineToPoint:CGPointMake(width*0.5+partW, width*0.5-partW)];
    [starPath addLineToPoint:CGPointMake(width-starER,width*0.5)];
    [starPath addLineToPoint:CGPointMake(width*0.5+partW, width*0.5+partW)];
    [starPath addLineToPoint:CGPointMake(width*0.5, width-starER)];
    [starPath addLineToPoint:CGPointMake(width*0.5-partW, width*0.5+partW)];
    [starPath closePath];
    /**设置线段交接处,内角和外角的距离
    starPath.lineJoinStyle = kCGLineJoinMiter;
    starPath.miterLimit = 1;
     */
    starPath.lineWidth = starLW;
    [[UIColor cyanColor] setStroke];
    [starPath stroke];
    [[UIColor yellowColor] setFill];
    [starPath fill];
}
- CGContextRef画图
- (void)drawRect:(CGRect)rect {

    //圆环所在矩形的宽度
    float width = MIN(rect.size.width, rect.size.height);
    //圆环宽度
    float circleLW = 10;
    //星角距离圆环内边的距离
    float starEdgeC = 10.0;
    //星星线宽
    float starLW = 4.0;
    //星角距离圆环所在矩形边框的距离
    float starER = circleLW + starEdgeC + starLW * 0.5;
    //星星所在正方形宽度
    float starWidth = rect.size.width - starER * 2;
    //星星所在矩形宽度的1/8
    float partW = starWidth / 8;

    CGContextRef circleCtx = UIGraphicsGetCurrentContext();
    CGContextAddArc(circleCtx, width * 0.5, width * 0.5, (width - circleLW) * 0.5, 0, 2 * M_PI, 1);
    CGContextSetLineWidth(circleCtx, circleLW);
    CGContextSetStrokeColorWithColor(circleCtx, [UIColor redColor].CGColor);
    CGContextStrokePath(circleCtx);

    CGContextRef starCtx = UIGraphicsGetCurrentContext();
    CGContextMoveToPoint(starCtx, starER, width * 0.5);
    CGContextAddLineToPoint(starCtx, width * 0.5 - partW, width * 0.5 - partW);
    CGContextAddLineToPoint(starCtx, width * 0.5, starER);
    CGContextAddLineToPoint(starCtx, width * 0.5 + partW, width * 0.5 - partW);
    CGContextAddLineToPoint(starCtx, width - starER, width * 0.5);
    CGContextAddLineToPoint(starCtx, width * 0.5 + partW, width * 0.5 + partW);
    CGContextAddLineToPoint(starCtx, width * 0.5, width - starER);
    CGContextAddLineToPoint(starCtx, width * 0.5 - partW, width * 0.5 + partW);
    CGContextClosePath(starCtx);
    CGContextSetLineWidth(starCtx, starLW);

    CGContextSetStrokeColorWithColor(starCtx, [UIColor cyanColor].CGColor);
    CGContextSetFillColorWithColor(starCtx, [UIColor yellowColor].CGColor);

    /** 即填充页画线,下面的两个方法只能共存一个,所以要用下方没注释的方法来画
    CGContextStrokePath(starCtx);
    CGContextFillPath(starCtx);
    */
    CGContextDrawPath(starCtx, kCGPathFillStroke);
}
通过上面两种画图方式的比较,我更喜欢用UIBezierPath对象来画图
画成UIImage对象
平时开发中可能有些简单的图,我们可以用代码画出来存到缓存中,也省了拖图片进工程
/**
 *  @brief  根据path和size生成一个图片(此方法可以个UIImage写一个类别)
 *  @param  path        UIBezierPath对象,需要注意对当前屏幕进行像素取整
 *  @param  strokeColor 路径颜色
 *  @param  size        图片大小
 *  @return             生成的图片(UIImage对象)
 */
+ (UIImage *)imageWithPath:(UIBezierPath *)path
            andStrokeColor:(UIColor *)strokeColor
                   andSize:(CGSize)size
{
    UIGraphicsBeginImageContextWithOptions(size, NO, 0);

    [strokeColor setStroke];
    [path stroke];

    UIImage *resultImage = UIGraphicsGetImageFromCurrentImageContext();
    UIGraphicsEndImageContext();
    return resultImage;
}


