人脸特征点检测(一):深度卷积网络级联
人脸特征检测(face feature detection)也称为 “facial landmark detection”, “facial keypoint detection” and “face alignment”,是在人脸检测的基础上,对人脸上的特征点例如眼睛、鼻子、嘴巴等进行定位。
人脸关键点检测有很多应用。如下作了一些列举:
(1)Facial feature detection improves face recognize(面部特征检测改善面部识别)
人脸特征点可以用来将人脸对齐到平均人脸(mean face shape),这样在对齐之后所有图像中的人脸特征点位置几乎相同。有论文验证了用对齐后的图像训练的人脸识别算法更加有效。
(2)Head pose estimation(头部姿势估计)
知道特征点的定向,可以估计头部姿势,即人脸朝向问题。
(3)Face Morphing(人脸变形)
人脸特征点对齐人脸之后,可以有两张人脸图像生成一张新的融合人脸图像。
(4)Virtual Makeover(虚拟化妆)
现在很多软件正在用的给图像上的人物化妆的功能就是基于人脸识别的。
(5)Face Replacement(人脸交换)
人脸对换:基于脸部监测点,将一张人脸换成另外一张人脸。
卷积神经网络可以用于分类和回归任务,做分类任务时最后一个全连接层的输出维度为类别数,接着Softmax层采用Softmax Loss计算损失函数,而如果做回归任务,最后一个全连接层的输出维度则是要回归的坐标值的个数,采用的是欧几里何损失Euclidean Loss。
这里基于《Deep Convolutional Network Cascade for Facial Point Detection》论文进行讲述,链接地址。


训练卷积神经网络来回归特征点坐标。如果只采用一个网络来做回归训练的话,会发现得到的特征点坐标不够准确,采用级联回归。CNN的方法,进行分段式特征点定位,可以更快速、准确的定位人脸特征点。如果采用更大的网络,特征点的预测会更加准确、鲁棒,但耗时会增加;为了在速度和性能上找到一个平衡点,使用较小的网络,所以使用级联的思想,先进行粗检测,然后微调特征点。具体思路如下:
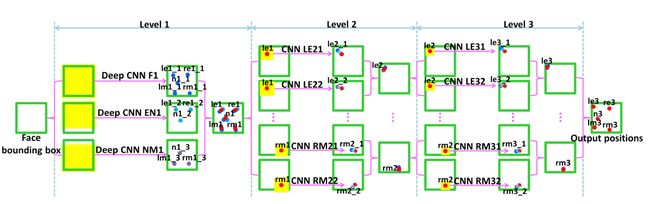
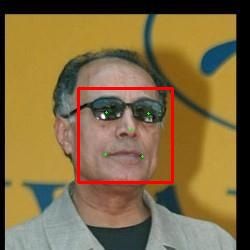
(1)首先在整个人脸图像(红色方框)上训练一个网络来对人脸特征点坐标进行粗回归,实际采用的网络其输入大小为39*39的人脸区域灰度图,预测时可以得到特征点的大概位置;如上图level1,在绿色框中,预测出5个点;第一层分为三波,分别是对五个点、左右眼和鼻子、鼻子和嘴巴。
(2)设计另一个回归网络,以人脸特征点(取得是level1训练之后得到的特征点)周围的局部区域图像(level2和level3中的黄色区域)作为输入进行训练,实际采用的网络为其输入大小为15*15的特征点局部区域灰度图,以预测到更加准确的特征点位置。这里level3比level2定义的输入区域要小一点。
另外需要注意的是,回归采用的欧几里得损失,在计算坐标时,使用的是相对坐标而不是绝对坐标,即每一次坐标计算,相对坐标是相对于上图所示的黄色框的边界进行的,绝对坐标是基于绿色边框边界进行的。
除此之外,在level1训练时,还对训练集进行了增广。除了做镜像之外,还对人脸框进行了两组缩放和四组平移,以及两组小角度的旋转,然后再将人脸框区域裁剪成39*39大小的区域。
下面是level1的实现:
#!/usr/bin/env python2.7
# coding: utf-8
"""
    This file convert dataset from http://mmlab.ie.cuhk.edu.hk/archive/CNN_FacePoint.htm
    We convert data for LEVEL-1 training data.
    all data are formated as (data, landmark), and landmark is ((x1, y1), (x2, y2)...)
"""

import os
import time
import math
from os.path import join, exists
import cv2
import numpy as np
import h5py
from common import shuffle_in_unison_scary, logger, createDir, processImage
from common import getDataFromTxt
from utils import show_landmark, flip, rotate


TRAIN = 'dataset/train'
OUTPUT = 'train'
if not exists(OUTPUT): os.mkdir(OUTPUT)
assert(exists(TRAIN) and exists(OUTPUT))


def generate_hdf5(ftxt, output, fname, argument=False):

    data = getDataFromTxt(ftxt)	#从txt文件中生成数据    return [(img_path, bbox, landmark)]
															   #bbox: [left, right, top, bottom]
															   #landmark: [(x1, y1), (x2, y2), ...]
    F_imgs = []
    F_landmarks = []
    EN_imgs = []
    EN_landmarks = []
    NM_imgs = []
    NM_landmarks = []

    for (imgPath, bbox, landmarkGt) in data:
        img = cv2.imread(imgPath, cv2.CV_LOAD_IMAGE_GRAYSCALE)
        assert(img is not None)
        logger("process %s" % imgPath)
        # F
        f_bbox = bbox.subBBox(-0.05, 1.05, -0.05, 1.05)
        f_face = img[f_bbox.top:f_bbox.bottom+1,f_bbox.left:f_bbox.right+1]   #人脸框图像


		##针对训练集,对数据集进行了增广,除了做镜像之外,还对人脸框位置做了两组缩放和四组平移

        ## data argument
        if argument and np.random.rand() > -1:		#argument=false时,不做数据增广
            ### flip#人脸镜像
            face_flipped, landmark_flipped = flip(f_face, landmarkGt)	#将人脸框图像和关键点坐标同时镜像
            face_flipped = cv2.resize(face_flipped, (39, 39))	#人脸框图像缩放到统一大小,默认双线性插值
            F_imgs.append(face_flipped.reshape((1, 39, 39)))	#opencv读取的图像shape为(h,w,c),转变为(c,h,w)
            F_landmarks.append(landmark_flipped.reshape(10))	 #将5x2的标签reshape成一维
            ### rotation  ##对人脸框做两组随机的小角度旋转,但最后对特征点位置预测的准确性并没有多大提高。
            if np.random.rand() > 0.5:
                face_rotated_by_alpha, landmark_rotated = rotate(img, f_bbox, \
                    bbox.reprojectLandmark(landmarkGt), 5)	#采用相对坐标,促进模型收敛,避免网络训练时发散
                landmark_rotated = bbox.projectLandmark(landmark_rotated)  ##在做数据增广时,对应的特征点坐标要转化为相对坐标
                face_rotated_by_alpha = cv2.resize(face_rotated_by_alpha, (39, 39))
                F_imgs.append(face_rotated_by_alpha.reshape((1, 39, 39)))
                F_landmarks.append(landmark_rotated.reshape(10))
                ### flip with rotation
                face_flipped, landmark_flipped = flip(face_rotated_by_alpha, landmark_rotated)
                face_flipped = cv2.resize(face_flipped, (39, 39))
                F_imgs.append(face_flipped.reshape((1, 39, 39)))
                F_landmarks.append(landmark_flipped.reshape(10))
            ### rotation
            if np.random.rand() > 0.5:
                face_rotated_by_alpha, landmark_rotated = rotate(img, f_bbox, \
                    bbox.reprojectLandmark(landmarkGt), -5)
                landmark_rotated = bbox.projectLandmark(landmark_rotated)
                face_rotated_by_alpha = cv2.resize(face_rotated_by_alpha, (39, 39))
                F_imgs.append(face_rotated_by_alpha.reshape((1, 39, 39)))
                F_landmarks.append(landmark_rotated.reshape(10))
                ### flip with rotation
                face_flipped, landmark_flipped = flip(face_rotated_by_alpha, landmark_rotated)
                face_flipped = cv2.resize(face_flipped, (39, 39))
                F_imgs.append(face_flipped.reshape((1, 39, 39)))
                F_landmarks.append(landmark_flipped.reshape(10))

        f_face = cv2.resize(f_face, (39, 39))
        en_face = f_face[:31, :]
        nm_face = f_face[8:, :]

        f_face = f_face.reshape((1, 39, 39))
        f_landmark = landmarkGt.reshape((10))
        F_imgs.append(f_face)
        F_landmarks.append(f_landmark)

        # EN
        # en_bbox = bbox.subBBox(-0.05, 1.05, -0.04, 0.84)
        # en_face = img[en_bbox.top:en_bbox.bottom+1,en_bbox.left:en_bbox.right+1]

        ## data argument
        if argument and np.random.rand() > 0.5:
            ### flip
            face_flipped, landmark_flipped = flip(en_face, landmarkGt)
            face_flipped = cv2.resize(face_flipped, (31, 39)).reshape((1, 31, 39))
            landmark_flipped = landmark_flipped[:3, :].reshape((6))
            EN_imgs.append(face_flipped)
            EN_landmarks.append(landmark_flipped)

        en_face = cv2.resize(en_face, (31, 39)).reshape((1, 31, 39))
        en_landmark = landmarkGt[:3, :].reshape((6))
        EN_imgs.append(en_face)
        EN_landmarks.append(en_landmark)

        # NM
        # nm_bbox = bbox.subBBox(-0.05, 1.05, 0.18, 1.05)
        # nm_face = img[nm_bbox.top:nm_bbox.bottom+1,nm_bbox.left:nm_bbox.right+1]

        ## data argument
        if argument and np.random.rand() > 0.5:
            ### flip
            face_flipped, landmark_flipped = flip(nm_face, landmarkGt)
            face_flipped = cv2.resize(face_flipped, (31, 39)).reshape((1, 31, 39))
            landmark_flipped = landmark_flipped[2:, :].reshape((6))
            NM_imgs.append(face_flipped)
            NM_landmarks.append(landmark_flipped)

        nm_face = cv2.resize(nm_face, (31, 39)).reshape((1, 31, 39))
        nm_landmark = landmarkGt[2:, :].reshape((6))
        NM_imgs.append(nm_face)
        NM_landmarks.append(nm_landmark)

    #imgs, landmarks = process_images(ftxt, output)

    F_imgs, F_landmarks = np.asarray(F_imgs), np.asarray(F_landmarks)
    EN_imgs, EN_landmarks = np.asarray(EN_imgs), np.asarray(EN_landmarks)
    NM_imgs, NM_landmarks = np.asarray(NM_imgs),np.asarray(NM_landmarks)

    F_imgs = processImage(F_imgs)  #图像预处理:去均值、归一化
    shuffle_in_unison_scary(F_imgs, F_landmarks)	#乱序
    EN_imgs = processImage(EN_imgs)
    shuffle_in_unison_scary(EN_imgs, EN_landmarks)
    NM_imgs = processImage(NM_imgs)
    shuffle_in_unison_scary(NM_imgs, NM_landmarks)

    # full face
    base = join(OUTPUT, '1_F')
    createDir(base)
    output = join(base, fname) #拼接成h5文件全路径
    logger("generate %s" % output)
    with h5py.File(output, 'w') as h5:
        h5['data'] = F_imgs.astype(np.float32)
        h5['landmark'] = F_landmarks.astype(np.float32)

    # eye and nose
    base = join(OUTPUT, '1_EN')
    createDir(base)
    output = join(base, fname)
    logger("generate %s" % output)
    with h5py.File(output, 'w') as h5:
        h5['data'] = EN_imgs.astype(np.float32)#数据转换成float32类型,存图像
        h5['landmark'] = EN_landmarks.astype(np.float32) #数据转换成float32类型,存坐标标签

    # nose and mouth
    base = join(OUTPUT, '1_NM')
    createDir(base)
    output = join(base, fname)
    logger("generate %s" % output)
    with h5py.File(output, 'w') as h5:
        h5['data'] = NM_imgs.astype(np.float32)
        h5['landmark'] = NM_landmarks.astype(np.float32)


if __name__ == '__main__':
    # train data
    train_txt = join(TRAIN, 'trainImageList.txt') #join函数相当于matlab中的fullfile函数,用来连接目录和文件名,得到完整文件路径
    generate_hdf5(train_txt, OUTPUT, 'train.h5', argument=True)	#输入参数:(原始图像和关键点坐标标签文本,h5文件输出目录,h5文件名,是否数据增广)

    test_txt = join(TRAIN, 'testImageList.txt')
    generate_hdf5(test_txt, OUTPUT, 'test.h5')	#验证集不需要取大量值,没有旋转


    with open(join(OUTPUT, '1_F/train.txt'), 'w') as fd:
        fd.write('train/1_F/train.h5')
    with open(join(OUTPUT, '1_EN/train.txt'), 'w') as fd:
        fd.write('train/1_EN/train.h5')
    with open(join(OUTPUT, '1_NM/train.txt'), 'w') as fd:
        fd.write('train/1_NM/train.h5')
    with open(join(OUTPUT, '1_F/test.txt'), 'w') as fd:
        fd.write('train/1_F/test.h5')
    with open(join(OUTPUT, '1_EN/test.txt'), 'w') as fd:
        fd.write('train/1_EN/test.h5')
    with open(join(OUTPUT, '1_NM/test.txt'), 'w') as fd:
        fd.write('train/1_NM/test.h5')
    # Done
因为lmdb不支持多标签,所以这里使用的是hdf5格式,支持多标签。

如上图所示为Deep CNN F1 的卷积网络结构,level1网络的输入层使用的是39*39的单通道灰色图像,经过四个带池化层的卷积层,最后经过全连接层,输出一个维度为10的结果,代表5个特征点的坐标值,,,在最后一层是欧几里得损失层,计算的是网络预测的坐标值与真实值(都是相对值)之间的均值误差的积累。以下为网络结构
# This file gives the CNN model to predict all landmark in LEVEL-1
name: "landmark_1_F"
layer {
    name: "hdf5_train_data"
    type: "HDF5Data"
    top: "data"
    top: "landmark"
    include {
        phase: TRAIN
    }
    hdf5_data_param {
        source: "train/1_F/train.txt"
        batch_size: 64
    }
}
layer {
    name: "hdf5_test_data"
    type: "HDF5Data"
    top: "data"
    top: "landmark"
    include {
        phase: TEST
    }
    hdf5_data_param {
        source: "train/1_F/test.txt"
        batch_size: 64
    }
}
layer {
    name: "conv1"
    type: "Convolution"
    bottom: "data"
    top: "conv1"
    param {
        lr_mult: 1
    }
    param {
        lr_mult: 2
    }
    convolution_param {
        num_output: 20
        kernel_size: 4
        weight_filler {
            type: "xavier"
        }
        bias_filler {
            type: "constant"
        }
    }
}
layer {
    name: "relu1"
    type: "ReLU"
    bottom: "conv1"
    top: "conv1"
}
layer {
    name: "pool1"
    type: "Pooling"
    bottom: "conv1"
    top: "pool1"
    pooling_param {
        pool: MAX
        kernel_size: 2
        stride: 2
    }
}
layer {
    name: "conv2"
    type: "Convolution"
    bottom: "pool1"
    top: "conv2"
    param {
        lr_mult: 1
    }
    param {
        lr_mult: 2
    }
    convolution_param {
        num_output: 40
        kernel_size: 3
        weight_filler {
            type: "xavier"
        }
        bias_filler {
            type: "constant"
        }
    }
}
layer {
    name: "relu2"
    type: "ReLU"
    bottom: "conv2"
    top: "conv2"
}
layer {
    name: "pool2"
    type: "Pooling"
    bottom: "conv2"
    top: "pool2"
    pooling_param {
        pool: MAX
        kernel_size: 2
        stride: 2
    }
}
layer {
    name: "conv3"
    type: "Convolution"
    bottom: "pool2"
    top: "conv3"
    param {
        lr_mult: 1
    }
    param {
        lr_mult: 2
    }
    convolution_param {
        num_output: 60
        kernel_size: 3
        weight_filler {
            type: "xavier"
        }
        bias_filler {
            type: "constant"
        }
    }
}
layer {
    name: "relu3"
    type: "ReLU"
    bottom: "conv3"
    top: "conv3"
}
layer {
    name: "pool3"
    type: "Pooling"
    bottom: "conv3"
    top: "pool3"
    pooling_param {
        pool: MAX
        kernel_size: 2
        stride: 2
    }
}
layer {
    name: "conv4"
    type: "Convolution"
    bottom: "pool3"
    top: "conv4"
    param {
        lr_mult: 1
    }
    param {
        lr_mult: 2
    }
    convolution_param {
        num_output: 80
        kernel_size: 2
        weight_filler {
            type: "xavier"
        }
        bias_filler {
            type: "constant"
        }
    }
}
layer {
    name: "relu4"
    type: "ReLU"
    bottom: "conv4"
    top: "conv4"
}
layer {
    name: "pool3_flat"
    type: "Flatten"
    bottom: "pool3"
    top: "pool3_flat"
}
layer {
    name: "conv4_flat"
    type: "Flatten"
    bottom: "conv4"
    top: "conv4_flat"
}
layer {
    name: "concat"
    type: "Concat"
    bottom: "pool3_flat"
    bottom: "conv4_flat"
    top: "faker"
    concat_param {
      concat_dim: 1
    }
}
layer {
    name: "fc1"
    type: "InnerProduct"
    bottom: "faker"
    top: "fc1"
    param {
        lr_mult: 1
    }
    param {
        lr_mult: 2
    }
    inner_product_param {
        num_output: 120
        weight_filler {
            type: "xavier"
        }
        bias_filler {
            type: "constant"
        }
    }
}
layer {
    name: "relu_fc1"
    type: "ReLU"
    bottom: "fc1"
    top: "fc1"
}
layer {
    name: "fc2"
    type: "InnerProduct"
    bottom: "fc1"
    top: "fc2"
    param {
        lr_mult: 1
    }
    param {
        lr_mult: 2
    }
    inner_product_param {
        num_output: 10
        weight_filler {
            type: "xavier"
        }
        bias_filler {
            type: "constant"
        }
    }
}
layer {
    name: "relu_fc2"
    type: "ReLU"
    bottom: "fc2"
    top: "fc2"
}

#计算的是网络预测的坐标值与真实值(都是相对值)之间的均方误差的累积
layer {
    name: "error"
    type: "EuclideanLoss"
    bottom: "fc2"
    bottom: "landmark"
    top: "error"
    include {
        phase: TEST
    }
}
layer {
    name: "loss"
    type: "EuclideanLoss"
    bottom: "fc2"
    bottom: "landmark"
    top: "loss"
    include {
        phase: TRAIN
    }
}
solver超参数文件如下,CPU/GPU模式依情况选择:
net: "prototxt/1_F_train.prototxt"

test_iter: 25
test_interval: 1000

base_lr: 0.01
momentum: 0.9
weight_decay: 0.0005

lr_policy: "inv"
gamma: 0.0001
power: 0.75

#lr_policy: "step"
#gamma: 0.1
#stepsize: 50000

display: 200

max_iter: 1000000

snapshot: 50000
snapshot_prefix: "model/1_F/"

test_compute_loss: true

solver_mode: CPU
第一层训练完成之后,得到预测结果,这是已经得到预测的特征点位置,但可能不够精确,接下来进入第二、三层训练,得到更加精确的结构。第一层使用的是一个较深一点的网络,估计关键点的位置;第二、三层共享一个较浅一点的网络,实现高精度。
第二层训练,以第一层训练得到的5个特征点为基础,每个特征点做两组数据集,即以第一组数据集特征点为中心,局部框大小为(2*0.18*W,2*0.18*H),其中W和H为人脸框的宽和高,并对此局部框做随机的微小平移使得特征点在局部框中的位置随机,裁剪出一个大小为15*15的局部框图像,第二组数据和第一组数据一样,只是框比例取0.16(第三层的两组数据比例为0.11、0.12,其余和第二层一样)。对每个特征点,针对这两组数据集采用同样的网络,得到两组模型;预测时,采用两组模型预测的均值作为预测结果,提高预测的准确度。以下为第二层网络代码:
#!/usr/bin/env python2.7
# coding: utf-8
"""
    This file convert dataset from http://mmlab.ie.cuhk.edu.hk/archive/CNN_FacePoint.htm
    We convert data for LEVEL-2 training data.
    all data are formated as (patch, delta landmark), and delta landmark is ((x1, y1), (x2, y2)...)
"""

import os
from os.path import join, exists
import time
from collections import defaultdict
import cv2
import numpy as np
import h5py
from common import logger, createDir, getDataFromTxt, getPatch, processImage
from common import shuffle_in_unison_scary
from utils import randomShift, randomShiftWithArgument

#两组数据集:(1)局部框大小为(2*0.18*W,2*0.18*H);(2)局部框大小为(2*0.16*W,2*0.16*H)
types = [(0, 'LE1', 0.16),
         (0, 'LE2', 0.18),
         (1, 'RE1', 0.16),
         (1, 'RE2', 0.18),
         (2, 'N1', 0.16),
         (2, 'N2', 0.18),
         (3, 'LM1', 0.16),
         (3, 'LM2', 0.18),
         (4, 'RM1', 0.16),
         (4, 'RM2', 0.18),]	#5个关键点,两种padding
for t in types:
    d = 'train/2_%s' % t[1]
    createDir(d)	#创建文件夹存放train和test的txt和h5文件

def generate(ftxt, mode, argument=False):
    """
        Generate Training Data for LEVEL-2
        mode = train or test
    """
    data = getDataFromTxt(ftxt)	#取得image_path、bbox、landmark

    trainData = defaultdict(lambda: dict(patches=[], landmarks=[]))	#数据字典
    for (imgPath, bbox, landmarkGt) in data:
        img = cv2.imread(imgPath, cv2.CV_LOAD_IMAGE_GRAYSCALE)
        assert(img is not None)
        logger("process %s" % imgPath)

        landmarkPs = randomShiftWithArgument(landmarkGt, 0.05)  #对关键点相对坐标的位置做2组随机平移,得到2组“新的关键点”
        if not argument:
            landmarkPs = [landmarkPs[0]]#测试集只做一组随机平移

		#对做的2组随机平移,将所有局部框图像和关键点相对于局部框的相对坐标送入到数据字典trainData
        for landmarkP in landmarkPs:
            for idx, name, padding in types:
                patch, patch_bbox = getPatch(img, bbox, landmarkP[idx], padding)	#根据随机平移过的关键点相对坐标和padding得到局部框图像和局部框
                patch = cv2.resize(patch, (15, 15))	#局部框图像缩放到15x15
                patch = patch.reshape((1, 15, 15)) 	#每个patch为c,h,w,append之后就变成了n,c,h,w
                trainData[name]['patches'].append(patch)
                _ = patch_bbox.project(bbox.reproject(landmarkGt[idx])) #‘真’关键点 ,再投影到局部框得到相对局部框的相对坐标
                trainData[name]['landmarks'].append(_)

    for idx, name, padding in types:
        logger('writing training data of %s'%name)
        patches = np.asarray(trainData[name]['patches'])	#从数据字典中取出
        landmarks = np.asarray(trainData[name]['landmarks'])
        patches = processImage(patches)	#预处理,去均值、归一化

        shuffle_in_unison_scary(patches, landmarks)

        with h5py.File('train/2_%s/%s.h5'%(name, mode), 'w') as h5:	 #生成mode.h5(train/test)
            h5['data'] = patches.astype(np.float32)
            h5['landmark'] = landmarks.astype(np.float32)
        with open('train/2_%s/%s.txt'%(name, mode), 'w') as fd:	#生成mode.txt(train/test),写入h5文件路径
            fd.write('train/2_%s/%s.h5'%(name, mode))


if __name__ == '__main__':
    np.random.seed(int(time.time()))	 #seed指定随机数生成时所用算法开始的整数值,使随机值的产生随时间而变化,而不会每次产生的随机数都相同
    # trainImageList.txt
    generate('dataset/train/trainImageList.txt', 'train', argument=True) #生成train.h5和train.txt,训练集做数据增强(实际上只是多做了一组随机平移)
    # testImageList.txt
    generate('dataset/train/testImageList.txt', 'test')#生成test.h5和test.txt
    # Done
# This file gives the CNN model to predict landmark in LEVEL-2
name: "landmark_2_LE1"
layer {
    name: "hdf5_train_data"
    type: "HDF5Data"
    top: "data"
    top: "landmark"
    include {
        phase: TRAIN
    }
    hdf5_data_param {
        source: "train/2_LE1/train.txt"
        batch_size: 64
    }
}
layer {
    name: "hdf5_test_data"
    type: "HDF5Data"
    top: "data"
    top: "landmark"
    include {
        phase: TEST
    }
    hdf5_data_param {
        source: "train/2_LE1/test.txt"
        batch_size: 64
    }
}
layer {
    name: "conv1"
    type: "Convolution"
    bottom: "data"
    top: "conv1"
    param {
        lr_mult: 1
    }
    param {
        lr_mult: 2
    }
    convolution_param {
        num_output: 20
        kernel_size: 4
        weight_filler {
            type: "xavier"
        }
        bias_filler {
            type: "constant"
        }
    }
}
layer {
    name: "relu1"
    type: "ReLU"
    bottom: "conv1"
    top: "conv1"
}
layer {
    name: "pool1"
    type: "Pooling"
    bottom: "conv1"
    top: "pool1"
    pooling_param {
        pool: MAX
        kernel_size: 2
        stride: 2
    }
}
layer {
    name: "conv2"
    type: "Convolution"
    bottom: "pool1"
    top: "conv2"
    param {
        lr_mult: 1
    }
    param {
        lr_mult: 2
    }
    convolution_param {
        num_output: 40
        kernel_size: 3
        weight_filler {
            type: "xavier"
        }
        bias_filler {
            type: "constant"
        }
    }
}
layer {
    name: "relu2"
    type: "ReLU"
    bottom: "conv2"
    top: "conv2"
}
layer {
    name: "pool2"
    type: "Pooling"
    bottom: "conv2"
    top: "pool2"
    pooling_param {
        pool: MAX
        kernel_size: 2
        stride: 2
    }
}
layer {
    name: "fc1"
    type: "InnerProduct"
    bottom: "pool2"
    top: "fc1"
    param {
        lr_mult: 1
    }
    param {
        lr_mult: 2
    }
    inner_product_param {
        num_output: 60
        weight_filler {
            type: "xavier"
        }
        bias_filler {
            type: "constant"
        }
    }
}
layer {
    name: "relu_fc1"
    type: "ReLU"
    bottom: "fc1"
    top: "fc1"
}
layer {
    name: "fc2"
    type: "InnerProduct"
    bottom: "fc1"
    top: "fc2"
    param {
        lr_mult: 1
    }
    param {
        lr_mult: 2
    }
    inner_product_param {
        num_output: 2
        weight_filler {
            type: "xavier"
        }
        bias_filler {
            type: "constant"
        }
    }
}
layer {
    name: "relu_fc2"
    type: "ReLU"
    bottom: "fc2"
    top: "fc2"
}
layer {
    name: "error"
    type: "EuclideanLoss"
    bottom: "fc2"
    bottom: "landmark"
    top: "error"
    include {
        phase: TEST
    }
}
layer {
    name: "loss"
    type: "EuclideanLoss"
    bottom: "fc2"
    bottom: "landmark"
    top: "loss"
    include {
        phase: TRAIN
    }
}
net: "prototxt/2_LE1_train.prototxt"

test_iter: 25
test_interval: 1000

base_lr: 0.005
momentum: 0.9
weight_decay: 0.0005

lr_policy: "inv"
gamma: 0.0001
power: 0.75

#lr_policy: "step"
#gamma: 0.1
#stepsize: 50000

display: 200

max_iter: 100000

snapshot: 10000
snapshot_prefix: "model/2_LE1/"

test_compute_loss: true

solver_mode: CPU
#!/usr/bin/env python2.7
# coding: utf-8
"""
    This file train Caffe CNN models
"""

import os, sys
import multiprocessing


pool_on = False

models = [
    ['F', 'EN', 'NM'],
    ['LE1', 'LE2', 'RE1', 'RE2', 'N1', 'N2', 'LM1', 'LM2', 'RM1', 'RM2'],
    ['LE1', 'LE2', 'RE1', 'RE2', 'N1', 'N2', 'LM1', 'LM2', 'RM1', 'RM2'],]

def w(c):
    if c != 0:
        print '\n'
        print ':-('
        print '\n'
        sys.exit()

def runCommand(cmd):
    w(os.system(cmd))

def train(level=1):
    """
        train caffe model
    """
    cmds = []
    for t in models[level-1]:
        cmd = 'mkdir model/{0}_{1}'.format(level, t)
		#此命令行错误,无法创建文件夹!
        os.system(cmd)
        cmd = 'caffe train --solver prototxt/{0}_{1}_solver.prototxt'.format(level, t)
        # w(os.system(cmd))
        cmds.append('caffe train --solver prototxt/{0}_{1}_solver.prototxt'.format(level, t))
    # we train level-2 and level-3 with mutilprocess (we may train two level in parallel)
    if level > 1 and pool_on:
        pool_size = 3
        pool = multiprocessing.Pool(processes=pool_size, maxtasksperchild=2)
        pool.map(runCommand, cmds)	#map函数,将runcommand函数应用到每个cmds上
        pool.close()
        pool.join()
    else:
        for cmd in cmds:
            runCommand(cmd)


if __name__ == '__main__':
    argc = len(sys.argv)	#获得命令行字符串的个数
    assert(2 <= argc <= 3)
    if argc == 3:	#如nohup python train/level.py 1 pool_on  只算python的后面三个
        pool_on = True

    level = int(sys.argv[1])	#python后面的第二个
    if 1 <= level <= 3:
        train(level)
    else:
        for level in range(1, 4):
            train(level)