Vue源码解析01
Vue源码解析01
首先来一张Vue工作流程图,作为整个Vue源码解析的基础
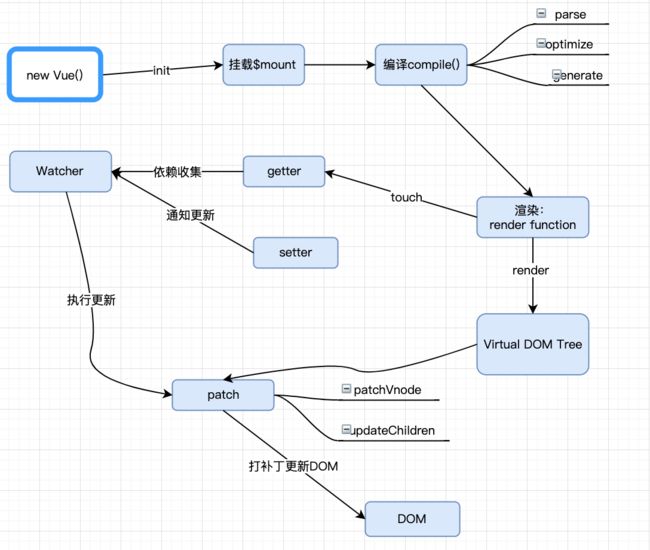
初始化
new Vue() 初始化创建Vue实例,初始化data、props、events等
挂载
$mount 挂载执行编译,首次渲染、创建和追加过程
编译
compile() 编译,该阶段分为三个阶段parse、optimize、generate
渲染
render function 渲染函数,渲染函数执行时会触发getter函数进行依赖收集,将来数据变化时会出发setter方法进行数据更新,这就是数据响应化
虚拟DOM
Virtual DOM 虚拟DOM,Vue2.0开始支持虚拟DOM,通过Js对象描述DOM,更新数据时映射为DOM操作
更新视图
patch 更新试图,数据修改时Watcher(监听器)会执行更新,对比新旧DOM,最小代价进行修改,就是patch
Vue源码解析入口查找
首先,如果要分析源码的化首先将Vue的项目迁移到本地,本文用的是2.1.10版本。
项目地址
-
项目clone:git clone https://github.com/vuejs/vue.git
-
配置运行环境这里不过多赘述
♣记得在package.json中加入 –sourcemap,方便在浏览器中进行调试
    "scripts":{
        "dev": "rollup -w -c scripts/config.js --sourcemap --environment TARGET:web-full-dev",
    }
直接运行 npm run dev创建测试文件vue.js
bundles /Users/songyanan/Desktop/前端学习/kkbNote/上课笔记/Vue191008/vue/src/platforms/web/entry-runtime-with-compiler.js → dist/vue.js...
created dist/vue.js in 4.5s

[2019-10-18 13:58:09] waiting for changes...
dist/vue.js是生成的测试文件,可以用来进行浏览器调试。
- package.json中的dev命令指定了配置文件scripts/config.js 和打包的目标TARGET:web-full-dev
在scripts/config.js文件中存在打包的配置信息,其中代码太多,只截取关键部分:
    // npm run dev命令中打包的目标文件描述,其中入口就是entry:resolve('web/entry-runtime-with-compiler.js')
    // umd格式的,对应package.json中的dev:web-full-dev
  // Runtime+compiler development build (Browser)
    'web-full-dev': {
        // 入口文件
        entry: resolve('web/entry-runtime-with-compiler.js'),
        // 打包生成的文件
        dest: resolve('dist/vue.js'),
        // 规定了输出规范
        format: 'umd',
        // 环境变量 development 开发时
        env: 'development',
        alias: { he: './entity-decoder' },
        banner
    }
通过查看上面的resolove()方法中引入的aliases类,我们可以找到上面的入口文件的实际地址为:
src/platforms/web/entry-runtime-with-compiler.js至此,找到入口文件
Vue的初始化过程
入口文件entry-runtime-with-compiler.js的主要作用
- 扩展了 m o u n t 方 法 , 不 同 的 平 台 下 , 挂 载 的 方 法 会 有 明 显 的 不 同 , 通 过 扩 展 mount方法,不同的平台下,挂载的方法会有明显的不同,通过扩展 mount方法,不同的平台下,挂载的方法会有明显的不同,通过扩展mount可以实现跨平台的作用
    import Vue from " ./runtime/index";
    // 取出vue的$mount 重新覆盖
    const mount = Vue.prototype.$mount
    // 扩展了$mount
    Vue.prototype.$mount = function (
    el?: string | Element,
    hydrating?: boolean
    ): Component {
        el = el && query(el)

        /* istanbul ignore if */
        if (el === document.body || el === document.documentElement) {
            process.env.NODE_ENV !== 'production' && warn(
            `Do not mount Vue to  or  - mount to normal elements instead.`
            )
            return this
        }
        // 处理传入vue的options选项:el和template
        // el和template都是挂载的时候用到的两种方式 ?
        const options = this.$options
        // resolve template/el and convert to render function
        // 只有render选项不存在时 考虑el和template
        // 从这里可以看出render的优先级是要高于template的,而tempelate的优先级高于el
        if (!options.render) {
            let template = options.template
            // 先判断template是否存在
            if (template) {
            if (typeof template === 'string') {
                // template本身也可是一个选择器
                if (template.charAt(0) === '#') {//首字母为#号的话,看作是ID选择器
                template = idToTemplate(template)
                /* istanbul ignore if */
                if (process.env.NODE_ENV !== 'production' && !template) {
                    warn(
                    `Template element not found or is empty: ${options.template}`,
                    this
                    )
                }
                }
            } else if (template.nodeType) {// template 是dom元素
                template = template.innerHTML
            } else {
                if (process.env.NODE_ENV !== 'production') {
                warn('invalid template option:' + template, this)
                }
                return this
            }
            } else if (el) {
            // 如果不存在template,存在el,则将el所在dom赋值给template
            template = getOuterHTML(el)
            }
            // 编译过程
            if (template) {
            /* istanbul ignore if */
            if (process.env.NODE_ENV !== 'production' && config.performance && mark) {
                mark('compile')
            }
            // 编译,这个地方就是上面图中的compile
            // 编译的过程是将template转换为render函数
            const { render, staticRenderFns } = compileToFunctions(template, {
                outputSourceRange: process.env.NODE_ENV !== 'production',
                shouldDecodeNewlines,
                shouldDecodeNewlinesForHref,
                delimiters: options.delimiters,
                comments: options.comments
            }, this)
            // 不管是template还是el最终都会转变为render函数去渲染
            options.render = render
            options.staticRenderFns = staticRenderFns
            /* istanbul ignore if */
            if (process.env.NODE_ENV !== 'production' && config.performance && mark) {
                mark('compile end')
                measure(`vue ${this._name} compile`, 'compile', 'compile end')
            }
            }
        }
        return mount.call(this, el, hydrating)
    }
./runtime/index 文件
该入口文件并没有初始化Vue,它是通过引入的 ./runtime/index.js,所以我们来看一下该文件中实现了什么功能
    import Vue from 'core/index'
    // 此处只粘贴核心功能相关的代码
    //install platform patch function
    //1、 定义了patch方法,这是真正的打补丁函数
    Vue.prototype.__patch__ = inBrowser ? patch : noop
    // public mount method
    // 定义了$mount挂载方法,这就是上述图片中的$mount挂载的部分
    Vue.prototype.$mount = function (
    el?: string | Element,
    hydrating?: boolean
    ): Component {
        // 找到宿主元素
        el = el && inBrowser ? query(el) : undefined
        // $mount的核心内容是执行mountComponent方法
        return mountComponent(this, el, hydrating)
    }
该文件依然没有初始化定义Vue,所以我们接着找他引入的 core/index
core/index
core/index.js文件中代码很简单,核心功能是初始化了全局的API
    //只粘贴部分全局API
    import Vue from './instance/index'
    // 定义了全局的API,后面文章再分析
    initGlobalAPI(Vue)
继续向下查找Vue的构造方法:./instance/index
./instance/index 定义了构造函数
    import { initMixin } from './init'
    import { stateMixin } from './state'
    import { renderMixin } from './render'
    import { eventsMixin } from './events'
    import { lifecycleMixin } from './lifecycle'
    import { warn } from '../util/index'

    // 定义了Vue的构造函数
    function Vue (options) {
        if (process.env.NODE_ENV !== 'production' &&
            !(this instanceof Vue)
        ) {
            warn('Vue is a constructor and should be called with the `new` keyword')
        }
        this._init(options)
    }

    initMixin(Vue)// 该方法实现了上面的_init()
    stateMixin(Vue)
    eventsMixin(Vue)
    lifecycleMixin(Vue)
    renderMixin(Vue)
    export default Vue
从上面的代码可以看出,该文件实现了Vue的初始化。至此我们真正的找到了Vue项目的起点,new Vue()
- Vue的构造方法的核心是**this._init(options)**方法,所以想进行下一步的源码研究,我们需要看看initMixin(Vue)中是怎样实现初始化的
初始化函数的实现 ./init
我们现在整体看一下initMinxin中的_init的代码实现,忽略掉各种警告信息和选项初始化合并,查看其比较核心的功能:
    import { initState } from './state'
    import { initRender } from './render'
    import { initEvents } from './events'
    import { initLifecycle, callHook } from './lifecycle'
    import { initProvide, initInjections } from './inject'
    // 初始化声明周期
    initLifecycle(vm)
    // 初始化事件,实现处理父组件传递的监听事件的监听器
    initEvents(vm)
    // 初始化渲染器$slots scopedSlots、_c、$createElement
    initRender(vm)
    // 调用生命周期钩子函数beforeCreate
    callHook(vm, 'beforeCreate')
    // 获取注入的数据
    initInjections(vm) // resolve injections before data/props
    // 初始化状态props、methods、data、computed、watch
    initState(vm)
    // 提供数据
    initProvide(vm) // resolve provide after data/props
    // 调用生命周期钩子函数 created
    callHook(vm, 'created')
下面我们首先简单看一下上述几个方法,后面章节会有详细解析
- initLifecycle初始化生命周期的作用:
    export function initLifecycle (vm: Component) {
    const options = vm.$options

    // locate first non-abstract parent
    let parent = options.parent
    if (parent && !options.abstract) {
        while (parent.$options.abstract && parent.$parent) {
        parent = parent.$parent
        }
        // 通知父组件将当前实例加入父组件之中,创建的时候通知父组件
        parent.$children.push(vm)
    }

    // 初始化Vue实例中的一些属性
    vm.$parent = parent
    vm.$root = parent ? parent.$root : vm
    vm.$children = []
    vm.$refs = {}
    vm._watcher = null
    vm._inactive = null
    vm._directInactive = false
    vm._isMounted = false
    vm._isDestroyed = false
    vm._isBeingDestroyed = false
}
- initEvents(vm) 方法的作用
    // 这个方法的核心功能是初始化了Vue实例中的_events选项,并且将父组件的监听方法加入到当前实例中
    export function initEvents (vm: Component) {
        vm._events = Object.create(null)
        vm._hasHookEvent = false
        // init parent attached events
        // 获取父组件的监听方法
        const listeners = vm.$options._parentListeners
        if (listeners) {
            // 将父组件的监听方法加入到当前实例中进行处理
            // 这个地方解释了关于 事件谁派发谁监听 的问题,
            //虽然监听事件实现是在父组件中,但是真正对事件进行监听处理的是当前实例,也就是派发事件的子组件
            updateComponentListeners(vm, listeners)
        }
    }
- 关于initRender(vm) 方法,看名称能看出该方法是初始化了Vue的一些渲染函数相关
    export function initRender (vm: Component) {
        // 此处初始化了当前组件实例的Vnode,也就是虚拟dom
        vm._vnode = null // the root of the child tree
        vm._staticTrees = null // v-once cached trees
        const options = vm.$options
        const parentVnode = vm.$vnode = options._parentVnode // the placeholder node in parent tree
        const renderContext = parentVnode && parentVnode.context
        // 此处初始化了实例的$slots,插槽相关
        vm.$slots = resolveSlots(options._renderChildren, renderContext)
        vm.$scopedSlots = emptyObject
        // bind the createElement fn to this instance
        // so that we get proper render context inside it.
        // args order: tag, data, children, normalizationType, alwaysNormalize
        // internal version is used by render functions compiled from templates
        //createElement,给编译器生成render函数使用
        vm._c = (a, b, c, d) => createElement(vm, a, b, c, d, false)
        // normalization is always applied for the public version, used in
        // user-written render functions.
        // 这是render(h)的h函数,给用户编写的render函数去使用
        vm.$createElement = (a, b, c, d) => createElement(vm, a, b, c, d, true)

        // $attrs & $listeners are exposed for easier HOC creation.
        // they need to be reactive so that HOCs using them are always updated
        const parentData = parentVnode && parentVnode.data
        /* istanbul ignore else */
        if (process.env.NODE_ENV !== 'production') {
            defineReactive(vm, '$attrs', parentData && parentData.attrs || emptyObject, () => {
            !isUpdatingChildComponent && warn(`$attrs is readonly.`, vm)
            }, true)
            defineReactive(vm, '$listeners', options._parentListeners || emptyObject, () => {
            !isUpdatingChildComponent && warn(`$listeners is readonly.`, vm)
            }, true)
        } else {
            // 数据响应化处理相关
            defineReactive(vm, '$attrs', parentData && parentData.attrs || emptyObject, null, true)
            defineReactive(vm, '$listeners', options._parentListeners || emptyObject, null, true)
        }
    }
- 关于initInjections(vm)方法,初始化数据注入相关
    // 主要功能是对
    export function initInjections (vm: Component) {
        // 对组件选项中的inject属性中的各个key进行遍历,通过父组件链一直向上查找provide()中和inject对应的属性
        // 通俗点就是获取父组件和祖先组件中提供的一些数据,然后注入到当前组件中
        const result = resolveInject(vm.$options.inject, vm)
        if (result) {
            toggleObserving(false)
            Object.keys(result).forEach(key => {
            /* istanbul ignore else */
            if (process.env.NODE_ENV !== 'production') {
                // 进行数据响应化的操作
                defineReactive(vm, key, result[key], () => {
                warn(
                    `Avoid mutating an injected value directly since the changes will be ` +
                    `overwritten whenever the provided component re-renders. ` +
                    `injection being mutated: "${key}"`,
                    vm
                )
                })
            } else {
                // 进行数据响应化的操作
                defineReactive(vm, key, result[key])
            }
            })
            toggleObserving(true)
        }
    }
- 关于initState(vm)方法,初始化组件各种状态相关
    export function initState (vm: Component) {
        // 初始化了实例中的_watchers数组
        vm._watchers = []
        const opts = vm.$options
        // 初始化props
        if (opts.props) initProps(vm, opts.props)
        // 初始化方法
        if (opts.methods) initMethods(vm, opts.methods)
        // data的处理,响应化处理
        if (opts.data) {
            // 初始化data
            initData(vm)
        } else {
            // 数据响应化
            observe(vm._data = {}, true /* asRootData */)
        }
        // 初始化computed
        if (opts.computed) initComputed(vm, opts.computed)
        //如果当前选项中国呢传入了watch 且 watch不等于nativeWatch(细节处理,在Firefox浏览器下Object的原型上含有一个watch函数)
        if (opts.watch && opts.watch !== nativeWatch) {
            // 初始化watch
            initWatch(vm, opts.watch)
        }
    }
- 关于initProvide(vm),初始化注入所需数据相关
// initProvide 是一个非常简单的函数
//他的主要作用就是将当前选项中的provide数据放到当前实例的_provided属性中
    export function initProvide (vm: Component) {
        const provide = vm.$options.provide
        if (provide) {
            vm._provided = typeof provide === 'function'
            ? provide.call(vm)
            : provide
        }
    }
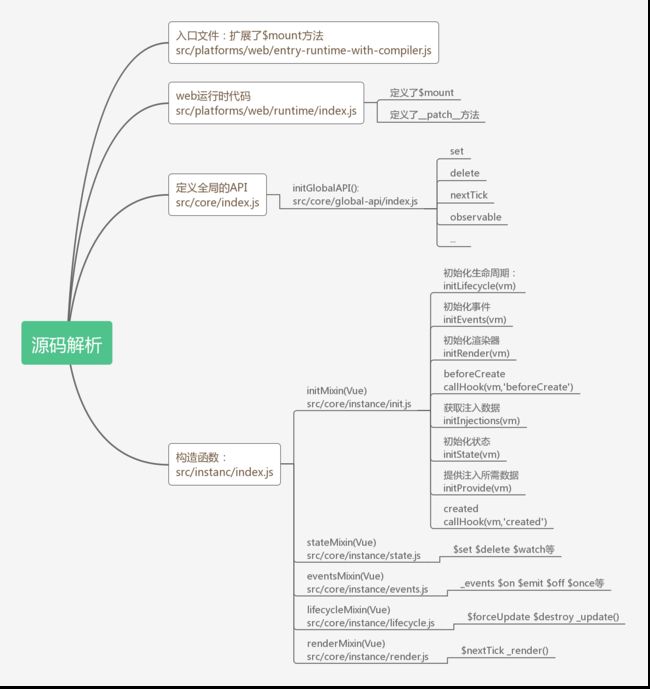
总结
直接上一张思维导图,后面会慢慢补充完整