第七章 设计模式
文章目录
- 1. 说说设计模式六大原则
- 2. 说说你会使用的设计模式?Android中应用?项目中应用?
- 3. 动态代理实现原理?
1. 说说设计模式六大原则
- 单一职责原则
就一个类而言,应该仅有一个引起它变化的原因。简单来说,一个类中应该是一组相关性很高的函数、数据的封装。 - 开闭原则
软件中的对象(类、模块、函数等),应该对于扩展是开放的,而对于修改是封闭的。 - 里氏替换原则
所有引用基类的地方必须能透明的使用其子类。通俗的说,就是只要父类能出现的地方子类就可以出现,而且替换为子类以后不会出现任何错误或异常。反过来就不行了,子类出现的地方父类不一定能适应。 - 依赖倒置原则
依赖倒置原则在Java中的表现就是:模块间的依赖通过抽象发生,实现类之间不发生直接的依赖关系,其依赖关系是通过接口或抽象类产生的。 - 接口隔离原则
类间的依赖关系应该建立在最小的接口上。 - 迪米特原则
一个对象应该对其他的对象有最少的了解
2. 说说你会使用的设计模式?Android中应用?项目中应用?
共有三大设计模式,包括:
- 创建型:
工厂方法模式、抽象工厂模式、单例模式、建造者模式、原型模式。 - 结构型:
适配器模式、装饰器模式、代理模式、外观模式、桥接模式、组合模式、享元模式。 - 行为型:
策略模式、模板方法模式、观察者模式、迭代子模式、责任链模式、命令模式、备忘录模式、状态模式、访问者模式、中介者模式、解释器模式。
- 单例模式
- 介绍
确保某个类只有一个实例且只提供一个全局访问点。 - 原理
通过类的构造方法实现一个类只有一个实例化对象,注意三点:
- 单例类只能有一个实例:创建静态私有变量 ourInstance 为Singleton 的唯一实例
- 单例类必须自己创建自己的唯一实例:把类的构造方法私有化,内部进行实例化,不让外部调用构造方法实例化
- 单例类必须给所有其他对象提供这一实例:定义共有方法提供该类全局唯一访问点,外部通过调用getInstance()方法来返回唯一实例
- 实现(根据单例创建时机不同分为饿汉式和懒汉式)
- 饿汉式——初始化单例类时即创建单例,线程安全
class Singleton {

    // 1. 加载该类时,单例就会自动被创建
    private static  Singleton ourInstance  = new  Singleton();

    // 2. 构造函数 设置为 私有权限
    // 原因:禁止他人创建实例
    private Singleton() {
    }

    // 3. 通过调用静态方法获得创建的单例
    public static  Singleton newInstance() {
        return ourInstance;
    }
}
- 懒汉式——有需要时手动创建单例,线程不安全
class Singleton {
    // 1. 类加载时,先不自动创建单例,即将单例的引用先赋值为 Null
    // 使用volatile,使单例模式在多线程环境下更加安全可靠。
    // volatile实现原理:
    // volatile变量保证每次读写变量都是不经过缓存而是直接从内存读写数据
    // 从而保证此变量对于所有线程的可见性
    private volatile static Singleton singleton = null;

    // 2. 构造函数 设置为 私有权限
    // 原因:禁止他人创建实例
    private Singleton() {
    }

    // 3. 需要时才手动调用 newInstance() 创建 单例
    // 使用双重校验锁 解决懒汉式线程不安全
    // 防止多个线程同时调用,从而避免造成单例被多次创建。
    public static Singleton newInstance() {
   if( ourInstance == null){  // 校验锁1:第1个if
     synchronized (Singleton.class){
      if( ourInstance == null){	// 校验锁2:第2个if
          ourInstance = new Singleton();
          }
      }
  }
        return ourInstance;
   }
}
// 说明
// 校验锁1:第1个if
// 作用:若单例已创建,则直接返回已创建的单例,无需再执行加锁操作
// 即直接跳到执行 return ourInstance

// 校验锁2:第2个 if
// 作用:防止多次创建单例问题
// 原理
  // 1. 线程A调用newInstance(),当运行到②位置时,此时线程B也调用了newInstance()
  // 2. 因线程A并没有执行instance = new Singleton();,此时instance仍为空,因此线程B能突破第1层 if 判断,运行到①位置等待synchronized中的A线程执行完毕
  // 3. 当线程A释放同步锁时,单例已创建,即instance已非空
  // 4. 此时线程B 从①开始执行到位置②。此时第2层 if 判断 = 为空(单例已创建),因此也不会创建多余的实例
- Android中应用
- 应用的Application
- 自定义ActivityManager工具类用于管理Activity
public class ActivityManager {

	private static volatile ActivityManager instance;
	private Stack<Activity> mActivityStack = new Stack<Activity>();

	private ActivityManager(){

	}

	public static ActivityManager getInstance(){
		if (instance == null) {
		synchronized (ActivityManager.class) {
			if (instance == null) {
				instance = new ActivityManager();
			}
		}
		return instance;
	}

	public void addActicity(Activity act){
		mActivityStack.push(act);
	}

	public void removeActivity(Activity act){
		mActivityStack.remove(act);
	}

	public void killMyProcess(){
		int nCount = mActivityStack.size();
		for (int i = nCount - 1; i >= 0; i--) {
        	Activity activity = mActivityStack.get(i);
        	activity.finish();
        }

		mActivityStack.clear();
		android.os.Process.killProcess(android.os.Process.myPid());
	}
}
- 图片加载框架对象,比如我们的ImageLoader,常用的图片加载框架Glide,universal-image-loader等
// universal-image-loader中单例
private volatile static ImageLoader instance;
/** Returns singleton class instance */
public static ImageLoader getInstance() {
	if (instance == null) {
		synchronized (ImageLoader.class) {
			if (instance == null) {
				instance = new ImageLoader();
			}
		}
	}
	return instance;
}
- EventBus中单例
private static volatile EventBus defaultInstance;
public static EventBus getDefault() {
	if (defaultInstance == null) {
		synchronized (EventBus.class) {
			if (defaultInstance == null) {
				defaultInstance = new EventBus();
			}
		}
	}
	return defaultInstance;
}
- 建造者模式
- 介绍
建造者模式是将一个复杂对象的构建过程从目标类中单独分离出来,使同样的构建过程可以创建出不同的表示。
适用于类内部数据结构/配置过程过于复杂时,通过构建者模式对对象创建过程进行隐藏,用户只需要提供构建对象所需要的参数,而不需要知道具体构造细节。 - 原理
UML类图

模式角色
| 角色 | 说明 |
|---|---|
| 抽象建造者(Builder) | 给出一个抽象接口,以规范产品对象的各个组成成分的建造。 |
| 具体建造者(ConcreteBuilder) | 担任这个角色的是于应用程序紧密相关的类,它们在应用程序调用下创建产品实例。 |
| 指挥者(Director) | 调用具体建造者角色以创建产品对象。 |
| 产品角色(Productor) | 产品便是建造中的复杂对象。 |
模式讲解
- 指挥者(Director)直接和客户(Client)进行需求沟通;
- 沟通后指挥者(Director)将客户(Client)创建产品的需求划分为各个部件的建造请求(Builder);
- 将各个部件的建造请求(Builder)委派到具体的建造者(ConcreteBuilder);
- 各个具体建造者负责进行产品各个部件进行构建,但不为客户(Client)所知;
- 最终构建成具体产品(Product)。
- 实现
(1)将对象的构建与表示分离,即将需要通过set方法设置的多个属性封装在一个配置类中
(2)每个属性值都有默认值
(3)具体的set方法放在配置类的内部类Builder类中,并且每个set方法都返回自身,以便进行链式调用
案例:使用了Builder模式顺序建造交通工具的不同部分 - Android中应用
- AlertDialog
- universal-image-loader
未采用Builder模式的ImageLoader
public class ImageLoader {
    //图片加载配置
    private int loadingImageId;
    private int loadingFailImageId;

    // 图片缓存,依赖接口
    ImageCache mImageCache = new MemoryCache();

    // 线程池,线程数量为CPU的数量
    ExecutorService mExecutorService = Executors.newFixedThreadPool(Runtime.getRuntime().availableProcessors());

    //省略单例模式实现

    /**
     * 设置图片缓存
     * @param cache
     */
    public void setImageCache(ImageCache cache) {
        mImageCache = cache;
    }

    /**
     * 设置图片加载中显示的图片
     * @param resId
     */
    public Builder setLoadingPlaceholder(int resId) {
        loadingImageId = resId;
    }

    /**
     * 设置加载失败显示的图片
     * @param resId
     */
    public Builder setLoadingFailPlaceholder(int resId) {
        loadingFailImageId = resId;
    }

    /**
     * 显示图片
     * @param imageUrl
     * @param imageView
     */
    public void displayImage(String imageUrl, ImageView imageView) {
        Bitmap bitmap = mImageCache.get(imageUrl);
        if (bitmap != null) {
            imageView.setImageBitmap(bitmap);
            return;
        }
        // 图片没有缓存,提交到线程池下载
        submitLoadRequest(imageUrl, imageView);
    }

    /**
     * 下载图片
     * @param imageUrl
     * @param imageView
     */
    private void submitLoadRequest(final String imageUrl, final ImageView imageView) {
        imageView.setImageResource(loadingImageId);
        imageView.setTag(imageUrl);
        mExecutorService.submit(new Runnable() {
            @Override
            public void run() {
                Bitmap bitmap = downloadImage(imageUrl);
                if (bitmap == null) {
                    imageView.setImageResource(loadingFailImageId);
                    return;
                }
                if (imageUrl.equals(imageView.getTag())) {
                    imageView.setImageBitmap(bitmap);
                }
                mImageCache.put(imageUrl, bitmap);
            }
        });
    }

    /**
     * 下载图片
     * @param imageUrl
     * @return
     */
    private Bitmap downloadImage(String imageUrl) {
        Bitmap bitmap = null;
        //省略下载部分代码
        return bitmap;
    }
}
从上面的代码中我们可以看出,每当需要增加一个设置选项的时候,就需要修改ImageLoader的代码,违背了开闭原则,而且ImageLoader中的代码会越来越多,不利于维护。
采用Builder模式的ImageLoader
首先是把ImageLoader的设置都放在单独的配置类里(将复杂的配置过程从目标类里面隔离出来),每个set方法都返回this,从而达到链式调用的目的
public class ImageLoaderConfig {
    // 图片缓存,依赖接口
    public ImageCache mImageCache = new MemoryCache();

    //加载图片时的loading和加载失败的图片配置对象
    public DisplayConfig displayConfig = new DisplayConfig();

    //线程数量,默认为CPU数量+1;
    public int threadCount = Runtime.getRuntime().availableProcessors() + 1;

    private ImageLoaderConfig() {
    }


    /**
     * 配置类的Builder
     */
    public static class Builder {
        // 图片缓存,依赖接口
        ImageCache mImageCache = new MemoryCache();

        //加载图片时的loading和加载失败的图片配置对象
        DisplayConfig displayConfig = new DisplayConfig();

        //线程数量,默认为CPU数量+1;
        int threadCount = Runtime.getRuntime().availableProcessors() + 1;

        /**
         * 设置线程数量
         * @param count
         * @return
         */
        public Builder setThreadCount(int count) {
            threadCount = Math.max(1, count);
            return this;
        }

        /**
         * 设置图片缓存
         * @param cache
         * @return
         */
        public Builder setImageCache(ImageCache cache) {
            mImageCache = cache;
            return this;
        }

        /**
         * 设置图片加载中显示的图片
         * @param resId
         * @return
         */
        public Builder setLoadingPlaceholder(int resId) {
            displayConfig.loadingImageId = resId;
            return this;
        }

        /**
         * 设置加载失败显示的图片
         * @param resId
         * @return
         */
        public Builder setLoadingFailPlaceholder(int resId) {
            displayConfig.loadingFailImageId = resId;
            return this;
        }

        void applyConfig(ImageLoaderConfig config) {
            config.displayConfig = this.displayConfig;
            config.mImageCache = this.mImageCache;
            config.threadCount = this.threadCount;
        }

        /**
         * 根据已经设置好的属性创建配置对象
         * @return
         */
        public ImageLoaderConfig create() {
            ImageLoaderConfig config = new ImageLoaderConfig();
            applyConfig(config);
            return config;
        }
    }
}
ImageLoader的修改
public class ImageLoader {
    //图片加载配置
    ImageLoaderConfig mConfig;

    // 图片缓存,依赖接口
    ImageCache mImageCache = new MemoryCache();

    // 线程池,线程数量为CPU的数量
    ExecutorService mExecutorService = Executors.newFixedThreadPool(Runtime.getRuntime().availableProcessors());

    //省略单例模式实现

    //初始化ImageLoader
    public void init(ImageLoaderConfig config) {
        mConfig = config;
        mImageCache = mConfig.mImageCache;
    }

    /**
     * 显示图片
     * @param imageUrl
     * @param imageView
     */
    public void displayImage(String imageUrl, ImageView imageView) {
        Bitmap bitmap = mImageCache.get(imageUrl);
        if (bitmap != null) {
            imageView.setImageBitmap(bitmap);
            return;
        }
        // 图片没有缓存,提交到线程池下载
        submitLoadRequest(imageUrl, imageView);
    }

    /**
     * 下载图片
     * @param imageUrl
     * @param imageView
     */
    private void submitLoadRequest(final String imageUrl, final ImageView imageView) {
        imageView.setImageResource(mConfig.displayConfig.loadingImageId);
        imageView.setTag(imageUrl);
        mExecutorService.submit(new Runnable() {
            @Override
            public void run() {
                Bitmap bitmap = downloadImage(imageUrl);
                if (bitmap == null) {
                    imageView.setImageResource(mConfig.displayConfig.loadingFailImageId);
                    return;
                }
                if (imageUrl.equals(imageView.getTag())) {
                    imageView.setImageBitmap(bitmap);
                }
                mImageCache.put(imageUrl, bitmap);
            }
        });
    }

    /**
     * 下载图片
     * @param imageUrl
     * @return
     */
    private Bitmap downloadImage(String imageUrl) {
        Bitmap bitmap = null;
        //省略下载部分代码
        return bitmap;
    }
}
调用形式
ImageLoaderConfig config = new ImageLoaderConfig.Builder()
        .setImageCache(new MemoryCache())
        .setThreadCount(2)
        .setLoadingFailPlaceholder(R.drawable.loading_fail)
        .setLoadingPlaceholder(R.drawable.loading)
        .create();
ImageLoader.getInstance().init(config);
- 工厂方法模式
- 介绍
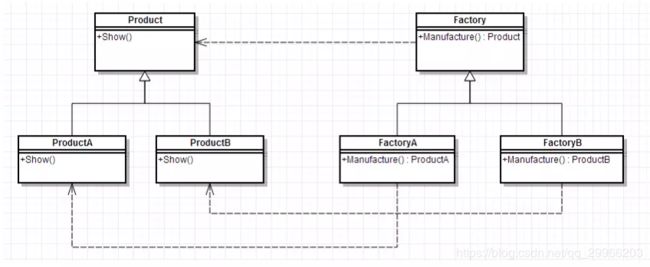
定义一个用于创建对象的公共接口(工厂类),将类的实例化(具体产品的创建)延迟到工厂类的子类(具体工厂)中完成,即让子类决定实例化哪个类。
适用于生成复杂对象时,可将多个产品的共性抽取出来,利用工厂方法生产具体需要的产品。
工厂模式通过依赖抽象达到解耦的目的,拥有较好的扩展性。 - 原理
UML类图

模式角色
| 组成(角色 | 关系 | 作用 |
|---|---|---|
| 抽象产品(Product) | 具体产品的父类 | 描述产品的公共接口 |
| 具体产品(Concrete Product) | 抽象产品的子类;工厂类创建的目标类 | 描述生产的具体产品 |
| 工厂(Factory) | 被外界调用 | 根据传入不同参数从而创建不同具体产品类的实例 |
| 具体工厂(Concrete Creator) | 抽象工厂的子类;被外界调用 | 描述具体工厂;实现FactoryMethod工厂方法创建产品的实例 |
模式讲解
- 创建抽象工厂类,定义具体工厂的公共接口;
- 创建抽象产品类 ,定义具体产品的公共接口;
- 创建具体产品类(继承抽象产品类) & 定义生产的具体产品;
- 创建具体工厂类(继承抽象工厂类),定义创建对应具体产品实例的方法;
- 外界通过调用具体工厂类的方法,从而创建不同具体产品类的实例
- 实现
工厂方法模式的实现主要是根据具体的实际情况来将多个产品的共性抽象出来,并定制具体的产品类,然后用工厂类来根据需要生产具体的产品类。
抽象产品类
public abstract class Product {

    /**
     * 产品类的抽象方法,由具体的产品类去实现
     */
    public abstract void method();
}
具体产品类
//产品A
public class ProductA extends Product {

    @Override
    public void method() {
        System.out.println("产品A");
    }
}

//产品B
public class ProductB extends Product {

    @Override
    public void method() {
        System.out.println("产品B");
    }
}
抽象工厂
public abstract class Factory {

    /**
     * @param clz 产品对象类型
     * @return 具体的产品类型
     */
    public abstract <T extends Product> T createProduct(Class<T> clz);
}
具体工厂
采用了反射的方式来实现生产具体的产品对象,这样更加简洁,不用为每一个产品都创建一个具体的工厂。
public class ConcreteFactory extends Factory {

    @Override
    public <T extends Product> T createProduct(Class<T> clz) {
        Product p = null;
        try {
            p = (Product) Class.forName(clz.getName()).newInstance();

        }catch (Exception e) {
            e.printStackTrace();
        }

        return (T) p;
    }
}
调用
Factory factory = new ConcreteFactory();
Product productA = factory.createProduct(ProductA.class);
Product productB = factory.createProduct(ProductB.class);
productA.method();
productB.method();
- Android中应用
Android 中数据持久化为我们提供了SharePreference和SQLite,还有普通的文件存储等方式。但是对数据的操作都是增删改查,可以把这些共同的操作抽象出来作为抽象产品类,然后每一种持久化方法作为具体产品。
抽象产品中定义操作的方法,即增删改查
public abstract class AbstractIoHandler {

    /**
     * 添加个人信息
     *
     * @param id 身份证号码
     * @param name 姓名
     */
    public abstract void add(String id, String name);

    /**
     * 根据ID删除一条信息
     *
     * @param id 身份证
     */
    public abstract void remove(String id);

    /**
     * 更新个人信息
     *
     * @param id 身份证
     * @param name 姓名
     */
    public abstract void update(String id, String name);

    /**
     * 查询ID对应的信息
     *
     * @param id 身份证
     * @return 人名
     */
    public abstract String query(String id);

}
具体的产品,持久化的类型,比如利用文件来持久化
public class FileHandler extends AbstractIoHandler {

    @Override
    public void add(String id, String name){
        //业务处理
    }

    @Override
    public void remove(String id) {
        //业务处理
    }

    @Override
    public void update(String id, String name) {
        //业务处理
    }

    @Override
    public String query(String id) {
        return "";
    }
}
工厂方法,这里仍然采用反射的方式
public class IoFactory {

    /**
     * 获取IoHandler
     *
     * @param clz AbstractIoHandler类型的类
     * @return AbstractIoHandler对象
     */
    public static <T extends AbstractIoHandler> T getIoHandler(Class<T> clz) {
        AbstractIoHandler handler = null;
        try {
            handler = (AbstractIoHandler) Class.forName(clz.getName()).newInstance();
        } catch (Exception e) {
            e.printStackTrace();
        }

        return (T) handler;
    }
}
在需要进行数据持久化的地方调用工厂方法
AbstractIoHandler ioHandler = IoFactory.getIoHandler(FileHandler.class);
System.out.println(ioHandler.query("123456"));
- 适配器模式
| 角色 | 说明 | 实例(ListView) |
|---|---|---|
| 目标角色(Target) | 期待得到的接口 | BaseAdapter |
| 源角色(Adaptee) | 需要适配的接口 | List data |
| 适配器(Adapter) | 适配器模式的核心,适配器将源接口转换成目标接口 | 自定义Adapter |
- 实现
将需要被适配的对象Adaptee传递到适配器Adapter中,实现目标的接口ITarget,并在内部进行接口的转换。
举例1:Android中ListView及自定义BaseAdapter适配器
- 自定义Customer的model类
- 自定义CustomerAdapter继承Adapter
public class CustomAdapter extends BaseAdapter {
    private ArrayList<Custom> aData;
    private Context mContext;

    public CustomAdapter(LinkedList<Custom> aData,Context mContext){
        this.aData = aData;
        this.mContext = mContext;
    }
    @Override
    public int getCount(){
        return aData.size();
    }
    @Override
    public  Object getItem(int position){
        return null;
    }
    @Override
    public long getItemId(int position){
        return position;
    }

    @Override
    public View getView(int position, View convertView, ViewGroup parent){
        ViewHolder holder = null;
        if (convertView==null){
            convertView = LayoutInflater.from(mContext).inflate(R.layout.list_item,parent,false);
            holder = new ViewHolder();
            holder.imageView = (ImageView)convertView.findViewById(R.id.imgtou);
            holder.nameTextView = (TextView)convertView.findViewById(R.id.name);
            convertView.setTag(holder);
        }else {
            holder = (ViewHolder)convertView.getTag();
        }
        holder.imageView.setBackgroundResource(aData.get(position).getaIcon());
        holder.nameTextView.setText(aData.get(position).getaName());
        return convertView;
    }
    static class ViewHolder{
        ImageView imageView;
        TextView nameTextView;
    }

}
- 自定义list_item.xml文件item布局文件
- 使用
ListView list_test = (ListView) findViewById(R.id.listview);
list_test.setAdapter(new CustomAdapter((LinkedList<Custom>)aData,LoginActivity.this));
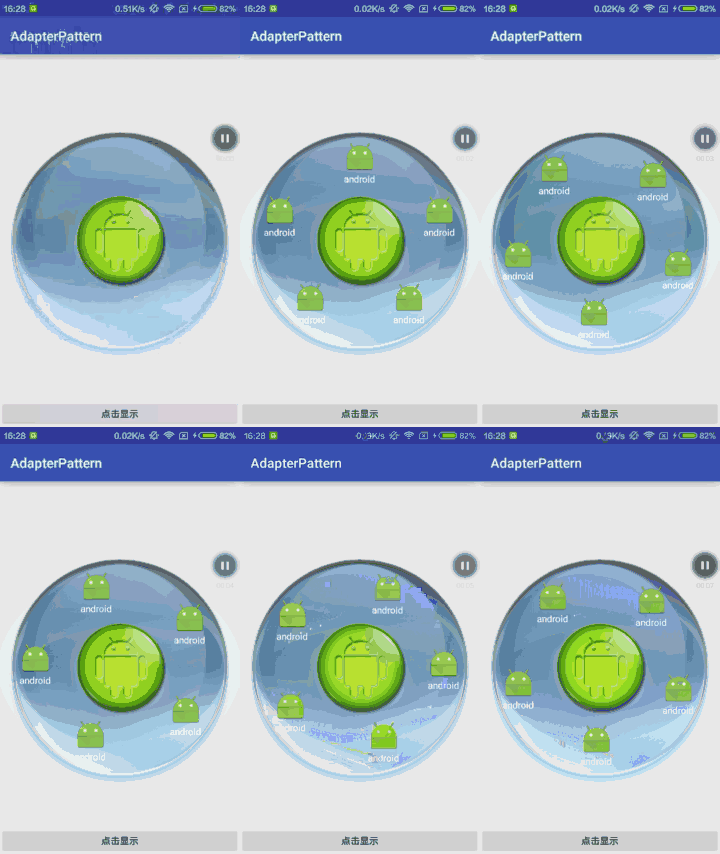
举例2:实现Android一个转盘效果的容器ViewGroup
这个例子就是典型的“需要统一的输出接口,而输入端的类型不可预知”情形,需要输出的是一个个 View ,而输入的数据是未知的。原先的处理方式是使用动态 addChild 的方式添加子 View,然后使用removeChild 方法删除子 View。
使用这种方式会造成外部对子 View 的操纵很繁琐,换位思考一下,如果 ListView 需要以 addView 和 removeView 的方式去处理,那是极其头疼的,所以现在我们可以换一种思维进行改进,学习 ListView 的 Adapter 思想,我们也使用适配器的方式进行处理。
可以通过直接继承BaseAdapter,每次数据源发生变更,则重新绘制布局。
/**
 * 设置适配器
 * @param adapter
 */
public void setAdapter(BaseAdapter adapter) throws NumberOverFlowException {
    this.adapter = adapter;
    if (adapter.getCount() > MAX_NUM) {
        throw new NumberOverFlowException(adapter.getCount());
    }
    adapter.registerDataSetObserver(new DataSetObserver() {
        @Override
        public void onChanged() {
            super.onChanged();
            onDataSetChanged();
        }

        @Override
        public void onInvalidated() {
            super.onInvalidated();
            onDataSetChanged();
        }
    });
    initChild();
}

/**
 * 数据源发生变更,需要重新绘制布局
 */
private void onDataSetChanged(){
    initChild();
}
...
private void initChild() {
    removeAllViews();
    location.clear();

    for (int i=0; i < adapter.getCount(); i++) {
        //每次添加子view的时候都要重新计算location数组
        location.add(new FloatWithFlag());
        TurnPlateViewUtil.getLocationByNum(location);
        View view = adapter.getView(i, null, this);
        view.setTag(i);
        view.setOnClickListener(new OnClickListener() {

            @Override
            public void onClick(View arg0) {
                listener.onClick((String)arg0.getTag());
            }
        });
        view.setOnLongClickListener(new OnLongClickListener() {

            @Override
            public boolean onLongClick(View arg0) {
                initPopUpWindow();
                window.showAsDropDown(arg0);
                viewIsBeingLongClick = arg0;
                return false;
            }
        });
        addView(view);
    }
}
外部使用时直接继承 BaseAdapter 类,然后在对应方法中返回对应 View 即可,这样就实现了“不同的输入,同样的输出”
private class TurnPlateViewAdapter extends BaseAdapter{

    @Override
    public int getCount() {
        return 5;
    }

    @Override
    public Object getItem(int position) {
        return null;
    }

    @Override
    public long getItemId(int position) {
        return 0;
    }

    @Override
    public View getView(int position, View convertView, ViewGroup parent) {
        final Drawable drawable = getResources().getDrawable(R.mipmap.ic_launcher);
        drawable.setBounds(0, 0,drawable.getMinimumHeight() , drawable.getMinimumHeight());
        TextView textview = new TextView(MainActivity.this);
        textview.setTextColor(getResources().getColor(android.R.color.white));
        textview.setText(R.string.text);
        textview.setCompoundDrawables(null, drawable, null, null);
        textview.setTag(tag++ +"");
        return textview;
    }
}
这样,外部修改输入数据之后,通知 adapter 数据源变更,因为已经注册观察者,所以 TurnplateView 自然而然可以收到通知,并且刷新界面.

- Android中应用
最常见的ListView、GridView、RecyclerView等的Adapter。
我们在使用ListView时,每一项的布局和数据都不一样,但是最后输出都可以看作是一个View,这就对应了上面的适配器模式应用场景的第三条:需要一个统一的输出接口,而输入端的接口不可预知。下面我们来看看ListView中的适配器模式。
ListView通过引入Adapter适配器类把那些多变的布局和数据交给用户处理,然后通过适配器中的接口获取需要的数据来完成自己的功能,从而达到了很好的灵活性。这里面最重要的接口莫过于getView()接口了,该接口返回一个View对象,而千变万化的UI视图都是View的子类,通过这样一种处理就将子View的变化隔离了,保证了AbsListView类族的高度可定制化。
ListView的父类AbsListView中有ListAdapter接口,通过这个接口来调用getCount()、getView()等方法获取View的数量,布局等等
public abstract class AbsListView extends AdapterView<ListAdapter> implements TextWatcher,
        ViewTreeObserver.OnGlobalLayoutListener, Filter.FilterListener,
        ViewTreeObserver.OnTouchModeChangeListener,
        RemoteViewsAdapter.RemoteAdapterConnectionCallback {

    /**
     * The adapter containing the data to be displayed by this view
     */
    ListAdapter mAdapter;

    @Override
    protected void onAttachedToWindow() {
        super.onAttachedToWindow();

        final ViewTreeObserver treeObserver = getViewTreeObserver();
        treeObserver.addOnTouchModeChangeListener(this);
        if (mTextFilterEnabled && mPopup != null && !mGlobalLayoutListenerAddedFilter) {
            treeObserver.addOnGlobalLayoutListener(this);
        }

        if (mAdapter != null && mDataSetObserver == null) {
            mDataSetObserver = new AdapterDataSetObserver();
            mAdapter.registerDataSetObserver(mDataSetObserver);

            // Data may have changed while we were detached. Refresh.
            mDataChanged = true;
            mOldItemCount = mItemCount;

            //通过getCount()获取View元素的个数
            mItemCount = mAdapter.getCount();
        }
        ...
    }
}
- 代理模式
| 角色 | 说明 |
|---|---|
| 抽象对象 (Subject) | 声明了真实对象和代理对象的公共接口 |
| 真实对象(RealSubject) | 代理对象所代表的真实对象,最终引用的对象 |
| 代理对象(Proxy) | 包含对真实对象的引用从而操作真实主题对象,相当于对真实对象进行封装 |
- 实现
- 代理类和被代理类都要继承或实现相同的接口或方法
- 代理类通过被代理类的引用来调用具体的业务逻辑
- Android应用
如Android源码中的ActivityManagerProxy代理ActivityManagerService类
举例:通过适配不同API版本下发送消息Notification来应用代理模式
步骤1:定义抽象主题类Notify
public abstract class Notify {
    protected Context context;
    protected NotificationManager notificationManager;
    protected NotificationCompat.Builder builder;

    public Notify(Context context) {
        this.context = context;
        notificationManager = (NotificationManager) context.getSystemService(Context.NOTIFICATION_SERVICE);
        builder = new NotificationCompat.Builder(context);
        builder.setSmallIcon(R.drawable.ic_launcher)
                .setContentIntent(PendingIntent.getActivity(context, 0,
                        new Intent(context, NotifyActivity.class),
                        PendingIntent.FLAG_UPDATE_CURRENT));
    }

    /**
     * 发送一条通知
     */
    public abstract void send();

    /**
     * 取消一条通知
     */
    public abstract void cancel();
}
步骤2:定义真实主题类(被代理类)继承抽象主题类
常规的通知的构建
public class NotifyNormal extends Notify {

    public NotifyNormal(Context context) {
        super(context);
    }

    @Override
    public void send() {
        builder.setContent(new RemoteViews(context.getPackageName(), R.layout.layout_notify_normal));
        Notification notification = builder.build();
        notificationManager.notify(0, notification);
    }

    @Override
    public void cancel() {
        notificationManager.cancel(0);
    }
}
大视图的通知的构建
public class NotifyBig extends Notify {

    public NotifyBig (Context context) {
        super(context);
    }

    @Override
    public void send() {
        builder.setContent(new RemoteViews(context.getPackageName(), R.layout.layout_notify_normal));
        builder.setCustomBigContentView(new RemoteViews(context.getPackageName(), R.layout.layout_notify_normal));
        Notification notification = builder.build();
        notificationManager.notify(0, notification);
    }

    @Override
    public void cancel() {
        notificationManager.cancel(0);
    }
}
浮动展示的通知的构建
public class NotifyHeadersUp extends Notify {

    public NotifyHeadersUp (Context context) {
        super(context);
    }

    @Override
    public void send() {
        builder.setContent(new RemoteViews(context.getPackageName(), R.layout.layout_notify_normal));
        builder.setCustomBigContentView(new RemoteViews(context.getPackageName(), R.layout.layout_notify_normal));
        builder.setCustomHeadsUpContentView(new RemoteViews(context.getPackageName(), R.layout.layout_notify_normal));
        Notification notification = builder.build();
        notificationManager.notify(0, notification);
    }

    @Override
    public void cancel() {
        notificationManager.cancel(0);
    }
}
步骤3:定义代理类继承抽象主题类,引用具体代理类
public class NotifyProxy extends Notify {
	// 引用真实主题类(被代理类)
	// 根据场景决定具体代理类
    private Notify notify;

    public NotifyProxy (Context context) {
        super(context);

        if (Build.VERSION.SDK_INT >= Build.VERSION_CODES.LOLLIPOP) {
            notify = new NotifyHeadersUp(context);
        } else if (Build.VERSION.SDK_INT >= Build.VERSION_CODES.KITKAT) {
            notify = new NotifyBig(context);
        } else {
            notify = new NotifyNormal(context);
        }
    }
    // 复写父类方法,并调用具体代理类的父类方法
    @Override
    public void send() {
        notify.send();
    }

    @Override
    public void cancel() {
        notify.cancel();
    }
}
步骤4:调用代理类的实现方法
new NotifyProxy(MainActivity.this).send();
- 外观模式
- 介绍
外观模式隐藏系统实现的复杂性,并向外部提供了一个可以访问系统的统一接口。 - 原理
| 角色 | 说明 |
|---|---|
| 外观接口/类 | |
| 其他内部子系统 |
- 实现
主要是把所有需要对外暴露的方法都统一在外观接口或类里面,隐藏其他的子模块。关键在于对子系统接口的封装。 - Android中应用
- 很多的第三方SDK,比如友盟统计
- 我们平时开发过程中封装的模块,比如网络模块、ImageLoader模块等
public class ImageLoader {
    //图片加载配置
    ImageLoaderConfig mConfig;

    // 图片缓存,依赖接口
    ImageCache mImageCache = new MemoryCache();

    //请求队列
    private RequestQueue requestQueue;

    private static ImageLoader mImageLoader = null;
    private ImageLoader () {}

    public static ImageLoader getInstance() {
        //省略单例实现
    }

    public void init(ImageLoaderConfig config) {
        mConfig = config;
        mImageCache = config.mImageCache;
        checkConfig();

        requestQueue = new RequestQueue(config.threadCount);
        requestQueue.start();
    }

    private void checkConfig() {
        //省略部分代码
    }

    public ImageLoaderConfig getConfig() {
        return mConfig;
    }

    public void displayImage(final ImageView imageView, String url) {
        displayImage(imageView, url, null);
    }

    public void displayImage(final ImageView imageView, String url, DisplayConfig config) {
        ImageRequest request = new ImageRequest(imageView, url, config);
        request.displayConfig = request.displayConfig != null ? request.displayConfig : mConfig.displayConfig;
        requestQueue.addRequest(request);
    }

}
ImageLoader类里面封装了配置类ImageLoaderConfig和请求队列RequestQueue。请求队列RequestQueue里面又封装了线程模型等
调用ImageLoader的init方法以后,用户就可以直接用display方法来加载显示图片了,而不用管网络请求、队列这些细节
所有的实现细节都被封装在ImageLoader类下面,用户只需要操作ImageLoader的接口就可以完成图片的加载操作,这样就避免暴露了过多的实现细节,而且用户使用起来也更加简单
- 装饰模式
- 介绍
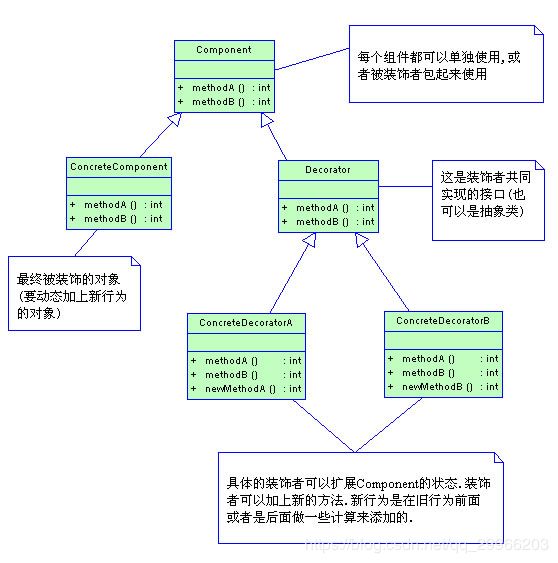
动态的给一个对象添加一些额外的职责。就增加功能来说,装饰模式比生成子类更为灵活。
适用于需要透明且动态地扩展类的功能。装饰器透明的实现就是跟被装饰对象的接口一致,不添加新的接口。 - 原理
UML类图

角色
| 角色 | 说明 |
|---|---|
| 抽象组件 | 可以是抽象类或接口,是被装饰类的原始对象 |
| 组件具体实现类 | 该类是抽象组件的具体实现,也是我们装饰的具体对象 |
| 抽象装饰者 | 为了装饰我们的组件对象,其内部一定要有一个指向组件对象的引用。在大多数情况下,该类为抽象类,需要根据不同的装饰逻辑实现不同的子类。如果装饰逻辑单一,只有一个的情况下我们可以省略该类直接作为具体的装饰者 |
| 具体的装饰者 | 对抽象装饰做具体的实现 |
- 实现
装饰模式通过在被装饰组件的方法执行之前或之后加入新的方法来实现功能的扩展 - Android中应用
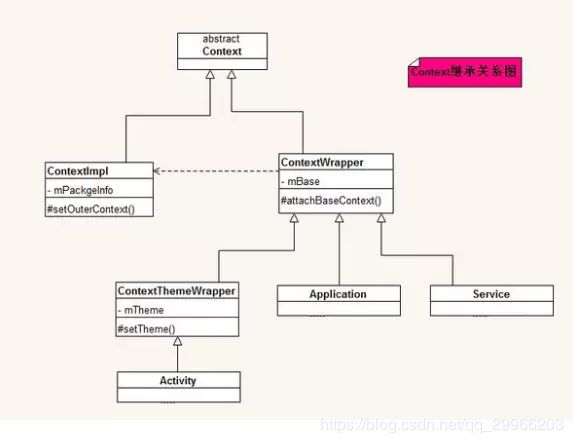
Android源码中的ContextWrapper
Activity,Service,Application都是ContextWrapper的子类。ContextWrapper里面有一个Context类型的成员变量mBase,当然它实际的类型是ContextImpl。ContextWrapper实现方法的时候调用了mBase的方法。

public class ContextWrapper extends Context {
    Context mBase;

    public ContextWrapper(Context base) {
        mBase = base;
    }

    /**
     * Set the base context for this ContextWrapper.  All calls will then be
     * delegated to the base context.  Throws
     * IllegalStateException if a base context has already been set.
     *
     * @param base The new base context for this wrapper.
     */
    protected void attachBaseContext(Context base) {
        if (mBase != null) {
            throw new IllegalStateException("Base context already set");
        }
        mBase = base;
    }

    /**
     * @return the base context as set by the constructor or setBaseContext
     */
    public Context getBaseContext() {
        return mBase;
    }

    @Override
    public AssetManager getAssets() {
        return mBase.getAssets();
    }

    @Override
    public Resources getResources()
    {
        return mBase.getResources();
    }

    @Override
    public PackageManager getPackageManager() {
        return mBase.getPackageManager();
    }

    @Override
    public ContentResolver getContentResolver() {
        return mBase.getContentResolver();
    }

    @Override
    public Looper getMainLooper() {
        return mBase.getMainLooper();
    }
使用装饰者模式优势
(1)避免代码重复,将一些通用的方法如starActivity()放到ContextImpl中,避免Activity,Application,Service中重复代码。
(2)版本兼容,比如现在starActivity()等具有两种不同的实现。可以根据传入的具体类进行调用。比如增加一个ContextImplA,思考传统的类的实现方式和修饰者模式
- 观察者模式
| 角色 | 说明 |
|---|---|
| 抽象主题/被观察者(Observable) | 抽象主题把所有的观察者对象的引用保存在一个集合里,每个主题可以有任意数量的观察者,抽象主题提供接口,可以增加和删除观察者对象 |
| 具体的主题(具体的被观察者) | 也就是抽象主题的子类,该角色将有关状态存入具体观察者对象,在具体主题内部状态发生改变时,通知所有注册过的观察者 |
| 抽象观察者 | 观察者的抽象类,定义了一个更新的接口 |
| 具体的观察者 | 实现了抽象观察者的更新接口,在被观察者状态发生变化时更新自身的状态 |
- 实现
步骤1:创建Subject类(被观察者)
public class Subject {
   // 用ArrayList存储观察者
   private List<Observer> observers = new ArrayList<Observer>();
   private int state;

   public int getState() {
      return state;
   }

   public void setState(int state) {
   //状态改变时,通知所有观察者
      this.state = state;
      notifyAllObservers();
   }

   public void attach(Observer observer){
      observers.add(observer);
   }

   public void notifyAllObservers(){
   //遍历观察者列表,通知每一个观察者
      for (Observer observer : observers) {
         observer.update();
      }
   }
}
步骤2:创建Observer类(抽象观察者)
public abstract class Observer {
   protected Subject subject;	// 实例化被观察对象
   public abstract void update();
}
步骤3:创建实体观察者
1、BinaryObserver.java
public class BinaryObserver extends Observer{

   public BinaryObserver(Subject subject){
      this.subject = subject;
      this.subject.attach(this);
   }

   @Override
   public void update() {
      System.out.println( "Binary String: "
      + Integer.toBinaryString( subject.getState() ) );
   }
}
2、OctalObserver.java
public class OctalObserver extends Observer{

   public OctalObserver(Subject subject){
      this.subject = subject;
      this.subject.attach(this);
   }

   @Override
   public void update() {
     System.out.println( "Octal String: "
     + Integer.toOctalString( subject.getState() ) );
   }
}
3、HexaObserver.java
public class HexaObserver extends Observer{

   public HexaObserver(Subject subject){
      this.subject = subject;
      this.subject.attach(this);
   }

   @Override
   public void update() {
      System.out.println( "Hex String: "
      + Integer.toHexString( subject.getState() ).toUpperCase() );
   }
}
步骤4:使用
public class ObserverPatternDemo {
   public static void main(String[] args) {
      Subject subject = new Subject();

      new HexaObserver(subject);
      new OctalObserver(subject);
      new BinaryObserver(subject);

      System.out.println("First state change: 15");
      subject.setState(15);
      System.out.println("Second state change: 10");
      subject.setState(10);
   }
}
- Android中应用
- 常见的发布-订阅模式
- ListView的Adapter的notifyDataSetChanged更新方法
- BroadcastReceiver
- 开源库EventBus
- RxJava
- 策略模式
策略模式定义了一系列算法,并将每一个算法封装起来,而且使它们可以相互替换。策略模式让算法独立于使用它的客户端而独立变化。 - 状态模式
在状态模式中,类的行为是基于它的状态改变的。对象在于不同的状态下对于同一行为有不同的响应。
- 《Android源码设计模式解析与实战》
- 菜鸟教程


