cocos2dx学习之路----第二篇(相关概念类介绍及HelloWorld分析)
这篇我们来分析一下关于cocos2d-x中的HelloWorld究竟是如何在win32平台上实现运行的。
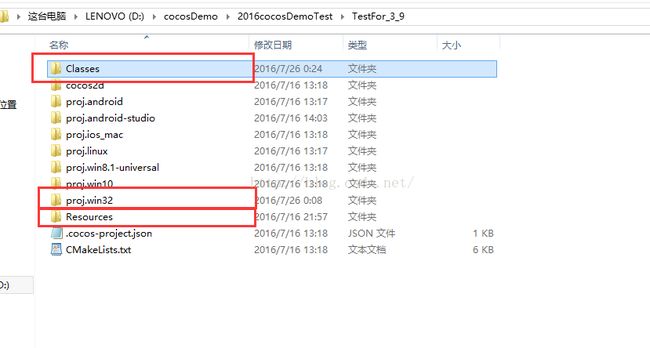
还记得上一篇创建的工程吗?进入上一篇所创建的TestFor_3_9的项目的目录,来看看该工程的目录结构:
在win32平台开发我们关心的主要是Classes、proj.win32和Resource这三个文件夹。当然,还有其它文件如cocos2d是源代码相关的文件,还有存放其它平台的项目文件夹,均以"proj."开头。下面的两个是配置问件,可以不用去了解它。
好,现在来看看主要的三个文件夹里分别有什么?
Classes文件夹:存放所有跨平台的类,所以以后创建类的时候都需要放在这里;
此时有两个类:HelloWorld和Appdelegate这两个类文件:
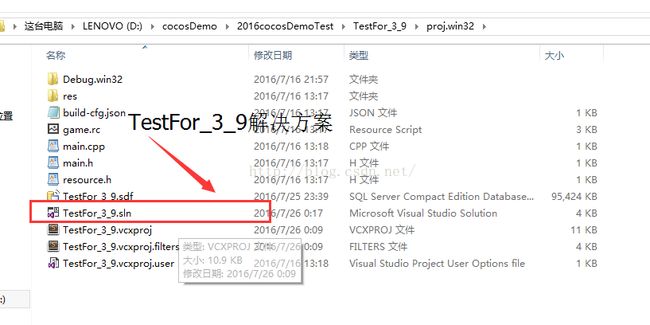
proj.win32文件夹:里面就是工程的编译文件了;
Resource文件夹:存放所有的资源文件
好了,然后打开解决方案,启动调试,,最后会出现如下结果:
Ok,以上只是对上节课进行简单回顾以及对项目目录的的了解。下面就进入正题吧~
在解析HelloWorld之前,我们需要明白cocos2d-x中的几个概念性的类:
1.节点类(Node);
2.场景类(Scene);
3.导演类(Director);
4.图层类(Layer);
5.精灵类(Sprite);
。。。
还有很多,不过以上的几个是基本的类,理解了它们,就已经对cocos2d-x的内容掌握了一半了。(哈哈,虽然我也没说我全掌握,但是至少在做项目的时候都必须要用到它们,这些类是非常的重要的!!!因为重要,所以写得会详细一点,如果觉得有点懵比也没关系,先在脑子里过一遍,留个印象,到时候用到了理解起来就会好一些~)
好,下面我们一个个来分析:
节点类(Node):
它是我们场景绘制对象的基本的元素,所有的场景绘制的对象都要基于节点来完成。也就是所有的场景对象都是节点或是它的子类。常见的一些节点对象有:场景(Scene)、图层(Layer)、精灵(Sprite)、菜单(Menu)等等。
那节点有什么特性呢?首先,节点与节点之间可以相互操作,比如在节点上添加另外一个节点(addChild),或是移除节点(removeChild),也可以通过它来获取它的子节点或父节点(getChildByTag、getParent)等等;
节点有自己的调度器(schedule),那什么是调度器呢?简单的说就是定时器;其次,节点可以进行执行动作(runAction),这到后面再说,记住就行了。
往往继承节点可以选择重写一下以下的方法:
~重写初始化方法(init)
~重写一些事件回调的方法,可以理解为它的生命周期
~重写绘制节点的方法(draw)
节点的属性(Properties):
~位置(position)--默认为(0,0)
~缩放(scale)--默认为(1,1)
~旋转(rotation)--默认为0,顺时针方向角度增加
~锚点(arthorPoint)--默认为(0,0)
~可见性(visible)--默认为可见
节点是一个空的对象,可以看作一个点,如果想要显示节点,可以通过重写绘制节点的方法或是直接用精灵类创建。
关于节点,就说到这里,如果很多不理解的可以忽略哈~先好好消化理解理解先。
场景类(Scene):
该类是节点类的子类,它是一个抽象的概念,场景类和节点类基本没什么不同,唯一不同的是场景类的锚点为屏幕的中心点。目前场景类没什么其它的逻辑,可能以后在释放方面会对它进行额外的处理。对于游戏,我们基本上都是想创建出一个场景,再对场景中添加一些实体对象等等的操作。所以,让场景作为所有节点的父节点,这将会是一个好的习惯。场景会为你创建一个默认的摄像机(Camera)。至于摄像机,这里就暂时不多讲。ok,场景的介绍就这么多。来看看下一个类~
导演类(Director):
这个类是创建和控制主窗口并且管理怎么和什么时候执行场景。
创建主窗口实质上就是对Opengl进行一定的初始化并设置一些相关的content 特性及投影相关的信息,投影属性默认为3D。它也是一个单例类,通过:Director::getInstance()->methodName();来调用其中的成员方法。
图层类(Layer):
这个类也很简单,它也是Node类的子类,所以Node类相关的在Layer类里面都是有效的。除了这些,它还扩展了如下方法:
~实现移动设备的触摸
~实现重力感应
精灵类(Sprite):
这个类也是继承Node类的,它特别的部分就是它是一张2D的图片。它可以用一张图片来创建,创建出来的可以是完整的图片或是图片的一部分。默认的锚点为(0,0)。
以上就是一些基本的类就介绍,毕竟还有很多很多没讲,不过基本上都是基于以上这些继承和定义的。大家也可以看看它的源码~
这里来个小插曲哈~下面基本上是对代码进行分析,所以,首先你需要找到它们的位置。在找到之后,可以不急着看解析,先自己研究研究。既然是研究自然是多少有点收获的,然后带着问题来看下面的分析或是解释会对学习很有帮助。当然,这只是个人的见解罢了,每个人都有自己不同的学习习惯和方式哈~好了,话不多说,继续吧~
现在我们来捋一捋HelloWorld的运行机制。
我们都知道,基本程序运行的入口都是main函数,所以我们就先看到项目中win32文件夹中的main.cpp:
#include "main.h"
#include "AppDelegate.h"
#include "cocos2d.h"

USING_NS_CC;

int APIENTRY _tWinMain(HINSTANCE hInstance,
                       HINSTANCE hPrevInstance,
                       LPTSTR    lpCmdLine,
                       int       nCmdShow)
{
    UNREFERENCED_PARAMETER(hPrevInstance);
    UNREFERENCED_PARAMETER(lpCmdLine);

    // create the application instance
    AppDelegate app;
    return Application::getInstance()->run();
}Application* Application::getInstance()
{
CC_ASSERT(sm_pSharedApplication);
return sm_pSharedApplication;
}Application * Application::sm_pSharedApplication = 0;Application::Application()
: _instance(nullptr)
, _accelTable(nullptr)
{
_instance = GetModuleHandle(nullptr);
_animationInterval.QuadPart = 0;
CC_ASSERT(! sm_pSharedApplication);
sm_pSharedApplication = this;
}
好,对于
run()方法点击选中,右键转到定义找到下面这段:
int Application::run()
{
    ...
    // Initialize instance and cocos2d.
    if (!applicationDidFinishLaunching())
    {
        return 1;
    }
    ...
    return 0;
}
其它的不多看,就这段我们会发现applicationDidFinishLaunching()这个方法被调用了,而这个方法是AppDelegate中的成员方法,所以当run()的时候这个方法被调用,对于这个方法,我们看到AppDelegate.cpp中来看它实现:
bool AppDelegate::applicationDidFinishLaunching() {
    // 初始化导演类,并创建出窗口
    auto director = Director::getInstance();
    auto glview = director->getOpenGLView();
    if(!glview) {
#if (CC_TARGET_PLATFORM == CC_PLATFORM_WIN32) || (CC_TARGET_PLATFORM == CC_PLATFORM_MAC) || (CC_TARGET_PLATFORM == CC_PLATFORM_LINUX)
        glview = GLViewImpl::createWithRect("hello3.9", Rect(0, 0, designResolutionSize.width, designResolutionSize.height));
#else
        glview = GLViewImpl::create("hello3.9");
#endif
        director->setOpenGLView(glview);
    }

    // 这里是帧率的显示,也就是窗口左下角的一些信息,如果设置为false,则左下角的数字便会消失
    director->setDisplayStats(true);
    //这里是设置渲染帧率,此时每秒60帧
    director->setAnimationInterval(1.0 / 60);

    // Set the design resolution
    glview->setDesignResolutionSize(designResolutionSize.width, designResolutionSize.height, ResolutionPolicy::NO_BORDER);
    Size frameSize = glview->getFrameSize();
    // if the frame's height is larger than the height of medium size.
    if (frameSize.height > mediumResolutionSize.height)
    {
        director->setContentScaleFactor(MIN(largeResolutionSize.height/designResolutionSize.height, largeResolutionSize.width/designResolutionSize.width));
    }
    // if the frame's height is larger than the height of small size.
    else if (frameSize.height > smallResolutionSize.height)
    {
        director->setContentScaleFactor(MIN(mediumResolutionSize.height/designResolutionSize.height, mediumResolutionSize.width/designResolutionSize.width));
    }
    // if the frame's height is smaller than the height of medium size.
    else
    {
        director->setContentScaleFactor(MIN(smallResolutionSize.height/designResolutionSize.height, smallResolutionSize.width/designResolutionSize.width));
    }

    register_all_packages();

    // 在这里调用HelloWorld场景的创建
    auto scene = HelloWorld::createScene();

    // 在这里运行场景
    director->runWithScene(scene);

    return true;
}好了,基本上这个过程就是最开始的入口了。我们来回顾一下:
~先定义出一个AppDelegate的实例出来
~当调用run()方法的时候会调用到它的applicationDidFinishLaunching()这个方法
~在applicationDidFinishLaunching()这个方法中进行了导演类和窗口的初始化工作
~最后在通过导演类运行HelloWorld场景
这样,一个场景就这么被运行起来了。
现在,我们终于可以来看看我们的HelloWorld类的具体实现了~
首先看到HelloWorld.h头文件:
#ifndef __HELLOWORLD_SCENE_H__
#define __HELLOWORLD_SCENE_H__

#include "cocos2d.h"

class HelloWorld : public cocos2d::Layer
{
public:
    static cocos2d::Scene* createScene();
    virtual bool init();
    // a selector callback
    void menuCloseCallback(cocos2d::Ref* pSender);
    // implement the "static create()" method manually
    CREATE_FUNC(HelloWorld);
};
#endif // __HELLOWORLD_SCENE_H__
这是一个HelloWorld类,继承Layer,也就是说HelloWorld是一个层!
然后这里有函数声明和一个宏定义:
  static cocos2d::Scene* createScene(); //这句是实现一个静态方法,将返回一个场景
  virtual bool init(); 			//这句是重写了init方法,可以在这里实现一些初始化工作
  void menuCloseCallback(cocos2d::Ref* pSender);//这是一个回调函数
下面来看看这个CREATE_FUNC();它是个宏,光标放在这处,右键转到定义如下:
#define CREATE_FUNC(__TYPE__) \
static __TYPE__* create() \
{ \
    __TYPE__ *pRet = new(std::nothrow) __TYPE__(); \
    if (pRet && pRet->init()) \
    { \
        pRet->autorelease(); \
        return pRet; \
    } \
    else \
    { \
        delete pRet; \
        pRet = nullptr; \
        return nullptr; \
    } \
}
就是实现了create()这个静态方法。这个方法里实现了__TYPE__的实例化并调用了其init()方法。
如果把__TYPE__替换成HelloWorld类名也就是实现了HelloWorld层的创建。
这要就说明了,一旦create,那么就会执行其init()方法。而init()里面就是我们写代码的地方了。
再来看看HelloWorld.cpp怎么来实现这些定义的方法:
#include "HelloWorldScene.h"
USING_NS_CC;
Scene* HelloWorld::createScene()
{
    // 这里的create真是和上面的CRATE_FUNC宏里面实现的一样,创建一个场景
    auto scene = Scene::create();
    // 调用HelloWorld层的create函数创建,也就是在.h中宏的调用
    auto layer = HelloWorld::create();
    // 然后在这个场景中把这个HelloWorld层加进来
    scene->addChild(layer);
    //返回这个场景
    return scene;
}

// 这里就是初始化函数实现了
bool HelloWorld::init()
{
    //////////////////////////////
    //这里会需要调用一下父类的init(),以保证层的正常创建,如果初始化失败,返回false
    if ( !Layer::init() )
    {
        return false;
    }
//得到屏幕大小和坐标位置
    Size visibleSize = Director::getInstance()->getVisibleSize();
    Vec2 origin = Director::getInstance()->getVisibleOrigin();

    /////////////////////////////
    // 这里添加一个菜单,也就是左下角的按钮
//这里需要说明的是,菜单需要先创建,然后再创建菜单条目,最后再把菜单条目添加到菜单中

    // 添加菜单条目(菜单条目的类型有多种创建方式,这里就不一一列举,一下是MenuItemImage,即图片菜单条目的创建)
//这里有三个参数,第一个是正常状态,也就是未被点击的时候,第二个是被选择状态,第三个调用的方法,此时是调用menuCloseCallback这个方法
    auto closeItem = MenuItemImage::create(
                                           "CloseNormal.png",
                                           "CloseSelected.png",
                                           CC_CALLBACK_1(HelloWorld::menuCloseCallback, this));
    //为菜单条目设置位置
closeItem->setPosition(Vec2(origin.x + visibleSize.width - closeItem->getContentSize().width/2 ,
                                origin.y + closeItem->getContentSize().height/2));

    // 菜单的创建
    auto menu = Menu::create(closeItem, NULL);
    menu->setPosition(Vec2::ZERO);
//把菜单添加到HelloWorld这个层中
    this->addChild(menu, 1);

    /////////////////////////////
    // HelloWorld场景中还有一个Label,也就是标签,标签的创建也有多种,这里是TTF标签
//这里有三个参数,第一个是显示的标签,第二个是字体格式,第三个是字体大小
    auto label = Label::createWithTTF("Hello World", "fonts/Marker Felt.ttf", 24);
    // 为标签设置位置
    label->setPosition(Vec2(origin.x + visibleSize.width/2,
                            origin.y + visibleSize.height - label->getContentSize().height));
    // 把标签添加到HelloWorld层中
    this->addChild(label, 1);
     /////////////////////////////////////
    // HelloWorld层中还有一张图片,图片由精灵创建
    auto sprite = Sprite::create("HelloWorld.png");
    // 为图片精灵设置位置
    sprite->setPosition(Vec2(visibleSize.width/2 + origin.x, visibleSize.height/2 + origin.y));
    //把图片精灵添加到HelloWorld层中
    this->addChild(sprite, 0);

    return true;
}

//这个是菜单条目回调函数,里面调用了退出这个应用程序的操作
void HelloWorld::menuCloseCallback(Ref* pSender)
{
    Director::getInstance()->end();

#if (CC_TARGET_PLATFORM == CC_PLATFORM_IOS)
    exit(0);
#endif
}
好了,这就是HelloWorld的全部代码分析。
关于Appdelegate.cpp中其它函数,我这里也来解释一下吧。
Appdelegate.cpp:
#include "AppDelegate.h"
#include "HelloWorldScene.h"//头文件包含,这个细节可不要忘记哦

USING_NS_CC;//使用cocos2dx的命名空间
static cocos2d::Size designResolutionSize = cocos2d::Size(480, 320);//窗口设计的大小
static cocos2d::Size smallResolutionSize = cocos2d::Size(480, 320);
static cocos2d::Size mediumResolutionSize = cocos2d::Size(1024, 768);
static cocos2d::Size largeResolutionSize = cocos2d::Size(2048, 1536);
AppDelegate::AppDelegate() {

}
AppDelegate::~AppDelegate()
{
}
//Opengl的一些文本属性
void AppDelegate::initGLContextAttrs()
{
    //set OpenGL context attributions,now can only set six attributions:
    //red,green,blue,alpha,depth,stencil
    GLContextAttrs glContextAttrs = {8, 8, 8, 8, 24, 8};

    GLView::setGLContextAttrs(glContextAttrs);
}
static int register_all_packages()
{
    return 0; //flag for packages manager
}


//程序进入后台时调用
void AppDelegate::applicationDidEnterBackground() {
    Director::getInstance()->stopAnimation();
    // SimpleAudioEngine::getInstance()->pauseBackgroundMusic();
}
// 程序恢复前台时调用
void AppDelegate::applicationWillEnterForeground() {
    Director::getInstance()->startAnimation();

    // if you use SimpleAudioEngine, it must resume here
    // SimpleAudioEngine::getInstance()->resumeBackgroundMusic();
}
这样,就把整个HelloWorld的运行过程给过了一遍。
写了挺多的,如果一开始不能接受这么多也不要紧,当时我也有想着把它能简单化,尽量简单化,但是写着写着又变多了,只能怪我暂时没有那么高的技巧能够以一种又简单,又明了的方式呈现给大家,希望不要介意,不过我也会好好努力的,这里我再提一点建议哈~
对于概念性的东西,就直接记住就行了,比如什么类有什么方法属性,因为这是框架,既然是框架,在我们使用之前有必要知道它基本的一些东西和能够做什么,就类来说,我们需要了解它的成员和成员方法。而对于运行的原理理解即可,因为我们在不需要修改框架的前提下是没必要知道它究竟是怎么去实现这些功能的。
好了,希望以上的讲解和建议会带给你收获~后面我会尽量使用例子来讲解的。


