opencv笔记三十四(基于分水岭变换的图像分割,核心操作:去噪声)watershed(t1, t4);t1为CV_8UC3, t4为CV_32SC1,元素为黑色背景为白色
API:(参考https://blog.csdn.net/qq_18343569/article/details/47972245)
distanceTransform函数
函数的作用:
主要用于计算非零像素到最近零像素点的最短距离。一般用于求解图像的骨骼
函数调用形式:
C++: void distanceTransform(InputArray src, OutputArray dst, int distanceType, int maskSize)
参数详解:
InputArray src:输入的图像,一般为二值图像
OutputArray dst:输出的图像
int distanceType:所用的求解距离的类型、
It can be DIST_L1, DIST_L2 , or DIST_C
mask_size 距离变换掩模的大小,可以是 3 或 5. 对 DIST_L1 或 DIST_C 的情况,参数值被强制设定为 3, 因为 3×3 mask 给出 5×5 mask 一样的结果,而且速度还更快。
mask
用户自定义距离情况下的 mask。 在 3×3 mask 下它由两个数(水平/垂直位量,对角线位移量)组成, 5×5 mask 下由三个数组成(水平/垂直位移量,对角位移和 国际象棋里的马步(马走日))
函数 cvDistTransform 二值图像每一个象素点到它最邻近零象素点的距离。对零象素,函数设置 0 距离,对其它象素,它寻找由基本位移(水平、垂直、对角线或knight's move,最后一项对 5×5 mask 有用)构成的最短路径。 全部的距离被认为是基本距离的和。由于距离函数是对称的,所有水平和垂直位移具有同样的代价 (表示为 a ), 所有的对角位移具有同样的代价 (表示为 b), 所有的 knight's 移动具有同样的代价 (表示为 c). 对类型 CV_DIST_C 和 CV_DIST_L1,距离的计算是精确的,而类型 CV_DIST_L2 (欧式距离) 距离的计算有某些相对误差 (5×5 mask 给出更精确的结果), OpenCV 使用 [Borgefors86] 推荐的值:
CV_DIST_C (3×3):
a=1, b=1
CV_DIST_L1 (3×3):
a=1, b=2
CV_DIST_L2 (3×3):
a=0.955, b=1.3693
CV_DIST_L2 (5×5):
a=1, b=1.4, c=2.1969
下面用户自定义距离的的距离域示例 (黑点 (0) 在白色方块中间): 用户自定义 3×3 mask (a=1, b=1.5)
| 4.5 | 4 | 3.5 | 3 | 3.5 | 4 | 4.5 |
| 4 | 3 | 2.5 | 2 | 2.5 | 3 | 4 |
| 3.5 | 2.5 | 1.5 | 1 | 1.5 | 2.5 | 3.5 |
| 3 | 2 | 1 | 0 | 1 | 2 | 3 |
| 3.5 | 2.5 | 1.5 | 1 | 1.5 | 2.5 | 3.5 |
| 4 | 3 | 2.5 | 2 | 2.5 | 3 | 4 |
| 4.5 | 4 | 3.5 | 3 | 3.5 | 4 | 4.5 |
用户自定义 5×5 mask (a=1, b=1.5, c=2)
| 4.5 | 3.5 | 3 | 3 | 3 | 3.5 | 4.5 |
| 3.5 | 3 | 2 | 2 | 2 | 3 | 3.5 |
| 3 | 2 | 1.5 | 1 | 1.5 | 2 | 3 |
| 3 | 2 | 1 | 0 | 1 | 2 | 3 |
| 3 | 2 | 1.5 | 1 | 1.5 | 2 | 3 |
| 3.5 | 3 | 2 | 2 | 2 | 3 | 3.5 |
| 4 | 3.5 | 3 | 3 | 3 | 3.5 | 4 |
典型的使用快速粗略距离估计 CV_DIST_L2, 3×3 mask , 如果要更精确的距离估计,使用 CV_DIST_L2, 5×5 mask。
图像的距离变换被定义为一幅新的图像,该图像的每个输出像素被设成与输入像素中0像素最近的距离。显然,典型
的距离变换的输入应为某些边缘图像。在多数应用中,距离变换的输入是例如Canny 边缘检测的检测图像的转换输
出(即边缘的值是0,非边缘的是非0)。
watershed(分水岭变换函数,参考:https://blog.csdn.net/dcrmg/article/details/52498440)
void watershed( InputArray image, InputOutputArray markers );
第一个参数 image,必须是一个8bit 3通道彩色图像矩阵序列,第一个参数没什么要说的。关键是第二个参数 markers,Opencv官方文档的说明如下:
Before passing the image to the function, you have to roughly outline the desired regions in the image markers with positive (>0) indices. So, every region is represented as one or more connected components with the pixel values 1, 2, 3, and so on. Such markers can be retrieved from a binary mask using findContours() and drawContours(). The markers are “seeds” of the future image regions. All the other pixels in markers , whose relation to the outlined regions is not known and should be defined by the algorithm, should be set to 0’s. In the function output, each pixel in markers is set to a value of the “seed” components or to -1 at boundaries between the regions.
就不一句一句翻译了,大意说的是在执行分水岭函数watershed之前,必须对第二个参数markers进行处理,它应该包含不同区域的轮廓,每个轮廓有一个自己唯一的编号,轮廓的定位可以通过Opencv中findContours方法实现,这个是执行分水岭之前的要求。
接下来执行分水岭会发生什么呢?算法会根据markers传入的轮廓作为种子(也就是所谓的注水点),对图像上其他的像素点根据分水岭算法规则进行判断,并对每个像素点的区域归属进行划定,直到处理完图像上所有像素点。而区域与区域之间的分界处的值被置为“-1”,以做区分。
简单概括一下就是说第二个入参markers必须包含了种子点信息。Opencv官方例程中使用鼠标划线标记,其实就是在定义种子,只不过需要手动操作,而使用findContours可以自动标记种子点。而分水岭方法完成之后并不会直接生成分割后的图像,还需要进一步的显示处理,如此看来,只有两个参数的watershed其实并不简单。
实验步骤:
处理流程:
1,图像锐化(这张图锐不锐化都行)
2,制造makers
3,分水岭变换
4,对分水岭变换后的图像进行上色
#include
#include
#include

using namespace std;
using namespace cv;

int main(int argc, char** argv) {
	char input_win[] = "input image";
	char watershed_win[] = "watershed segmentation demo";
	Mat src = imread("test1.jpg");
	// Mat src = imread("test1.jpg");
	if (src.empty()) {
		printf("could not load image...\n");
		return -1;
	}
	namedWindow(input_win, CV_WINDOW_AUTOSIZE);
	imshow(input_win, src);

	// sharpen
	Mat kernel = (Mat_(3, 3) << 1, 1, 1, 1, -8, 1, 1, 1, 1);
	Mat imgLaplance;
	Mat sharpenImg = src;
	filter2D(src, imgLaplance, CV_32F, kernel, Point(-1, -1), 0, BORDER_DEFAULT);
	src.convertTo(sharpenImg, CV_32F);
	Mat resultImg = sharpenImg - imgLaplance;
	//imshow("L", imgLaplance);
	imshow("resultImg", resultImg);

	resultImg.convertTo(resultImg, CV_8UC3);
	imgLaplance.convertTo(imgLaplance, CV_8UC3);
	imshow("sharpen image", resultImg);
	// src = resultImg; // copy back

	// convert to binary
	Mat binaryImg,b2;//我只是想看看sharp和不sharp的区别
	src.copyTo(b2);
	cvtColor(src, resultImg, CV_BGR2GRAY);
	threshold(resultImg, binaryImg, 40, 255, THRESH_BINARY | THRESH_OTSU);
	threshold(resultImg, b2, 40, 255, THRESH_BINARY | THRESH_OTSU);
	imshow("binary image", binaryImg);
	imshow("binary image2", b2);
	bitwise_not(binaryImg, binaryImg, Mat());

	// markers
	Mat dist_8u;
	binaryImg.convertTo(dist_8u, CV_8U);
	imshow("dist_8u", dist_8u);
	vector> contours;
	vector hierarchy;
	findContours(dist_8u, contours, hierarchy,RETR_EXTERNAL, CHAIN_APPROX_SIMPLE, Point(0, 0));

	// create makers
	Mat markers = Mat::zeros(src.size(), CV_32SC1);
	for (size_t i = 0; i < contours.size(); i++) {
		drawContours(markers, contours, static_cast(i),
            Scalar::all(static_cast(i) + 1), -1);//对轮廓内部所有的点上色(进行标记)
	}
	circle(markers, Point(5, 5), 3, Scalar(255, 255, 255), -1);
	imshow("my markers", markers * 10000);


	//看看轮廓
	Mat seemarkers = Mat::zeros(src.size(), CV_8UC3);
	RNG rng(123456);
	for (size_t i = 0; i < contours.size(); i++) {
		Scalar color = Scalar(rng.uniform(0, 255), rng.uniform(0, 255), rng.uniform(0, 255));
		drawContours(seemarkers, contours, static_cast(i),color,2,8,hierarchy);
	}
	imshow("see my markers",seemarkers);


	// perform watershed   //不知道为啥这步操作一做,数字轮廓就不对了6,4,5粘连。
	watershed(src, markers);
	Mat mark = Mat::zeros(markers.size(), CV_8UC1);
	markers.convertTo(mark, CV_8UC1);
	bitwise_not(mark, mark, Mat());
	imshow("watershed image", mark);

	// generate random color
	vector colors;
	for (size_t i = 0; i < contours.size(); i++) {
		int r = theRNG().uniform(0, 255);
		int g = theRNG().uniform(0, 255);
		int b = theRNG().uniform(0, 255);
		colors.push_back(Vec3b((uchar)b, (uchar)g, (uchar)r));
	}

	// fill with color and display final result
	Mat dst = Mat::zeros(markers.size(), CV_8UC3);
	for (int row = 0; row < markers.rows; row++) {
		for (int col = 0; col < markers.cols; col++) {
			int index = markers.at(row, col);
			if (index > 0 && index <= static_cast(contours.size())) {
				dst.at(row, col) = colors[index - 1];
			}
			else {
				dst.at(row, col) = Vec3b(0, 0, 0);
			}
		}
	}
	imshow("Final Result", dst);/**/

	waitKey(0);
	return 0;
}
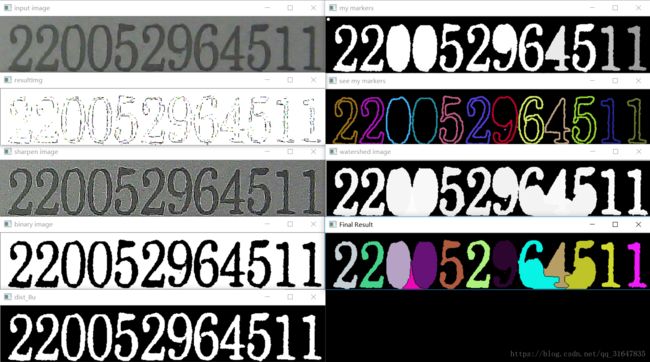
结果:
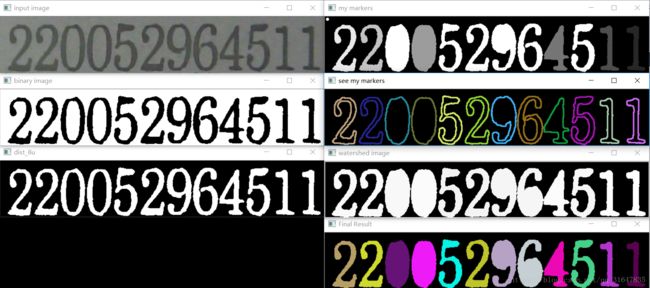
然而执行了以下流程之后,就不粘连了(说明是噪声的原因):
处理流程:
1,高模糊去噪声
2,制造makers
3,分水岭变换
4,对分水岭变换后的图像进行上色
#include
#include
#include

using namespace std;
using namespace cv;

int main(int argc, char** argv) {
	char input_win[] = "input image";
	char watershed_win[] = "watershed segmentation demo";
	Mat src = imread("test1.jpg");
	// Mat src = imread("test1.jpg");
	if (src.empty()) {
		printf("could not load image...\n");
		return -1;
	}
	namedWindow(input_win, CV_WINDOW_AUTOSIZE);
	imshow(input_win, src);

	//GaussianBlur  denoising
	GaussianBlur(src, src, Size(3,3), 0, 0, BORDER_DEFAULT);
	imshow(input_win, src);

	// convert to binary
	Mat resultImg, binaryImg;
	cvtColor(src, resultImg, CV_BGR2GRAY);
	threshold(resultImg, binaryImg, 40, 255, THRESH_BINARY | THRESH_OTSU);
	imshow("binary image", binaryImg);
	bitwise_not(binaryImg, binaryImg, Mat());

	// markers
	Mat dist_8u;
	binaryImg.convertTo(dist_8u, CV_8U);
	imshow("dist_8u", dist_8u);
	vector> contours;
	vector hierarchy;
	findContours(dist_8u, contours, hierarchy,RETR_EXTERNAL, CHAIN_APPROX_SIMPLE, Point(0, 0));

	// create makers
	Mat markers = Mat::zeros(src.size(), CV_32SC1);
	for (size_t i = 0; i < contours.size(); i++) {
		drawContours(markers, contours, static_cast(i),
            Scalar::all(static_cast(i) + 1), -1);
        //Scalar::all轮廓内所有颜色为static_cast(i) + 1。
        //-1表示轮廓内填充?去掉后结果也没变
	}
	circle(markers, Point(5, 5), 3, Scalar(255, 255, 255), -1);
	imshow("my markers", markers * 10000);


	//看看轮廓
	Mat seemarkers = Mat::zeros(src.size(), CV_8UC3);
	RNG rng(123456);
	for (size_t i = 0; i < contours.size(); i++) {
		Scalar color = Scalar(rng.uniform(0, 255), rng.uniform(0, 255), rng.uniform(0, 255));
		drawContours(seemarkers, contours, static_cast(i),color,2,8,hierarchy);
	}
	imshow("see my markers",seemarkers);


	// perform watershed
	watershed(src, markers);
	Mat mark = Mat::zeros(markers.size(), CV_8UC1);
	markers.convertTo(mark, CV_8UC1);
	bitwise_not(mark, mark, Mat());
	imshow("watershed image", mark);

	// generate random color
	vector colors;
	for (size_t i = 0; i < contours.size(); i++) {
		int r = theRNG().uniform(0, 255);
		int g = theRNG().uniform(0, 255);
		int b = theRNG().uniform(0, 255);
		colors.push_back(Vec3b((uchar)b, (uchar)g, (uchar)r));
	}

	// fill with color and display final result
	Mat dst = Mat::zeros(markers.size(), CV_8UC3);
	for (int row = 0; row < markers.rows; row++) {
		for (int col = 0; col < markers.cols; col++) {
			int index = markers.at(row, col);
			if (index > 0 && index <= static_cast(contours.size())) {
				dst.at(row, col) = colors[index - 1];
			}
			else {
				dst.at(row, col) = Vec3b(0, 0, 0);
			}
		}
	}
	imshow("Final Result", dst);/**/

	waitKey(0);
	return 0;
}
去掉
circle(markers, Point(5, 5), 3, Scalar(255, 255, 255), -1);的运行结果:
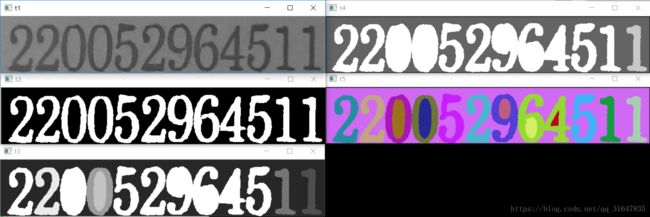
再次修改后代码如下(加入膨胀腐蚀):
#include
#include
#include

using namespace std;
using namespace cv;
RNG rng(123456);
int main(int argc, char** argv) {
	Mat t0,t1, t2, t3, t4, t5;
	t0 = imread("test1.jpg");
	if (!t0.data) {
		cout << "WRONG";
		return -1;
	}
	cvtColor(t0, t1, CV_BGR2GRAY);
	GaussianBlur(t1, t1, Size(3, 3), 0, 0, BORDER_DEFAULT);
	threshold(t1, t2, 0, 255, THRESH_OTSU);

	Mat elem=getStructuringElement(MORPH_RECT, Size(3, 1), Point(-1,-1));
	erode(t2, t2, elem);
	//elem要确保数字不和边界粘连,否则数字会消失

	vector> contour;
	vector hierarchy;
	findContours(t2, contour, hierarchy, RETR_TREE, CHAIN_APPROX_SIMPLE, Point(0, 0));
	bitwise_not(t2, t2, Mat());
	t3.create(t1.size(), CV_32SC1);
	t3 = Scalar(0);
	for (size_t i = 0; i < contour.size(); i++) {
		drawContours(t3, contour, static_cast(i), Scalar::all((static_cast(i) + 1)),-1);
	}
	//circle(t3, Point(5, 5), 3, Scalar(255, 255, 255), -1);
	//不知道为啥加不加没区别

	imshow("t1", t1);
	imshow("t2", t2);
	imshow("t3", t3*10000);

	watershed(t0, t3);
	t3.convertTo(t4, CV_8UC1);
	imshow("t4", t4*100);

	vector colors;
	for (size_t i = 0; i < contour.size(); i++) {
		int r = rng.uniform(0, 255);
		int g = rng.uniform(0, 255);
		int b = rng.uniform(0, 255);
		colors.push_back(Vec3b((uchar)b, (uchar)g, (uchar)r));
	}

	t5.create(t3.size(), CV_8UC3);
	t5 = Scalar(0, 0, 0);
	for (int row = 0; row < t3.rows; row++) {
		for (int col = 0; col < t3.cols; col++) {
			int a = t3.at(row, col);
			if (a > 0 && a <= static_cast(contour.size())) {
				t5.at(row, col) = colors[a-1];
			}
			else {
				t5.at(row, col) = Vec3b(0,0,0);
			}
		}
	}
	imshow("t5", t5);

	waitKey(0);
}
