springboot +mybatis整合Redis
安装Redis
安装完成后打开redis-server.exe启动Redis服务器,再打开redis-cli.exe文件启动客户端,Redis Ping 命令使用客户端向 Redis 服务器发送一个 PING ,如果服务器运作正常的话,会返回一个 PONG 。
通常用于测试与服务器的连接是否仍然生效,或者用于测量延迟值。
redis的一些命令
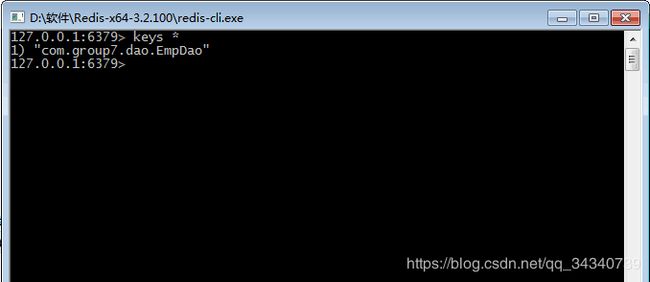
keys * 查看所有缓存
flushall 清除所有数据
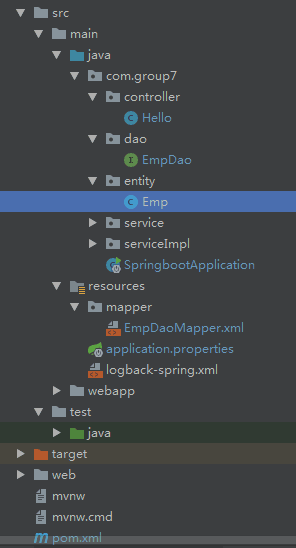
我的项目列表

1.pom.xml文件引用
    4.0.0

    com.group7.pm
    personalmanagement
    0.0.1-SNAPSHOT
    jar

    PersonalManagement
    Project for PersonalManagement


        org.springframework.boot
        spring-boot-starter-parent
        2.1.0.RELEASE


        UTF-8
        1.8
        1.8


            org.springframework.boot
            spring-boot-starter-aop


            org.springframework.boot
            spring-boot-starter-thymeleaf


            org.springframework.boot
            spring-boot-starter-web


            org.mybatis.spring.boot
            mybatis-spring-boot-starter
            1.3.2


            org.springframework.boot
            spring-boot-devtools
            runtime


            org.springframework.boot
            spring-boot-starter-test
            test


            org.springframework.boot
            spring-boot-starter-jdbc


            org.apache.shiro
            shiro-core
            1.2.2


            org.apache.shiro
            shiro-web
            1.2.2


            org.apache.shiro
            shiro-spring
            1.2.2


            org.apache.shiro
            shiro-ehcache
            1.2.2


            org.springframework.boot
            spring-boot-starter-thymeleaf


            com.alibaba
            druid-spring-boot-starter
            1.1.9


              com.oracle
              ojdbc6
              11.2.0.4.0


            ch.qos.logback
            logback-classic
            1.2.3
            compile


            org.apache.logging.log4j
            log4j-to-slf4j
            2.10.0
            compile


            org.slf4j
            jul-to-slf4j
            1.7.25
            compile


            redis.clients
            jedis
            2.8.0


            org.mybatis.caches
            mybatis-redis
            1.0.0-beta2


                    maven-clean-plugin
                    3.0.0


                    maven-resources-plugin
                    3.0.2


                    maven-compiler-plugin
                    3.7.0


                    maven-surefire-plugin
                    2.20.1


                    maven-war-plugin
                    3.2.0


                    maven-install-plugin
                    2.5.2


                    maven-deploy-plugin
                    2.8.2
2.application.properties中的配置
# 配置项目名称
server.servlet.context-path=/p2p

spring.datasource.driver-class-name=oracle.jdbc.driver.OracleDriver

#清除缓存,实现热部署
spring.thymeleaf.cache=false
#回避HTML进行严格的检查的配置 需要提前引入nekohtml依赖
spring.thymeleaf.mode=LEGACYHTML5

spring.datasource.druid.url=jdbc:oracle:thin:@172.16.22.63:1521:orcl
#数据库登录名
spring.datasource.druid.username=scott
#登录密码
spring.datasource.druid.password=admin
#最小链接数
spring.datasource.druid.initial-size=5
#最大链接数
spring.datasource.druid.max-active=20
#最小空闲数
spring.datasource.druid.min-idle=10
#最大等待时间
spring.datasource.druid.max-wait=10
#是否缓存preparedStatement,也就是PSCache。PSCache对支持游标的数据库性能提升巨大,比如说oracle。
#在mysql5.5以下的版本中没有PSCache功能,建议关闭掉。
#spring.datasource.druid.pool-prepared-statements=true
#配置间隔多久才进行一次检测,检测需要关闭的空闲连接,单位是毫秒
spring.datasource.druid.time-between-eviction-runs-millis=60000
#配置一个连接在池中最小生存的时间,单位是毫秒
spring.datasource.druid.min-evictable-idle-time-millis=300000

#实体别名
mybatis.typeAliasesPackage=com.group7.entity
#全局解决无效的列类型1111
mybatis.configuration.jdbc-type-for-null=NULL

#mapper文件扫描
mybatis.mapperLocations=classpath:mapper/*.xml
#配置静态资源前后缀
spring.thymeleaf.prefix=classpath:/templates/
spring.thymeleaf.suffix=.html
#配置上传路径
upload.path=D:/images/
#上传配置
#默认支持文件上传
spring.servlet.multipart.enabled=true
spring.servlet.multipart.file-size-threshold=0
#上传文件大小配置 这两行加上了会报错,还没解决
#spring.servlet.multipart.max-file-size=10Mb
#spring.servlet.multipart.max-request-size=10Mb

#redis配置
spring.redis.host=127.0.0.1
spring.redis.port=6379
spring.redis.database=0
spring.redis.timeout=3000
spring.redis.jedis.pool.max-active=200
spring.redis.jedis.pool.max-idle=100
spring.redis.jedis.pool.min-idle=1
spring.redis.jedis.pool.max-wait=1000
spring.datasource.druid.test-on-borrow=true
spring.datasource.druid.test-on-return=true
3.dao层EmpDao的代码
import com.group7.entity.Emp;
import java.util.List;
import java.util.Map;
public interface EmpDao {
        /**
         * 员工列表方法
         * @param map
         * @return
         */
        List getList(Map map);
}
4.mapper中EmpDaoMapper.xml中的代码
6.service层EmpService中的代码
package com.group7.service;
import com.group7.entity.Emp;
import java.util.List;
import java.util.Map;

public interface EmpService {
    /**
     * 员工列表方法
     * @param map
     * @return
     */
    List getList(Map map);
}
7.serviceImpl中EmpServiceImpl中的代码
package com.group7.serviceImpl;

import com.group7.dao.EmpDao;
import com.group7.entity.Emp;
import com.group7.service.EmpService;
import org.springframework.beans.factory.annotation.Autowired;
import org.springframework.stereotype.Service;

import java.util.List;
import java.util.Map;
@Service
public class EmpServiceImpl implements EmpService {

    @Autowired
    private EmpDao empDao;

    @Override
    public List getList(Map map) {

        return empDao.getList(map);
    }
}
8.controller层的EmpController中的代码
package com.group7.controller;

import com.group7.entity.Emp;
import com.group7.service.EmpService;
import org.springframework.beans.factory.annotation.Autowired;
import org.springframework.web.bind.annotation.RequestMapping;
import org.springframework.web.bind.annotation.ResponseBody;
import org.springframework.web.bind.annotation.RestController;

import java.util.List;
import java.util.Map;
@RestController
public class EmpController{
	/**
	 * 跳转雇员列表
	 * @return
	 */
	@ResponseBody
	@RequestMapping("/toList")
	public Object toList(Map map){
		List list = empService.getList(map);
		return list;
	}
}
9.启动类SpringbootApplication中的代码
package com.group7;

import org.mybatis.spring.annotation.MapperScan;
import org.springframework.boot.SpringApplication;
import org.springframework.boot.autoconfigure.SpringBootApplication;

//@EnableTransactionManagement//spring boot 开启注解式事务
@SpringBootApplication
@MapperScan("com.group7.dao")
public class SpringbootApplication {

    public static void main(String[] args) {

        SpringApplication.run(SpringbootApplication.class);
    }
}
10.测试类SpringbootApplicationTests中的代码
package com.group7;

import org.junit.Test;
import org.junit.runner.RunWith;
import org.springframework.boot.test.context.SpringBootTest;
import org.springframework.test.context.junit4.SpringRunner;

@RunWith(SpringRunner.class)
@SpringBootTest
public class SpringbootApplicationTests {

    @Test
    public void contextLoads() {
    }

}
11.彩色日志logback-spring.xml中的配置
    logback


            ${CONSOLE_LOG_PATTERN}
            utf8


            info


            ${CONSOLE_LOG_PATTERN}

            UTF-8


        ${log.path}/log_debug.log


            %d{yyyy-MM-dd HH:mm:ss.SSS} [%thread] %-5level %logger{50} - %msg%n
            UTF-8


            ${log.path}/debug/log-debug-%d{yyyy-MM-dd}.%i.log

                100MB


            15


            debug
            ACCEPT
            DENY


        ${log.path}/log_info.log


            %d{yyyy-MM-dd HH:mm:ss.SSS} [%thread] %-5level %logger{50} - %msg%n
            UTF-8


            ${log.path}/info/log-info-%d{yyyy-MM-dd}.%i.log

                100MB


            15


            info
            ACCEPT
            DENY


        ${log.path}/log_warn.log


            %d{yyyy-MM-dd HH:mm:ss.SSS} [%thread] %-5level %logger{50} - %msg%n
            UTF-8


            ${log.path}/warn/log-warn-%d{yyyy-MM-dd}.%i.log

                100MB


            15


            warn
            ACCEPT
            DENY


        ${log.path}/log_error.log


            %d{yyyy-MM-dd HH:mm:ss.SSS} [%thread] %-5level %logger{50} - %msg%n
            UTF-8


            ${log.path}/error/log-error-%d{yyyy-MM-dd}.%i.log

                100MB


            15


            ERROR
            ACCEPT
            DENY
执行完上面的代码得出的结果

再打开redis-cli.exe程序,输入keys * ,可以看到redis的缓存中已经有了上图中的数据

redis中没有缓存时执行的时候需要去数据库中查询,如果redis中有缓存时就直接在缓存中取,没有缓存跟有缓存时的执行区别如下图
没有缓存

有缓存(直接在缓存中取了,所以相当于不用执行查询代码)

这是今天老师讲完我总结的,一部分是想着自己忘了还能看看,一部分有需要的可以看看
GitHub地址:https://github.com/aywc/P2P.git