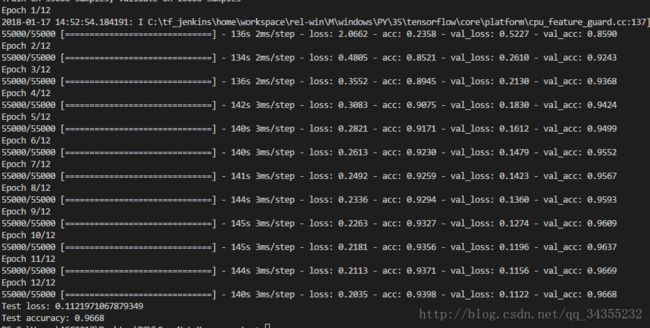
基于keras的fashion_mnist的卷积神经网络(CNN)
首先我们先介绍一个什么是fashion_mnist数据集。
FashionMNIST 是一个替代 MNIST 手写数字集的图像数据集。 它是由 Zalando(一家德国的时尚科技公司)旗下的研究部门提供。其涵盖了来自 10 种类别的共 7 万个不同商品的正面图片。
FashionMNIST 的大小、格式和训练集/测试集划分与原始的 MNIST 完全一致。60000/10000 的训练测试数据划分,28x28 的灰度图片。你可以直接用它来测试你的机器学习和深度学习算法性能,且不需要改动任何的代码。
类别如下:
| 标注编号 | 描述 |
|---|---|
| 0 | T-shirt/top(T恤) |
| 1 | Trouser(裤子) |
| 2 | Pullover(套衫) |
| 3 | Dress(裙子) |
| 4 | Coat(外套) |
| 5 | Sandal(凉鞋) |
| 6 | Shirt(汗衫) |
| 7 | Sneaker(运动鞋) |
| 8 | Bag(包) |
| 9 | Ankle boot(踝靴) |
数据集下载:https://github.com/zalandoresearch/fashion-mnist
这样我们就可以直接模仿mnist_cnn去做了。
下面就是代码详解:
代码中需要注意的点就是这里我是已经下载了fashion_mnist数据集,所以我这里没有利用类似mnist中load_data()这个函数,而是直接从自己下载的文件夹中读取,具体代码如下:
from tensorflow.examples.tutorials.mnist import input_data
MNIST_data_folder = "C:\\Users\\ASC2017\\Desktop\\DCY重要的文件\\FASHION_MNIST\\fashion_mnist"
fashion_mnist = input_data.read_data_sets(MNIST_data_folder,one_hot=True)
这里我们需要注意的一点就是fashion_mnist中已经是binary class matrix,所以我们就不要像mnist数据集那样利用keras.utils.to_categorical(y, num_classes=None)将一个类向量(整数)转换为二进制类矩阵。
完整代码:
from __future__ import print_function
import keras
from keras.models import Sequential
from keras.layers import Dense, Dropout, Flatten
from keras.layers import Conv2D, MaxPooling2D
from keras import backend as K

import win_unicode_console
win_unicode_console.enable()

batch_size = 128
num_classes = 10
epochs = 12
# input image dimensions
img_rows, img_cols = 28, 28
# the data, shuffled and split between train and test sets

from tensorflow.examples.tutorials.mnist import input_data
MNIST_data_folder = "C:\\Users\\ASC2017\\Desktop\\DCY重要的文件\\FASHION_MNIST\\fashion_mnist"
fashion_mnist = input_data.read_data_sets(MNIST_data_folder,one_hot=True)

x_train, y_train = fashion_mnist.train.images,fashion_mnist.train.labels
x_test, y_test = fashion_mnist.test.images, fashion_mnist.test.labels
x_train = x_train.reshape(-1, 28, 28,1).astype('float32')
x_test = x_test.reshape(-1,28, 28,1).astype('float32')

if K.image_data_format() == 'channels_first':
    x_train = x_train.reshape(x_train.shape[0], 1, img_rows, img_cols)
    x_test = x_test.reshape(x_test.shape[0], 1, img_rows, img_cols)
    input_shape = (1, img_rows, img_cols)
else:
    x_train = x_train.reshape(x_train.shape[0], img_rows, img_cols, 1)
    x_test = x_test.reshape(x_test.shape[0], img_rows, img_cols, 1)
    input_shape = (img_rows, img_cols, 1)

x_train /= 255
x_test /= 255
print('x_train shape:', x_train.shape)
print('x_test shape:', x_test.shape)
print(x_train.shape[0], 'train samples')
print(x_test.shape[0], 'test samples')

print('y_train shape:', y_train.shape)
print('y_test shape:', y_test.shape)
print(y_train.shape[0], 'train samples')
print(y_test.shape[0], 'test samples')


model = Sequential()
model.add(Conv2D(32,
                 activation='relu',
                 input_shape=input_shape,
                 nb_row=3,
                 nb_col=3))
model.add(Conv2D(64, activation='relu',
                 nb_row=3,
                 nb_col=3))
model.add(MaxPooling2D(pool_size=(2, 2)))
model.add(Dropout(0.35))
model.add(Flatten())
model.add(Dense(128, activation='relu'))
model.add(Dropout(0.5))
model.add(Dense(num_classes, activation='softmax'))
model.compile(loss=keras.metrics.categorical_crossentropy,
              optimizer=keras.optimizers.Adadelta(),
              metrics=['accuracy'])
model.summary()

print('x_train shape:', x_train.shape)
print('x_test shape:', x_test.shape)
print(x_train.shape[0], 'train samples')
print(x_test.shape[0], 'test samples')


model.fit(x_train, y_train, batch_size=batch_size, epochs=epochs,
          verbose=1, validation_data=(x_test, y_test))
score = model.evaluate(x_test, y_test, verbose=0)

print('Test loss:', score[0])
print('Test accuracy:', score[1])