模型微调fine-tuning
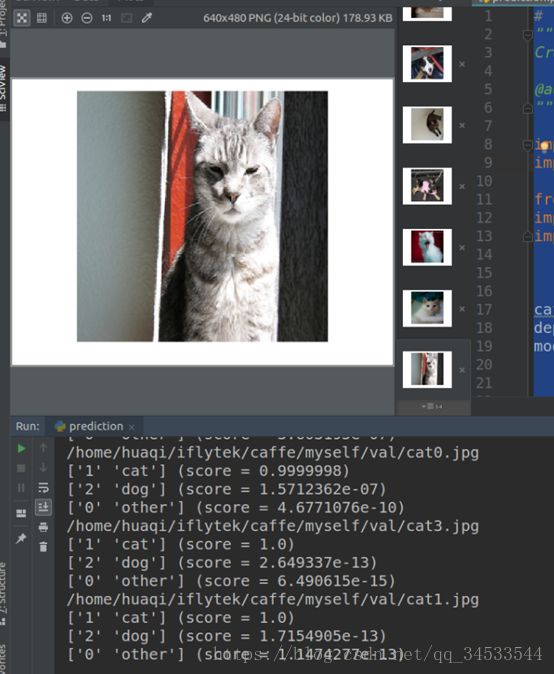
因为上一篇博客采用的数据集太少,直接利用模型进行训练其预测能力较弱,故在此需要采取fine-tuning的方案进行训练,微调的训练结果如下,效果显而易见。(所有包含文件都在链接:https://pan.baidu.com/s/1pJPGlhrQa305cneCwNvBWA 密码:domc)
具体微调过程如下:
数据集的准备以及均值文件的获取过程与上一篇的流程是一样的,同时需要下载一个预模型bvlc_reference_caffenet.caffemodel,在此就不多叙述。均值文件得到后的后续步骤:
3、网络的定义:
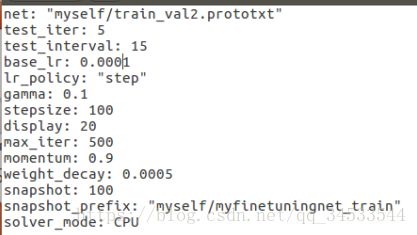
Solver.prototxt文件,因数据集少,重新定义了一些值
注意:loss有时会很高,就降低base_lr的值,10倍的降低。要是loss一致不怎么变化,就改变batch_size的值,如下给出了说明。
从models/bvlc_reference_caffenet下复制train_val.prototxt以及deploy.prototxt到新建文件夹myself
网络定义文件train_val.prototxt:(注意修改的地方)
name: "CaffeNet"
layer {
  name: "data"
  type: "Data"
  top: "data"
  top: "label"
  include {
    phase: TRAIN
  }
  transform_param {
    mirror: true
    crop_size: 227
    mean_file: "myself/myimagenet_mean.binaryproto"
  }
# mean pixel / channel-wise mean instead of mean image
#  transform_param {
#    crop_size: 227
#    mean_value: 104
#    mean_value: 117
#    mean_value: 123
#    mirror: true
#  }
  data_param {
    source: "myself/myself_train_lmdb"
    batch_size: 8 #8*test_interval(15)=120 等于测试集,正好是一个epoch
    backend: LMDB
  }
}
layer {
  name: "data"
  type: "Data"
  top: "data"
  top: "label"
  include {
    phase: TEST
  }
  Transform_param {
    mirror: false
    crop_size: 227
    mean_file: "myself/myimagenet_mean.binaryproto"
  }
# mean pixel / channel-wise mean instead of mean image
#  transform_param {
#    crop_size: 227
#    mean_value: 104
#    mean_value: 117
#    mean_value: 123
#    mirror: false
#  }
  data_param {
    source: "myself/myself_val_lmdb"
    batch_size: 4 #4*test_iter(5)20 验证数据集的一个epoch
    backend: LMDB
  }
}
layer {
  name: "fc8_my"  #修改名字,这样预训练模型训练时因名称不同于未改前的,权值会重新训练,后面也有几处需要修改的地方
  type: "InnerProduct"
  bottom: "fc7"
  top: "fc8_my"
  param {
    lr_mult: 10 #调整学习率,因为最后一层时重新训练的,因此需要比其他层更快的学习率,将weights和bias增加10倍
    decay_mult: 1
  }
  param {
    lr_mult: 20 #上同
    decay_mult: 0
  }
  inner_product_param {
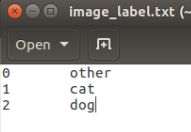
    num_output: 3 #修改你想识别的种类个数,重点是:若你的标签不是从0开始的,那么你需要将这个参数调为你最大标签数量值+1,我这里是cat标签为1,dog标签为2,所以num_output=3。
    weight_filler {
      type: "gaussian"
      std: 0.01
    }
    bias_filler {
      type: "constant"
      value: 0
    }
  }
}
layer {
  name: "accuracy"
  type: "Accuracy"
  bottom: "fc8_my"
  bottom: "label"
  top: "accuracy"
  include {
    phase: TEST
  }
}
layer {
  name: "loss"
  type: "SoftmaxWithLoss"
  bottom: "fc8_my"
  bottom: "label"
  top: "loss"
}
4、训练模型:
因为实在已有的caffemodel上进行训练的,即利用已有的caffemodel作为新mofel的weights初始化值。训练指令:
./build/tools/caffe train -solver myself/solver.prototxt -weights myself/bvlc_reference_caffenet.caffemodel训练结果的截图在文章开头给出了。
5、训练预测:
在这之前,python需要将前面得到的均值文件:myimagenet_mean.binaryproto转换为:myimagenet_mean.npy
代码如下:
import caffe
import numpy as np

MEAN_PROTO_PATH = '/home/****/caffe/myself/myimagenet_mean.binaryproto'
MEAN_NPY_PATH = '/home/*****/caffe/myself/myimagenet_mean.npy'

blob = caffe.proto.caffe_pb2.BlobProto()
data = open(MEAN_PROTO_PATH, 'rb' ).read()
blob.ParseFromString(data)

array = np.array(caffe.io.blobproto_to_array(blob))
mean_npy = array[0]
np.save(MEAN_NPY_PATH ,mean_npy)
利用模型预测(其中deploy.prototxt文件需要将最后一层改写成自己重命名的层,以及输出num_output):
# -*- coding: utf-8 -*-
import caffe
import numpy as np

from PIL import Image
import matplotlib.pyplot as plt
import os


caffe_root = '/home/***/caffe/myself/'
deploy_file = caffe_root + 'deploy.prototxt' #预测的网络定义结构
model_file = caffe_root + 'myfinetuningnet_train_iter_500.caffemodel' #训练模型


caffe.set_mode_cpu()


net = caffe.Classifier(deploy_file,
                model_file,
                mean=np.load(caffe_root + 'myimagenet_mean.npy').mean(1).mean(1), #训练用到均值文件,预测也需要用到
                channel_swap=(2,1,0),
                raw_scale=255,
                image_dims=(227,227)) #大小要与你训练时的模型一致


imagenet_labels_filename = caffe_root + 'image_label.txt'
labels = np.loadtxt(imagenet_labels_filename, str, delimiter = '\t') #标签与名称相隔一个分隔符
myfile = open("/home/*****/caffe/myself/label.txt", "w+")

for root, dir, files in os.walk(caffe_root + 'val/'):
    for file in files:
        image_file = os.path.join(root,file)
        input_image = caffe.io.load_image(image_file)
        image_path = os.path.join(root, file)
        print(image_path)
        myfile.write(image_path)
        myfile.write(":")
        img = Image.open(image_path)
        plt.imshow(img)
        plt.axis('off')
        plt.show()
        prediction = net.predict([input_image])
        top_five = prediction[0].argsort()[-5:][::-1]
        for i in top_five:
            class_string = labels[i]
            score = prediction[0][i]
            lines=str(class_string)+str(score)
            myfile.write(lines)
            myfile.write(",")
            print('%s (score = %.15s)' % (class_string, score))
        myfile.write("\n")

myfile.close()
代码运行会展示验证的文件夹下的所有的分类种类图片,以及输出每一个图片对应的三个分类对应的标签和概率值(本文只有两个分类,因为从0标签,所以需要加上0)。
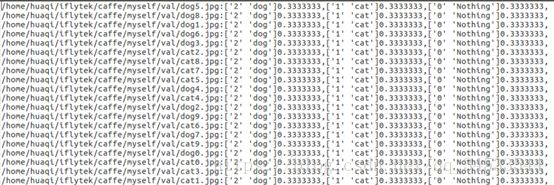
同时会生成一个label.txt文件,如下:
在数据集小的时候,微调的结果是比重新训练效果要好多的,如下是重新训练的预测结果:
可见微调的作用是很明显的。
参考博客:
https://www.jianshu.com/p/b2684a2ea5a2
https://blog.csdn.net/cs24k1993/article/details/78974468
https://blog.csdn.net/teeyohuang/article/details/76905525


