利用Python实现一个感知器学习算法
利用Python实现一个感知器学习算法**
注:PYTHON机器学习 [美] 塞巴斯蒂安 拉施卡著 第二章笔记一
**
感知器的基本概念:
**
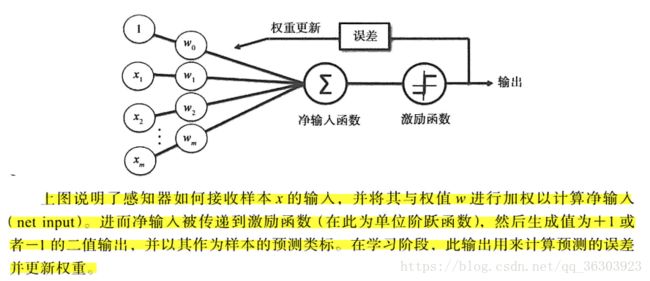
Frank Rossenblatt 基于MCP神经元模型提出了第一个感知器学习法则,在此感知器规则中,他提出了一个自学算法,此算法可以自动通过优化得到权重系数,此系数与输入值的乘积决定了神经元是否被激活。MFC神经元和罗森布拉特阈值感知器的理念就是,通过模拟的方式还原大脑中单个神经元的工作方式:它是否被激活。
规则总结如下:

感知器的基本概念总结如下:

使用python实现感知器学习算法
使用数据开放的鸢尾花数据 https://archive.ics.uci.edu/ml/machine-learning-databases/iris/iris.data
1、定义感知器接口
import numpy as np

class Perceptron(object):
    """Perceptron classifier.
    Parameters
    ------------
    eta:float,Learning rate (between 0.0 and 1.0)  #学习速率
    n_iter:int,Passes over the training dataset. #迭代次数

    Attributes
    -------------
    w_: 1d-array,Weights after fitting.
    errors_: list,Numebr of misclassifications in every epoch.
    """
    def __init__(self,eta=0.01,n_iter=10):
        self.eta = eta
        self.n_iter = n_iter
    def fit(self,X,y):
        """Fit training data.先对权重参数初始化,然后对训练集中每一个样本循环,根据感知机算法学习规则对权重进行更新
        Parameters
        ------------
        X: {array-like}, shape=[n_samples, n_features]
            Training vectors, where n_samples is the number of samples and n_featuers is the number of features.
        y: array-like, shape=[n_smaples]
            Target values.
        Returns
        ----------
        self: object
        """
        self.w_ = np.zeros(1 + X.shape[1]) # add w_0  #初始化权重。数据集特征维数+1。
        self.errors_ = []#用于记录每一轮中误分类的样本数

        for _ in range(self.n_iter):
            errors = 0
            for xi, target in zip(X,y):
                update = self.eta * (target - self.predict(xi))#调用了predict()函数
                self.w_[1:] += update * xi
                self.w_[0] += update
                errors += int(update != 0.0)
            self.errors_.append(errors)
        return self

    def net_input(self,X):
        """calculate net input"""
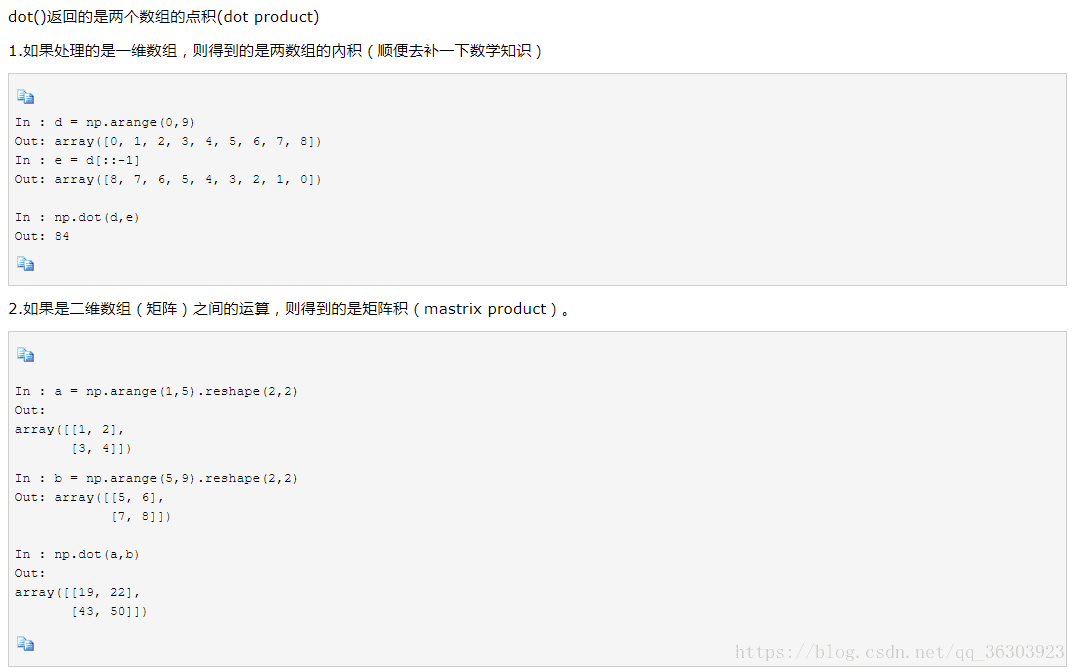
        return np.dot(X,self.w_[1:]) + self.w_[0]#计算向量点乘

    def predict(self,X):#预测类别标记
        """return class label after unit step"""
        return np.where(self.net_input(X) >= 0.0,1,-1)
实例化了一个Perceptron对象,给出了一个学习速率eta和在训练数据集上进行迭代的次数n_iter。通过fit方法,循环迭代数据集中的所有样本,并根据感知器规则更新权重。
2、基于鸢尾花数据集训练感知器模型
为了测试前面的感知器算法,从鸢尾花数据中挑选了山鸢尾(Setosa)和变色鸢尾(Versicolor)两种花的信息为测试数据。并且除于可视化的原因,只考虑数据集中的萼片长度和花瓣长度两个特征。
import pandas as pd#用pandas读取数据
import matplotlib.pyplot as plt
import numpy as np
from matplotlib.colors import ListedColormap
from Perceptron_1 import Perceptron

df = pd.read_csv('https://archive.ics.uci.edu/ml/machine-learning-databases/iris/iris.data',header=None)#读取数据还可以用request这个包
print(df.tail())#输出最后五行数据,看一下Iris数据集格式

"""抽取出前100条样本,这正好是Setosa和Versicolor对应的样本,并将些样本用两个整数值替代,
我们将Versicolor对应的数据作为类别1,Setosa对应的作为-1。
对于特征,我们抽取出sepal length和petal
length两维度特征,然后用散点图对数据进行可视化"""

y = df.iloc[0:100,4].values
y = np.where(y == 'Iris-setosa',-1,1) #把pandas DataFrame产生的对应的整数类标赋给numpy的向量y
X = df.iloc[0:100,[0,2]].values #把提取的这100个训练样本的第一个特征列和第三个特征列赋值给属性矩阵X
#plt.scatter(X[:50,0],X[:50,1],color = 'red',marker='o',label='setosa')
#plt.scatter(X[50:100,0],X[50:100,1],color='blue',marker='x',label='versicolor')
#plt.xlabel('petal length')
#plt.ylabel('sepal lenght')
#plt.legend(loc='upper left')
#plt.show()

#train our perceptron model now
#为了更好地了解感知机训练过程,我们将每一轮的误分类
#数目可视化出来,检查算法是否收敛和找到分界线

ppn=Perceptron(eta=0.1,n_iter=10)
ppn.fit(X,y)
#plt.plot(range(1,len(ppn.errors_)+1),ppn.errors_,marker='o')
#plt.xlabel('Epoches')
#plt.ylabel('Number of misclassifications')
#plt.show()

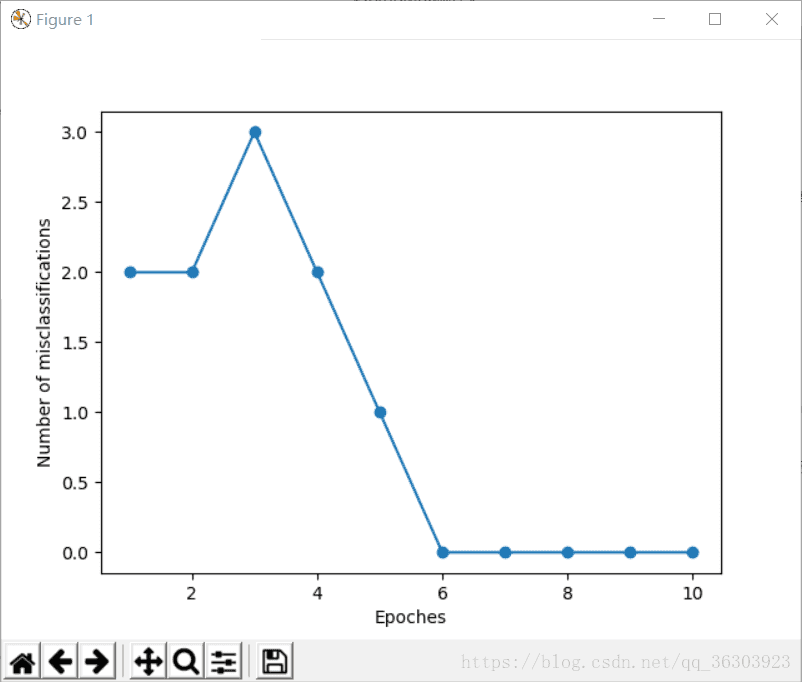
#通过对输出的图看到,分类器在第六次迭代后就已经收敛了,并且具备对训练样本进行正确分类的能力

#画分界线超平面
def plot_decision_region(X,y,classifier,resolution=0.02):
    #setup marker generator and color map
    #通过ListedColormap方法定义一些颜色和标记符号,并通过颜色列表生成颜色示意图
    markers=('s','x','o','^','v')
    colors=('red','blue','lightgreen','gray','cyan')
    cmap=ListedColormap(colors[:len(np.unique(y))])

    #对两个特征的最大值最小值做了限定
    #plot the desicion surface
    x1_min,x1_max=X[:,0].min()-1,X[:,0].max()+1
    x2_min,x2_max=X[:,1].min()-1,X[:,1].max()+1

    #使用numpy的meshgrid函数将最大值最小值向量生成二维数组xx1,xx2
    xx1,xx2=np.meshgrid(np.arange(x1_min,x1_max,resolution),
                        np.arange(x2_min,x2_max,resolution))
    Z=classifier.predict(np.array([xx1.ravel(),xx2.ravel()]).T)
    Z=Z.reshape(xx1.shape)

    plt.contourf(xx1,xx2,Z,alpha=0.4,cmap=cmap)
    plt.xlim(xx1.min(),xx1.max())
    plt.ylim(xx2.min(),xx2.max())

    #plot class samples
    for idx,cl in enumerate(np.unique(y)):
        plt.scatter(x=X[y==cl,0],y=X[y==cl,1],alpha=0.8,c=cmap(idx), marker=markers[idx],label=cl)

plot_decision_region(X,y,classifier=ppn)
plt.xlabel('sepal length [cm]')
plt.ylabel('petal length [cm]')
plt.legend(loc='upperleft')
plt.show()
注:由于不想在shell里运行代码,然后又不知道怎么同时显示多个图像,所以前一步的图像显示没错后就注解了。
运行结果:

可以看到第六次迭代后就已经收敛了

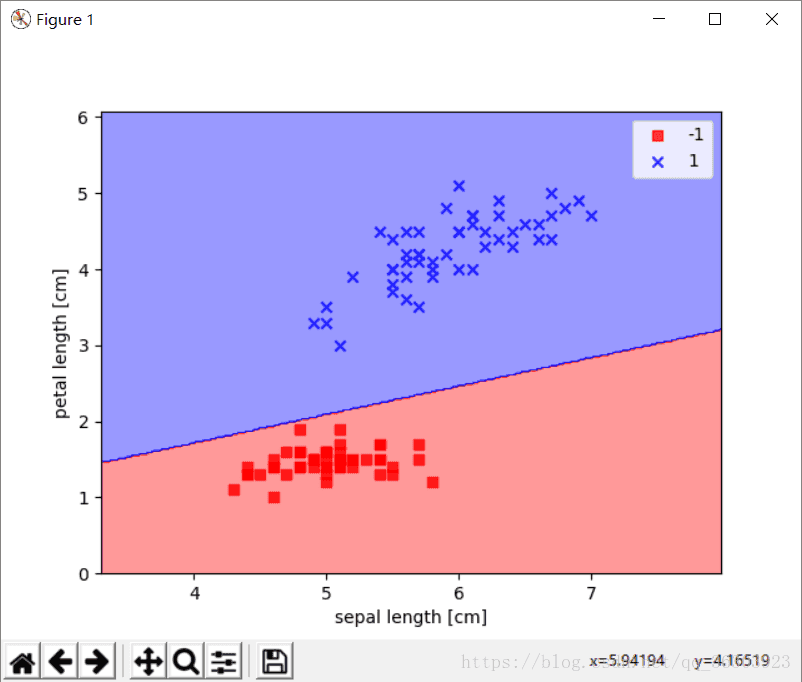
上图就是得到的决策区域的图像
3、注意事项
感知器面临的最大问题是算法的收敛。Frank Rosenblatt从数学上证明了:如果两个类别可以通过线性超平面进行划分,则感知器算法一定收敛。但是如果两个类别无法通过线性判定边界完全正确的划分,则权重会不断的更新,为防止应该预先设置权重更新的最大迭代次数。
4、函数使用方法记录
①numpy.where()
https://www.cnblogs.com/massquantity/p/8908859.html


②numpy.dot()
https://www.cnblogs.com/luhuan/p/7925790.html

③numpy.unique()
https://blog.csdn.net/a2224998/article/details/45499881
unique()保留数组中不同的值,返回两个参数。
>>> a=np.random.randint(0,5,8)
>>> a
array([2, 3, 3, 0, 1, 4, 2, 4])

>>> np.unique(a)
array([0, 1, 2, 3, 4])

>>> c,s=np.unique(b,return_index=True)
>>> c
array([0, 1, 2, 3, 4])
>>> s
array([3, 4, 0, 1, 5])(元素出现的起始位置)
④matplotlib
https://www.cnblogs.com/zhizhan/p/5615947.html
⑤plt.scatter()
https://blog.csdn.net/m0_37393514/article/details/81298503