LitePal源码学习(1)——建表流程(创建数据库)
add 2018/6/11
以上是LitePal的包结构,来自https://blog.csdn.net/android_app_2012/article/details/78025704
我学习的方式是通过使用LItePal的顺序来的。使用LitePal第一步是在asssets写litepal.xml文件,建表操作是LitePal.getDatabase(),那么可以以LitePal为切入点进行学习。
创建DB的过程:LitePal.getDatabase()
/**
     * Get a writable SQLiteDatabase.
     *
     * @return A writable SQLiteDatabase instance
     */
    public static SQLiteDatabase getDatabase() {
        synchronized (LitePalSupport.class) {
            return Connector.getDatabase();
        }
    }
可以看到这个方法给LitePalSupport加锁,然后调用Connector.getDatabase(),源码如下:
public static SQLiteDatabase getDatabase() {
		return getWritableDatabase();
	}
继续,Connector.getWritableDatabase():
	public synchronized static SQLiteDatabase getWritableDatabase() {
		LitePalOpenHelper litePalHelper = buildConnection();
		return litePalHelper.getWritableDatabase();
	}
LitePalOpenHelper继承自SQLiteOpenHelper,最后调用的getWritableDatabase(),是原生的方法,接下来将关注点放在Connextor.buildConnextion():
/**
	 * Build a connection to the database. This progress will analysis the
	 * litepal.xml file, and will check if the fields in LitePalAttr are valid,
	 * and it will open a SQLiteOpenHelper to decide to create tables or update
	 * tables or doing nothing depends on the version attributes.
	 *
	 * After all the stuffs above are finished. This method will return a
	 * LitePalHelper object.Notes this method could throw a lot of exceptions.
	 *
	 * @return LitePalHelper object.
	 *
	 * @throws org.litepal.exceptions.InvalidAttributesException
	 */
	private static LitePalOpenHelper buildConnection() {
		LitePalAttr litePalAttr = LitePalAttr.getInstance();
		litePalAttr.checkSelfValid();
		if (mLitePalHelper == null) {
			String dbName = litePalAttr.getDbName();
			if ("external".equalsIgnoreCase(litePalAttr.getStorage())) {
				dbName = LitePalApplication.getContext().getExternalFilesDir("") + "/databases/" + dbName;
			} else if (!"internal".equalsIgnoreCase(litePalAttr.getStorage()) && !TextUtils.isEmpty(litePalAttr.getStorage())) {
                // internal or empty means internal storage, neither or them means sdcard storage
                String dbPath = Environment.getExternalStorageDirectory().getPath() + "/" + litePalAttr.getStorage();
                dbPath = dbPath.replace("//", "/");
                if (BaseUtility.isClassAndMethodExist("android.support.v4.content.ContextCompat", "checkSelfPermission") &&
                        ContextCompat.checkSelfPermission(LitePalApplication.getContext(), Manifest.permission.WRITE_EXTERNAL_STORAGE) != PackageManager.PERMISSION_GRANTED) {
                    throw new DatabaseGenerateException(String.format(DatabaseGenerateException.EXTERNAL_STORAGE_PERMISSION_DENIED, dbPath));
                }
                File path = new File(dbPath);
                if (!path.exists()) {
                    path.mkdirs();
                }
                dbName = dbPath + "/" + dbName;
            }
			mLitePalHelper = new LitePalOpenHelper(dbName, litePalAttr.getVersion());
		}
		return mLitePalHelper;
	}
可以很清楚的看到做了3件事:
(1)获取了LitePalAttr单例;
(2)根据xml中设置的Storage标签创建了保存数据库的文件夹;
(3)创建LitePalOpenHelper并返回。
逻辑比较清晰,(2)不用解释,(1)大致可以推测是解析了xml,将配置都存在了LitePalAttr中,先放过,我们先看(3),也就是LitePalOpenHelper:
@Override
	public void onCreate(SQLiteDatabase db) {
		Generator.create(db);
	}

	@Override
	public void onUpgrade(SQLiteDatabase db, int oldVersion, int newVersion) {
		Generator.upgrade(db);
		SharedUtil.updateVersion(LitePalAttr.getInstance().getExtraKeyName(), newVersion);
	}
构造方法就是调用了父类的构造方法,主要看上面两个方法的实现,可以得知建表和更新表操作都在Generator中实现,并且DB的最新version是在SharedPreferences中存储的。
LitePal的模块化是比较规范的,接下来有两个方向可以走:
1.去LitePalAttr看xml解析
2.去Generator看建表和更新表的逻辑
先1后2,LitePalAttr:
	public static LitePalAttr getInstance() {
		if (litePalAttr == null) {
			synchronized (LitePalAttr.class) {
				if (litePalAttr == null) {
					litePalAttr = new LitePalAttr();
                    loadLitePalXMLConfiguration();
				}
			}
		}
		return litePalAttr;
	}
然后看loadLitePalXMLConfiguration()方法:
private static void loadLitePalXMLConfiguration() {
        if (BaseUtility.isLitePalXMLExists()) {
            LitePalConfig config = LitePalParser.parseLitePalConfiguration();
            litePalAttr.setDbName(config.getDbName());
            litePalAttr.setVersion(config.getVersion());
            litePalAttr.setClassNames(config.getClassNames());
            litePalAttr.setCases(config.getCases());
            litePalAttr.setStorage(config.getStorage());
        }
    }
关键在 LitePalConfig config = LitePalParser.parseLitePalConfiguration(); 这一句,那我们先看一下LitePalConfig的结构:
/**
     * The version of database.
     */
    private int version;

    /**
     * The name of database.
     */
    private String dbName;

    /**
     * The case of table names and column names and SQL.
     */
    private String cases;

    /**
     * Define where the .db file should be. Option values: internal external.
     */
    private String storage;

    /**
     * All the model classes that want to map in the database. Each class should
     * be given the full name including package name.
     */
    private List classNames;
我省略了其中自动生成的getter,setter方法,很显然这是一个单纯的bean,存储了数据库的基本信息。
那么接下来是LitePalParser.parseLitePalConfiguration():
public static LitePalConfig parseLitePalConfiguration() {
		if (parser == null) {
			parser = new LitePalParser();
		}
		return parser.usePullParse();
	}
到这里基本xml解析都做了什么就比较明确了,LitePalParser中只有3个方法,其中一个是读取assets文件夹的,另外两个分别是Pull解析和SAX解析,没有做什么特别的操作,那么解析xml的代码分析到这里就结束了,接下来回到回到Generator。
先码到这。
update 2018/6/12
Generator这一块在tablemanager包中,继承结构为:
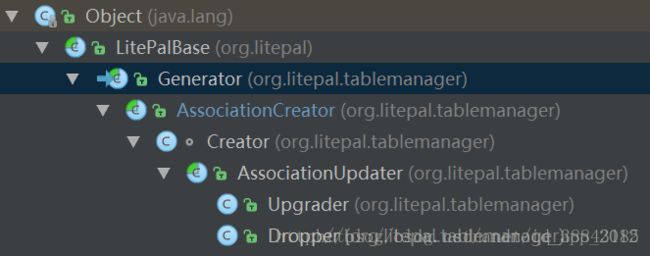
图来自开头提到的同一篇博客。
需要注意的时候xml解析结束后并没有建表,只是准备好了数据库名,表名等基本信息,而具体表的列名还没有获取。回到文章中间提到的Generator.create():
/**
	 * Create tables based on the class models defined in the litepal.xml file.
	 * After the tables are created, add association to these tables based on
	 * the associations between class models.
	 *
	 * @param db
	 *            Instance of SQLiteDatabase.
	 */
	static void create(SQLiteDatabase db) {
		create(db, true);
		addAssociation(db, true);
	}
根据注释可以很清楚的理解两个方法的作用,即先建表,再添加关联。那么关联是什么?郭霖大神(LitePal作者)写了一系列如何使用LitePal的博客中讲解了这个关联https://blog.csdn.net/guolin_blog/article/details/39207945
看过之后相信你已经理解关联的含义了,那么我们回归正题,先看看create两个参数的重载方法:
/**
	 * Create tables based on the class models defined in the litepal.xml file.
	 * After the tables are created, add association to these tables based on
	 * the associations between class models.
	 *
	 * @param db
	 *            Instance of SQLiteDatabase.
	 * @param force
	 *            Drop the table first if it already exists.
	 */
	private static void create(SQLiteDatabase db, boolean force) {
		Creator creator = new Creator();
		creator.createOrUpgradeTable(db, force);
	}
这里的第二个参数force解释的不清楚,但我们可以一直看下去他到底控制了什么。先进入Creator.createOrUpgradeTable(db, force):
@Override
	protected void createOrUpgradeTable(SQLiteDatabase db, boolean force) {
		for (TableModel tableModel : getAllTableModels()) {
			createOrUpgradeTable(tableModel, db, force);
		}
	}

    protected void createOrUpgradeTable(TableModel tableModel, SQLiteDatabase db, boolean force) {
        execute(getCreateTableSQLs(tableModel, db, force), db);
        giveTableSchemaACopy(tableModel.getTableName(), Const.TableSchema.NORMAL_TABLE, db);
    }
force在两参的方法中没有用到,先放下,看看它是如何获得所有表的,TableModel也是一个bean,有三个成员,分别是表名、所有列的List、class名(用于生成表名),那么看下getAllTableModels()这个方法(继承自Generator):
protected Collection getAllTableModels() {
		if (mTableModels == null) {
			mTableModels = new ArrayList();
		}
		if (!canUseCache()) {
			mTableModels.clear();
			for (String className : LitePalAttr.getInstance().getClassNames()) {
				mTableModels.add(getTableModel(className));
			}
		}
		return mTableModels;
	}
canUseCache方法很简单,就是看你之前有没有得到过TableModel,没有或者与之前获得的不同则重新获取。那么获取列的逻辑应该就在getTableModel中了,这个方法继承自LitePalBase:
protected TableModel getTableModel(String className) {
		String tableName = DBUtility.getTableNameByClassName(className);
		TableModel tableModel = new TableModel();
		tableModel.setTableName(tableName);
		tableModel.setClassName(className);
		List supportedFields = getSupportedFields(className);
		for (Field field : supportedFields) {
                    ColumnModel columnModel = convertFieldToColumnModel(field);
                    tableModel.addColumnModel(columnModel);
		}
		return tableModel;
	}
这是一个标准的反射实例,实现不复杂但是内容很多,我就不一一展开了,大概做了这些事:获取列名(字段);根据注解获取nullable,unique等属性;类型转换(见typechange包);存入ColumnModel,最后加入到TableModel中。
ColumnModel是列的模型,也是一个bean,内容如下:
    private String columnName;
    private String columnType;
    private boolean isNullable = true;
    private boolean isUnique = false;
    private String defaultValue = "";
columnType指的是转换后的SQLite类型如text等。
经过以上步骤我们获取到了TableModel,回到createOrUpgradeTable方法:
    protected void createOrUpgradeTable(TableModel tableModel, SQLiteDatabase db, boolean force) {
        execute(getCreateTableSQLs(tableModel, db, force), db);
        giveTableSchemaACopy(tableModel.getTableName(), Const.TableSchema.NORMAL_TABLE, db);
}protected List getCreateTableSQLs(TableModel tableModel, SQLiteDatabase db, boolean force) {
List sqls = new ArrayList();
if (force) {
sqls.add(generateDropTableSQL(tableModel));
sqls.add(generateCreateTableSQL(tableModel));
} else {
if (DBUtility.isTableExists(tableModel.getTableName(), db)) {
return null;
} else {
sqls.add(generateCreateTableSQL(tableModel));
}
}
return sqls;
} 终于用到了force这个值,逻辑也比较清晰,为true时先删表再建表(也因此这一步可能会生成2条sql语句,不过这没有多大影响,在execute()中会对List中的每一条语句依次执行),为false时对已存在的表不做任何操作。删表语句是(最终的方法继承自AssociationCreator):
return "drop table if exists " + tableName;建表语句也差不多,就是要考虑的东西多一些,我们来看一下AssociationCreator.generateCreateTableSQL方法:
protected String generateCreateTableSQL(String tableName, List columnModels,
			boolean autoIncrementId) {
		StringBuilder createTableSQL = new StringBuilder("create table ");
		createTableSQL.append(tableName).append(" (");
		if (autoIncrementId) {
			createTableSQL.append("id integer primary key autoincrement,");
		}
		if (isContainsOnlyIdField(columnModels)) {
            // Remove the last comma when only have id field in model.
			createTableSQL.deleteCharAt(createTableSQL.length() - 1);
		}
		boolean needSeparator = false;
        for (ColumnModel columnModel : columnModels) {
            if (columnModel.isIdColumn()) {//如果有id字段则跳过
                continue;
            }
            if (needSeparator) {
                createTableSQL.append(", ");
            }
            needSeparator = true;
            createTableSQL.append(columnModel.getColumnName()).append(" ").append(columnModel.getColumnType());
            if (!columnModel.isNullable()) {
                createTableSQL.append(" not null");
            }
            if (columnModel.isUnique()) {
                createTableSQL.append(" unique");
            }
            String defaultValue = columnModel.getDefaultValue();
            if (!TextUtils.isEmpty(defaultValue)) {
                createTableSQL.append(" default ").append(defaultValue);
            }
        }
		createTableSQL.append(")");
		LogUtil.d(TAG, "create table sql is >> " + createTableSQL);
		return createTableSQL.toString();
	}
调用的时候第三个参数是true,false出现在其他时候。可以看到id是在生成建表语句才添加的。
这样,理论上一个建表流程就完成了,但其实在createOrUpgradeTable还有一句:
    protected void createOrUpgradeTable(TableModel tableModel, SQLiteDatabase db, boolean force) {
        execute(getCreateTableSQLs(tableModel, db, force), db);
        giveTableSchemaACopy(tableModel.getTableName(), Const.TableSchema.NORMAL_TABLE, db);
    }
那么这个giveTableSchemaACopy是干什么的呢?
/**
	 * Once there's new table created. The table name will be saved into
	 * table_schema as a copy. Each table name will be saved only once.
	 *
	 * @param tableName
	 *            The table name.
	 * @param tableType
	 *            0 means normal table, 1 means intermediate join table.
	 * @param db
	 *            Instance of SQLiteDatabase.
	 */
	protected void giveTableSchemaACopy(String tableName, int tableType, SQLiteDatabase db) {
		StringBuilder sql = new StringBuilder("select * from ");
		sql.append(Const.TableSchema.TABLE_NAME);
		LogUtil.d(TAG, "giveTableSchemaACopy SQL is >> " + sql);
		Cursor cursor = null;
		try {
			cursor = db.rawQuery(sql.toString(), null);
			if (isNeedtoGiveACopy(cursor, tableName)) {
				ContentValues values = new ContentValues();
				values.put(Const.TableSchema.COLUMN_NAME, BaseUtility.changeCase(tableName));
				values.put(Const.TableSchema.COLUMN_TYPE, tableType);
				db.insert(Const.TableSchema.TABLE_NAME, null, values);
			}
		} catch (Exception e) {
			e.printStackTrace();
		} finally {
			if (cursor != null) {
				cursor.close();
			}
		}
	}
注释已经写的很清楚了,那就是将新建表的表明放入table_schema中,这下我终于知道LitePal中的这张一直存在的表是干什么的了。这张表实在LitePalAttr中建立的,见getClassNames()。
不要忘了,LitePal是有关联的,建表后要建立表关联,回到Generator,看一下他的addAssociation方法:
	static void create(SQLiteDatabase db) {
		create(db, true);
		addAssociation(db, true);
	}
private static void addAssociation(SQLiteDatabase db, boolean force) {
AssociationCreator associationsCreator = new Creator();
associationsCreator.addOrUpdateAssociation(db, force);
}进入associationsCreator.addOrUpdateAssociation(db, force):
	@Override
	protected void addOrUpdateAssociation(SQLiteDatabase db, boolean force) {
		addAssociations(getAllAssociations(), db, force);
	}
接下来会调用三参的addAssociations方法,多的参数是getAllAssociations(),看一下它返回什么:
	protected Collection getAllAssociations() {
		if (mAllRelationModels == null || mAllRelationModels.isEmpty()) {
			mAllRelationModels = getAssociations(LitePalAttr.getInstance().getClassNames());
		}
		return mAllRelationModels;
	}
protected Collection getAssociations(List classNames) {//继承自LitePalBase
if (mAssociationModels == null) {
mAssociationModels = new HashSet();
}
if (mGenericModels == null) {
mGenericModels = new HashSet();
}
mAssociationModels.clear();
mGenericModels.clear();
for (String className : classNames) {
analyzeClassFields(className, GET_ASSOCIATIONS_ACTION);
}
return mAssociationModels;
} 他返回了关联模型的集合mAssociationModels,要想继续下去,我们要先理解mAssociationModels和mGenericModels是做什么的。这两者都是继承自LitePalBase的Collection(继承关系乱了的可以回去看一下继承关系表),元素分别是AssociationsModel和GenericModel。
AssociationsModel:
/**
	 * Table name.
	 */
	private String tableName;

	/**
	 * Associated table name.
	 */
	private String associatedTableName;

	/**
	 * The table which holds foreign key.
	 */
	private String tableHoldsForeignKey;

	/**
	 * The association type, including {@link Const.Model#MANY_TO_ONE},
	 * {@link Const.Model#MANY_TO_MANY}, {@link Const.Model#ONE_TO_ONE}.
	 */
private int associationType; /**
* Table name.
*/
private String tableName;
/**
* Column name for storing value.
*/
private String valueColumnName;
/**
* Column type for storing value.
*/
private String valueColumnType;
/**
* Column name for reference with main table.
*/
private String valueIdColumnName;
/**
* Only used when query generic data. This is cache fields for improving performance.
*/
private String getMethodName;看了我上面提到的郭霖大神的博客后应该能够理解关联模型中每个成员的含义,那么这个GenericModel是什么?
update 2018/6/13
不知道不要紧,继续顺着走下去,LitePalBase的analyzeClassFields方法:
	private void analyzeClassFields(String className, int action) {
		try {
            Class dynamicClass = Class.forName(className);
			Field[] fields = dynamicClass.getDeclaredFields();
			for (Field field : fields) {
				if (isNonPrimitive(field)) {
                    Column annotation = field.getAnnotation(Column.class);
                    if (annotation != null && annotation.ignore()) {
                        continue;
                    }
					oneToAnyConditions(className, field, action);
					manyToAnyConditions(className, field, action);
				}
			}
		} catch (ClassNotFoundException ex) {
			ex.printStackTrace();
			throw new DatabaseGenerateException(DatabaseGenerateException.CLASS_NOT_FOUND + className);
		}
	}
这里比较关键的是isNonPrimitive(field)这个判断,如果这个field不是原始类型则返回true,这种情况下他可能是一个类,那么对应1对1的情况,如果是List则对应n对1或n的情况。接下来看它是如何分辨不同的关联类型的。
	private void oneToAnyConditions(String className, Field field, int action) throws ClassNotFoundException {
		Class fieldTypeClass = field.getType();
		// If the mapping list contains the class name
		// defined in one class.
		if (LitePalAttr.getInstance().getClassNames().contains(fieldTypeClass.getName())) {
			Class reverseDynamicClass = Class.forName(fieldTypeClass.getName());
			Field[] reverseFields = reverseDynamicClass.getDeclaredFields();
			// Look up if there's a reverse association
			// definition in the reverse class.
			boolean reverseAssociations = false;
			// Begin to check the fields of the defined
			// class.
            for (Field reverseField : reverseFields) {
                if (!Modifier.isStatic(reverseField.getModifiers())) {
                    Class reverseFieldTypeClass = reverseField.getType();
                    // If there's the from class name in the
                    // defined class, they are one2one bidirectional
                    // associations.
                    if (className.equals(reverseFieldTypeClass.getName())) {
                        if (action == GET_ASSOCIATIONS_ACTION) {
                            addIntoAssociationModelCollection(className, fieldTypeClass.getName(),
                                    fieldTypeClass.getName(), Const.Model.ONE_TO_ONE);
                        } else if (action == GET_ASSOCIATION_INFO_ACTION) {
                            addIntoAssociationInfoCollection(className, fieldTypeClass.getName(),
                                    fieldTypeClass.getName(), field, reverseField, Const.Model.ONE_TO_ONE);
                        }
                        reverseAssociations = true;
                    }
                    // If there's the from class Set or List in
                    // the defined class, they are many2one bidirectional
                    // associations.
                    else if (isCollection(reverseFieldTypeClass)) {
                        String genericTypeName = getGenericTypeName(reverseField);
                        if (className.equals(genericTypeName)) {
                            if (action == GET_ASSOCIATIONS_ACTION) {
                                addIntoAssociationModelCollection(className, fieldTypeClass.getName(),
                                        className, Const.Model.MANY_TO_ONE);
                            } else if (action == GET_ASSOCIATION_INFO_ACTION) {
                                addIntoAssociationInfoCollection(className, fieldTypeClass.getName(),
                                        className, field, reverseField, Const.Model.MANY_TO_ONE);
                            }
                            reverseAssociations = true;
                        }
                    }
                }
            }
            // If there's no from class in the defined class, they are
            // one2one unidirectional associations.
            if (!reverseAssociations) {
                if (action == GET_ASSOCIATIONS_ACTION) {
                    addIntoAssociationModelCollection(className, fieldTypeClass.getName(),
                            fieldTypeClass.getName(), Const.Model.ONE_TO_ONE);
                } else if (action == GET_ASSOCIATION_INFO_ACTION) {
                    addIntoAssociationInfoCollection(className, fieldTypeClass.getName(),
                            fieldTypeClass.getName(), field, null, Const.Model.ONE_TO_ONE);
                }
            }
		}
	}
其实注释已经恰到好处了,先判断是否在mapping中定义过,没有的话是和表无关的field,不考虑。如果有,那么至少是单向的ONE_TO_ONE关联。接下来判断在被关联的表中是否有反过来的关联,有就是双向ONE_TO_ONE,没有再判断是否是Collection,如果是那就是MANY_TO_ONE关联。在判断MANY_TO_ONE关联的时候有getGenericTypeName这样一个方法,我就不展开了,他的作用是获取Collection
	private void addIntoAssociationModelCollection(String className, String associatedClassName,
			String classHoldsForeignKey, int associationType) {
		AssociationsModel associationModel = new AssociationsModel();
		associationModel.setTableName(DBUtility.getTableNameByClassName(className));
		associationModel.setAssociatedTableName(DBUtility.getTableNameByClassName(associatedClassName));
		associationModel.setTableHoldsForeignKey(DBUtility.getTableNameByClassName(classHoldsForeignKey));
		associationModel.setAssociationType(associationType);
		mAssociationModels.add(associationModel);
	}
这样,一个关联就建立好了,可以发现并没有GenericModel这个东西,不过相信根据getGenericTypeName方法你可能已经对GenericModel有了一个猜测。先继续看下去吧,manyToAnyConditions:
	private void manyToAnyConditions(String className, Field field, int action) throws ClassNotFoundException {
		if (isCollection(field.getType())) {
			String genericTypeName = getGenericTypeName(field);
			// If the mapping list contains the genericTypeName, begin to check
			// this genericTypeName class.
			if (LitePalAttr.getInstance().getClassNames().contains(genericTypeName)) {
				Class reverseDynamicClass = Class.forName(genericTypeName);
				Field[] reverseFields = reverseDynamicClass.getDeclaredFields();
				// Look up if there's a reverse association
				// definition in the reverse class.
				boolean reverseAssociations = false;
                for (Field reverseField : reverseFields) {
                    // Only map private fields
                    if (!Modifier.isStatic(reverseField.getModifiers())) {
                        Class reverseFieldTypeClass = reverseField.getType();
                        // If there's a from class name defined in the reverse
                        // class, they are many2one bidirectional
                        // associations.
                        if (className.equals(reverseFieldTypeClass.getName())) {
                            if (action == GET_ASSOCIATIONS_ACTION) {
                                addIntoAssociationModelCollection(className, genericTypeName,
                                        genericTypeName, Const.Model.MANY_TO_ONE);
                            } else if (action == GET_ASSOCIATION_INFO_ACTION) {
                                addIntoAssociationInfoCollection(className, genericTypeName, genericTypeName,
                                        field, reverseField, Const.Model.MANY_TO_ONE);
                            }
                            reverseAssociations = true;
                        }
                        // If there's a List or Set contains from class name
                        // defined in the reverse class, they are many2many
                        // association.
                        else if (isCollection(reverseFieldTypeClass)) {
                            String reverseGenericTypeName = getGenericTypeName(reverseField);
                            if (className.equals(reverseGenericTypeName)) {
                                if (action == GET_ASSOCIATIONS_ACTION) {
                                    if (className.equalsIgnoreCase(genericTypeName)) {
                                        // This is M2M self association condition. Regard as generic model condition.
                                        GenericModel genericModel = new GenericModel();
                                        genericModel.setTableName(DBUtility.getGenericTableName(className, field.getName()));
                                        genericModel.setValueColumnName(DBUtility.getM2MSelfRefColumnName(field));
                                        genericModel.setValueColumnType("integer");
                                        genericModel.setValueIdColumnName(DBUtility.getGenericValueIdColumnName(className));
                                        mGenericModels.add(genericModel);
                                    } else {
                                        addIntoAssociationModelCollection(className, genericTypeName, null,
                                                Const.Model.MANY_TO_MANY);
                                    }
                                } else if (action == GET_ASSOCIATION_INFO_ACTION) {
                                    if (!className.equalsIgnoreCase(genericTypeName)) {
                                        addIntoAssociationInfoCollection(className, genericTypeName, null, field,
                                                reverseField, Const.Model.MANY_TO_MANY);
                                    }
                                }
                                reverseAssociations = true;
                            }
                        }
                    }
                }
                // If there's no from class in the defined class, they
                // are many2one unidirectional associations.
                if (!reverseAssociations) {
                    if (action == GET_ASSOCIATIONS_ACTION) {
                        addIntoAssociationModelCollection(className, genericTypeName,
                                genericTypeName, Const.Model.MANY_TO_ONE);
                    } else if (action == GET_ASSOCIATION_INFO_ACTION) {
                        addIntoAssociationInfoCollection(className, genericTypeName, genericTypeName,
                                field, null, Const.Model.MANY_TO_ONE);
                    }
                }
			} else if(BaseUtility.isGenericTypeSupported(genericTypeName) && action == GET_ASSOCIATIONS_ACTION) {
                GenericModel genericModel = new GenericModel();
                genericModel.setTableName(DBUtility.getGenericTableName(className, field.getName()));
                genericModel.setValueColumnName(DBUtility.convertToValidColumnName(field.getName()));
                genericModel.setValueColumnType(getColumnType(genericTypeName));
                genericModel.setValueIdColumnName(DBUtility.getGenericValueIdColumnName(className));
                mGenericModels.add(genericModel);
            }
		}
	}
和oneToAnyConditions很相似,自己读一下就好了,然后分析一下GenericModel是什么。在这个方法里GenericModel出现了两次,第一次在有类似class Singer{List
// This is M2M self association condition. Regard as generic model condition.else if(BaseUtility.isGenericTypeSupported(genericTypeName) && action == GET_ASSOCIATIONS_ACTION)的分支,也就是说Field不在mapping中才考虑这种情况,看一下BaseUtility.isGenericTypeSupported(genericTypeName):
    public static boolean isGenericTypeSupported(String genericType) {
        if ("java.lang.String".equals(genericType)) {
            return true;
        } else if ("java.lang.Integer".equals(genericType)) {
            return true;
        } else if ("java.lang.Float".equals(genericType)) {
            return true;
        } else if ("java.lang.Double".equals(genericType)) {
            return true;
        } else if ("java.lang.Long".equals(genericType)) {
            return true;
        } else if ("java.lang.Short".equals(genericType)) {
            return true;
        } else if ("java.lang.Boolean".equals(genericType)) {
            return true;
        } else if ("java.lang.Character".equals(genericType)) {
            return true;
        }
        return false;
}回到addAssociations(getAllAssociations(), db, force)这个方法:
	/**
	 * Analyzing all the association models in the collection. Judge their
	 * association types. If it's one2one or many2one associations, add the
	 * foreign key column to the associated table. If it's many2many
	 * associations, create an intermediate join table.
	 *
	 * @param associatedModels
	 *            A collection contains all the association models.Use the
	 *            association models to get association type and associated
	 *            table names.
	 * @param db
	 *            Instance of SQLiteDatabase.
	 * @param force
	 *            Drop the table first if it already exists.
	 */
	private void addAssociations(Collection associatedModels, SQLiteDatabase db,
			boolean force) {
		for (AssociationsModel associationModel : associatedModels) {
			if (Const.Model.MANY_TO_ONE == associationModel.getAssociationType()
					|| Const.Model.ONE_TO_ONE == associationModel.getAssociationType()) {
				addForeignKeyColumn(associationModel.getTableName(),
						associationModel.getAssociatedTableName(),
						associationModel.getTableHoldsForeignKey(), db);
			} else if (Const.Model.MANY_TO_MANY == associationModel.getAssociationType()) {
				createIntermediateTable(associationModel.getTableName(),
						associationModel.getAssociatedTableName(), db, force);
			}
		}
        for (GenericModel genericModel : getGenericModels()) {
            createGenericTable(genericModel, db, force);
        }
	}
这一块就是给ONE_TO_ONE和MANY_TO_ONE关联的表加上外键,给MANY_TO_MANY的关联表建立中间表(加外键和建中间表的的规则在郭霖的博客中,链接是上文中提到的)。生成建表语句和插入列的方法我就不贴了,都比较简单
还是说一下吧。如果两个表的名分别为A和B,那么在各种情况下:
(1)one2one:在这种情况下,会在在A表中会添加一列B_id,或者在B表中添加一列A_id(固定为tableName_id);
(2)many2one:如果A类中有B类的Collection,那么在B表中会添加一列A_id(固定为tableName_id),反之亦然;
(3)many2many:如果A类中有B类的Collection,且B类中有A类的Collection,那么会建立一张中间表,表名为A_B(固定为两张表名的字典序连接),有两列,分别是A_id和B_id。
最后,表都建立完后会更新Table_Schema,将新建的表(中间表和Generic表)存入其中,也就是调用一遍giveTableSchemaACopy方法,至此,一个完整的建表流程就结束了。
前天 2017/6/13 郭霖大神发布了LitePal2.0,代码结构更清晰,并且支持cotlin,可以去围观下:
Android数据库高手秘籍(九)——赶快使用LitePal 2.0版本吧
PS:我这篇博客是基于LitePal2.0的。
如果感兴趣,可以继续阅读LitePal源码学习(2)——更新表流程(更新数据库)