SpringBoot官方文档地址:
https://docs.spring.io/spring-boot/docs/current-SNAPSHOT/reference/htmlsingle/#boot-documentation-about
Spring Boot简介
这里引用一下SpringBoot官网OverView页面的介绍
Spring Boot makes it easy to create stand-alone, production-grade Spring based Applications that you can "just run".
We take an opinionated view of the Spring platform and third-party libraries so you can get started with minimum fuss. Most Spring Boot applications need very little Spring configuration.
特点
- Create stand-alone Spring applications
创建独立的Spring应用程序 - Embed Tomcat, Jetty or Undertow directly (no need to deploy WAR files)
嵌入式Tomcat,Jetty或Undertow(无需部署WAR文件) - Provide opinionated 'starter' dependencies to simplify your build configuration
提供自己的'starter'依赖来简化你的项目构建配置 - Automatically configure Spring and 3rd party libraries whenever possible
尽可能自动配置Spring以及第三方库 - Provide production-ready features such as metrics, health checks and externalized
configuration
提供生产就绪功能,如指标,健康检查和外部配置 - Absolutely no code generation and no requirement for XML configuration
绝对不会生成代码,并且不需要XML配置
我的理解
以往的spring应用往往需要大量的xml配置,为了改变这一现状spring团队引入了java config(主要依赖@Configuration、@Bean等注解)配置方案,但在整合第三方库时依然需要配置很多固定的Bean,这和xml配置一样仍然有些繁琐,因此spring boot项目应运而生,采用自动化配置方案简化spring应用开发的配置工作。
关于全java config的web项目可以参看我的github https://github.com/fulgens-cn/webapp
构建项目
第一个SpringBoot项目以官网Guides页面的Building a RESTful Web Service指导为例

构建步骤
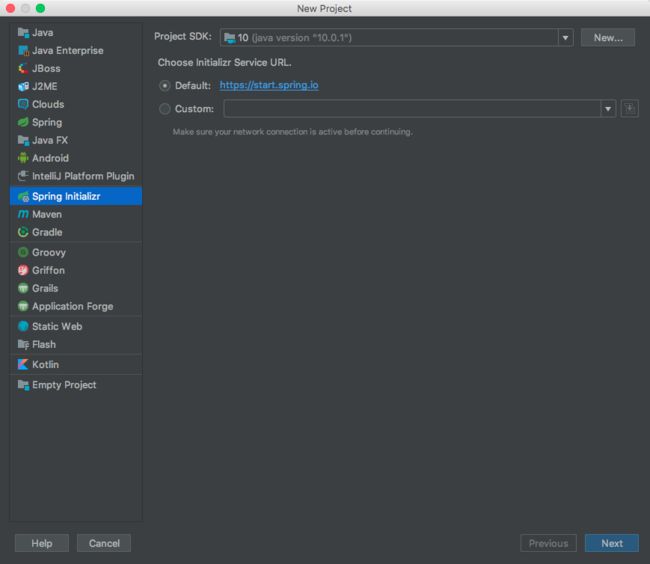
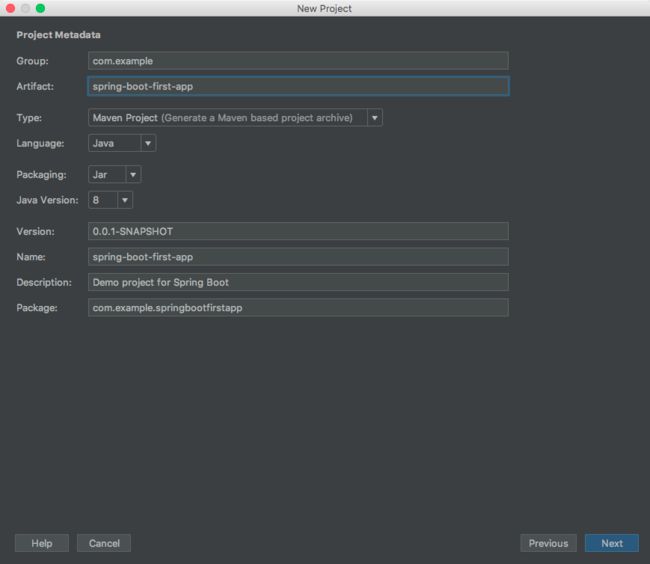
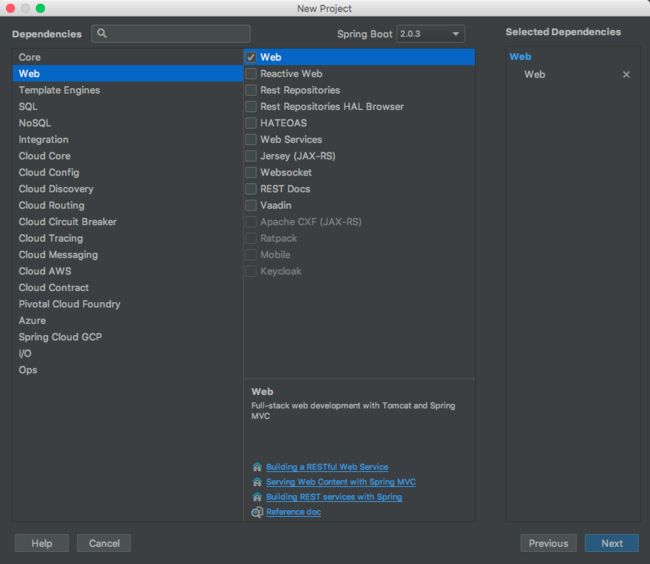
方法一:在 Spring Boot官方Initializer页面 在线构建工程再导入到Ide中
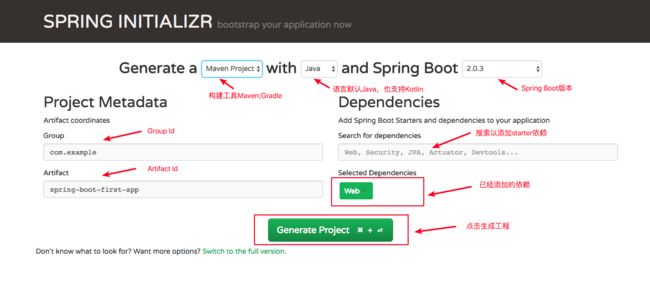
方法二:直接在Idea中Create New Project --> Spring Initializr --> 填写group、artifact -->钩上web --> 点下一步就行了
工程目录结构
-src
    -main
        -java
            -package
                #主函数,启动类,运行它如果运行了 Tomcat、Jetty、Undertow 等容器
                -SpringbootApplication
        -resouces
            #存放静态资源 js/css/images 等
            - statics
            #存放 html 模板文件
            - templates
            #主要的配置文件,SpringBoot启动时候会自动加载application.yml/application.properties
            - application.properties
    #测试文件存放目录
    -test
        # pom.xml 文件是Maven构建的基础,里面包含了我们所依赖JAR和Plugin的信息
        - pom.xml
pom.xml
    4.0.0

    com.example
    spring-boot-first-app
    0.0.1-SNAPSHOT
    jar

    spring-boot-first-app
    Demo project for Spring Boot


        org.springframework.boot
        spring-boot-starter-parent
        2.0.3.RELEASE


        UTF-8
        UTF-8
        1.8


            org.springframework.boot
            spring-boot-starter-web


            org.springframework.boot
            spring-boot-starter-test
            test


                org.springframework.boot
                spring-boot-maven-plugin
coding
创建实体类
com/example/springbootfirstapp/hello/Greeting.java
package com.example.springbootfirstapp.hello;

public class Greeting {

    private final long id;

    private final String content;

    public Greeting(long id, String content) {
        this.id = id;
        this.content = content;
    }

    public long getId() {
        return id;
    }

    public String getContent() {
        return content;
    }

}
创建controller
com/example/springbootfirstapp/hello/GreetingController.java
package com.example.springbootfirstapp.hello;

import org.springframework.web.bind.annotation.RequestMapping;
import org.springframework.web.bind.annotation.RequestParam;
import org.springframework.web.bind.annotation.RestController;

import java.util.concurrent.atomic.AtomicLong;

@RestController
public class GreetingController {

    private static final String template = "Hello, %s!";

    private final AtomicLong counter = new AtomicLong();

    @RequestMapping("/greeting")
    public Greeting greeting(@RequestParam(value="name", defaultValue="World") String name) {
        return new Greeting(counter.incrementAndGet(),
                String.format(template, name));
    }

}
上面这个Controller非常简单,以下内容是官网的解释(值得注意的是解释的最后两段):
This controller is concise and simple, but there’s plenty going on under the hood. Let’s break it down step by step.
The @RequestMapping annotation ensures that HTTP requests to /greeting are mapped to the greeting() method.
The above example does not specify
GETvs.PUT,POST, and so forth, because@RequestMappingmaps all HTTP operations by default. Use@RequestMapping(method=GET)to narrow this mapping.
@RequestParam binds the value of the query string parameter name into the nameparameter of the greeting() method. If the name parameter is absent in the request, the defaultValue of "World" is used.
The implementation of the method body creates and returns a new Greeting object with id and content attributes based on the next value from the counter, and formats the given name by using the greeting template.
A key difference between a traditional MVC controller and the RESTful web service controller above is the way that the HTTP response body is created. Rather than relying on a view technology to perform server-side rendering of the greeting data to HTML, this RESTful web service controller simply populates and returns a Greeting object. The object data will be written directly to the HTTP response as JSON.
This code uses Spring 4’s new @RestController annotation, which marks the class as a controller where every method returns a domain object instead of a view. It’s shorthand for @Controller and @ResponseBody rolled together.
The Greeting object must be converted to JSON. Thanks to Spring’s HTTP message converter support, you don’t need to do this conversion manually. Because Jackson 2 is on the classpath, Spring’s MappingJackson2HttpMessageConverter is automatically chosen to convert the Greeting instance to JSON.
启动第一个Spring Boot应用
方法一:直接运行SpringBootFirstAppApplication中的main方法
Although it is possible to package this service as a traditional WAR file for deployment to an external application server, the simpler approach demonstrated below creates a standalone application. You package everything in a single, executable JAR file, driven by a good old Java
main()method. Along the way, you use Spring’s support for embedding the Tomcat servlet container as the HTTP runtime, instead of deploying to an external instance.
src/main/java/com/example/springbootfirstapp/SpringBootFirstAppApplication.java
package com.example.springbootfirstapp;

import org.springframework.boot.SpringApplication;
import org.springframework.boot.autoconfigure.SpringBootApplication;

@SpringBootApplication
public class SpringBootFirstAppApplication {

    public static void main(String[] args) {
        SpringApplication.run(SpringBootFirstAppApplication.class, args);
    }
}
@SpringBootApplication注解加在SpringBoot应用启动类上,大致相当于以下注解作用的集合:
@Configuration标注这个类为一个配置类@EnableAutoConfiguration开启Spring Boot的自动化配置功能- 通常你会为一个Spring MVC 应用添加
@EnableWebMvc注解, 但Spring Boot会当类路径下存在spring mvc时自动添加。@ComponentScan会使Spring扫描启动类所在包下的其他组件,如controller。
启动类的mian()方法中调用了Spring Boot的SpringApplication.run() 方法来启动一个应用。不同于以往的web应用,Spring Boot应用没有一行xml配置,也没有web.xml文件。100% pure Java and don’t have to deal with configuring any plumbing or infrastructure
方法二:maven命令启动
cd到项目主目录后执行(其中-Dtest.skip=true表示跳过单元测试)
mvn clean package
mvn spring-boot:run -Dtest.skip=true
当然如果是Gradle构建,则可以执行以下命令
gradle build
gradle bootRun
方法三:以java -jar的方式启动
maven打包完成后cd到target目录下执行以下命令,jar包名称视自己情况而定
java -jar spring-boot-first-app-0.0.1-SNAPSHOT.jar
启动成功显示大致如下:
  .   ____          _            __ _ _
 /\\ / ___'_ __ _ _(_)_ __  __ _ \ \ \ \
( ( )\___ | '_ | '_| | '_ \/ _` | \ \ \ \
 \\/  ___)| |_)| | | | | || (_| |  ) ) ) )
  '  |____| .__|_| |_|_| |_\__, | / / / /
 =========|_|==============|___/=/_/_/_/
 :: Spring Boot ::        (v2.0.3.RELEASE)

2018-06-24 14:32:15.310  INFO 1959 --- [           main] c.e.s.SpringBootFirstAppApplication      : Starting SpringBootFirstAppApplication on fulgensdeMacBook-Pro.local with PID 1959 (/Users/fulgens/IdeaProjects/SpringBootLearning/spring-boot-first-app/target/classes started by fulgens in /Users/fulgens/IdeaProjects/SpringBootLearning/spring-boot-first-app)
2018-06-24 14:32:15.314  INFO 1959 --- [           main] c.e.s.SpringBootFirstAppApplication      : No active profile set, falling back to default profiles: default
2018-06-24 14:32:15.370  INFO 1959 --- [           main] ConfigServletWebServerApplicationContext : Refreshing org.springframework.boot.web.servlet.context.AnnotationConfigServletWebServerApplicationContext@4eb92a67: startup date [Sun Jun 24 14:32:15 CST 2018]; root of context hierarchy
WARNING: An illegal reflective access operation has occurred
WARNING: Illegal reflective access by org.springframework.cglib.core.ReflectUtils$1 (file:/usr/local/dev/repository/org/springframework/spring-core/5.0.7.RELEASE/spring-core-5.0.7.RELEASE.jar) to method java.lang.ClassLoader.defineClass(java.lang.String,byte[],int,int,java.security.ProtectionDomain)
WARNING: Please consider reporting this to the maintainers of org.springframework.cglib.core.ReflectUtils$1
WARNING: Use --illegal-access=warn to enable warnings of further illegal reflective access operations
WARNING: All illegal access operations will be denied in a future release
2018-06-24 14:32:16.378  INFO 1959 --- [           main] o.s.b.w.embedded.tomcat.TomcatWebServer  : Tomcat initialized with port(s): 8080 (http)
2018-06-24 14:32:16.418  INFO 1959 --- [           main] o.apache.catalina.core.StandardService   : Starting service [Tomcat]
2018-06-24 14:32:16.418  INFO 1959 --- [           main] org.apache.catalina.core.StandardEngine  : Starting Servlet Engine: Apache Tomcat/8.5.31
2018-06-24 14:32:16.435  INFO 1959 --- [ost-startStop-1] o.a.catalina.core.AprLifecycleListener   : The APR based Apache Tomcat Native library which allows optimal performance in production environments was not found on the java.library.path: [/Users/fulgens/Library/Java/Extensions:/Library/Java/Extensions:/Network/Library/Java/Extensions:/System/Library/Java/Extensions:/usr/lib/java:.]
2018-06-24 14:32:16.540  INFO 1959 --- [ost-startStop-1] o.a.c.c.C.[Tomcat].[localhost].[/]       : Initializing Spring embedded WebApplicationContext
2018-06-24 14:32:16.540  INFO 1959 --- [ost-startStop-1] o.s.web.context.ContextLoader            : Root WebApplicationContext: initialization completed in 1170 ms
2018-06-24 14:32:16.676  INFO 1959 --- [ost-startStop-1] o.s.b.w.servlet.ServletRegistrationBean  : Servlet dispatcherServlet mapped to [/]
2018-06-24 14:32:16.679  INFO 1959 --- [ost-startStop-1] o.s.b.w.servlet.FilterRegistrationBean   : Mapping filter: 'characterEncodingFilter' to: [/*]
2018-06-24 14:32:16.680  INFO 1959 --- [ost-startStop-1] o.s.b.w.servlet.FilterRegistrationBean   : Mapping filter: 'hiddenHttpMethodFilter' to: [/*]
2018-06-24 14:32:16.680  INFO 1959 --- [ost-startStop-1] o.s.b.w.servlet.FilterRegistrationBean   : Mapping filter: 'httpPutFormContentFilter' to: [/*]
2018-06-24 14:32:16.680  INFO 1959 --- [ost-startStop-1] o.s.b.w.servlet.FilterRegistrationBean   : Mapping filter: 'requestContextFilter' to: [/*]
2018-06-24 14:32:16.811  INFO 1959 --- [           main] o.s.w.s.handler.SimpleUrlHandlerMapping  : Mapped URL path [/**/favicon.ico] onto handler of type [class org.springframework.web.servlet.resource.ResourceHttpRequestHandler]
2018-06-24 14:32:17.016  INFO 1959 --- [           main] s.w.s.m.m.a.RequestMappingHandlerAdapter : Looking for @ControllerAdvice: org.springframework.boot.web.servlet.context.AnnotationConfigServletWebServerApplicationContext@4eb92a67: startup date [Sun Jun 24 14:32:15 CST 2018]; root of context hierarchy
2018-06-24 14:32:17.122  INFO 1959 --- [           main] s.w.s.m.m.a.RequestMappingHandlerMapping : Mapped "{[/greeting]}" onto public com.example.springbootfirstapp.hello.Greeting com.example.springbootfirstapp.hello.GreetingController.greeting(java.lang.String)
2018-06-24 14:32:17.127  INFO 1959 --- [           main] s.w.s.m.m.a.RequestMappingHandlerMapping : Mapped "{[/error]}" onto public org.springframework.http.ResponseEntity> org.springframework.boot.autoconfigure.web.servlet.error.BasicErrorController.error(javax.servlet.http.HttpServletRequest)
2018-06-24 14:32:17.129  INFO 1959 --- [           main] s.w.s.m.m.a.RequestMappingHandlerMapping : Mapped "{[/error],produces=[text/html]}" onto public org.springframework.web.servlet.ModelAndView org.springframework.boot.autoconfigure.web.servlet.error.BasicErrorController.errorHtml(javax.servlet.http.HttpServletRequest,javax.servlet.http.HttpServletResponse)
2018-06-24 14:32:17.162  INFO 1959 --- [           main] o.s.w.s.handler.SimpleUrlHandlerMapping  : Mapped URL path [/webjars/**] onto handler of type [class org.springframework.web.servlet.resource.ResourceHttpRequestHandler]
2018-06-24 14:32:17.163  INFO 1959 --- [           main] o.s.w.s.handler.SimpleUrlHandlerMapping  : Mapped URL path [/**] onto handler of type [class org.springframework.web.servlet.resource.ResourceHttpRequestHandler]
2018-06-24 14:32:17.318  INFO 1959 --- [           main] o.s.j.e.a.AnnotationMBeanExporter        : Registering beans for JMX exposure on startup
2018-06-24 14:32:17.365  INFO 1959 --- [           main] o.s.b.w.embedded.tomcat.TomcatWebServer  : Tomcat started on port(s): 8080 (http) with context path ''
2018-06-24 14:32:17.371  INFO 1959 --- [           main] c.e.s.SpringBootFirstAppApplication      : Started SpringBootFirstAppApplication in 2.389 seconds (JVM running for 10.932)
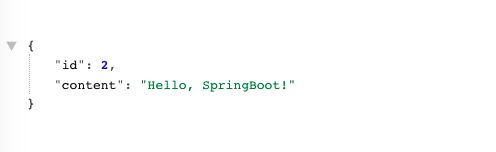
浏览器输入http://localhost:8080/greeting?name=SpringBoot返回如下内容
单元测试
package com.example.springbootfirstapp.hello;

import org.junit.Before;
import org.junit.Test;
import org.junit.runner.RunWith;
import org.springframework.beans.factory.annotation.Autowired;
import org.springframework.boot.test.context.SpringBootTest;
import org.springframework.http.HttpMethod;
import org.springframework.http.MediaType;
import org.springframework.test.context.junit4.SpringRunner;
import org.springframework.test.web.servlet.MockMvc;
import org.springframework.test.web.servlet.request.MockMvcRequestBuilders;
import org.springframework.test.web.servlet.result.MockMvcResultMatchers;
import org.springframework.test.web.servlet.setup.MockMvcBuilders;
import org.springframework.web.context.WebApplicationContext;

@RunWith(SpringRunner.class)
@SpringBootTest
public class GreetingControllerTest {

    private MockMvc mockMvc;

    @Autowired
    private WebApplicationContext applicationContext;

    @Before
    public void init() {
        // mockMvc = MockMvcBuilders.standaloneSetup(GreetingController.class).build();
        mockMvc = MockMvcBuilders.webAppContextSetup(applicationContext).build();
    }

    @Test
    public void greeting() throws Exception {
        mockMvc.perform(MockMvcRequestBuilders.request(HttpMethod.GET, "/greeting?name=SpringBoot"))
                .andExpect(MockMvcResultMatchers.status().isOk())
                .andExpect(MockMvcResultMatchers.content().contentType(MediaType.APPLICATION_JSON_UTF8))
                .andExpect(MockMvcResultMatchers.jsonPath("$.id").isNumber())
                .andExpect(MockMvcResultMatchers.jsonPath("$.content").isString())
                .andExpect(MockMvcResultMatchers.content().json("{\"id\":1, \"content\":\"Hello, SpringBoot!\"}"));

    }

}
spring boot 1.4.0 版本之前使用以下三个注解,参考Spring Boot 系列(二)单元测试&网络请求
@RunWith(SpringJUnit4ClassRunner.class)
@SpringApplicationConfiguration(classes = DemoApplication.class) //在spring boot 1.4.0 版本之后取消了 //classes需要指定spring boot 的启动类如:DemoApplication.class 不然WebApplicationContext不被实例化
@WebAppConfiguration