效果:
那就拿向上滑动出现的挑选主题颜色的ColorController
要设置好的如下:
- UIViewControllerTransitioningDelegate
- UIViewControllerAnimatedTransitioning
- UIPresentationController
如下设置好present的delegate和style
    func presentColorController(){
        let colorVC = self.storyboard!.instantiateViewControllerWithIdentifier("colorVC") as! ColorViewController
        //1 设置 modal PreStyle
        colorVC.modalPresentationStyle = UIModalPresentationStyle.Custom

        //2 设置 transition delegate
        colorVC.transitioningDelegate = transitionDelegate

        //3 present controller
        self.presentViewController(colorVC, animated: true, completion: nil)
    }
transitionDelegate是用来返回:要present的controller大小和动画
class TransitionDelegate:NSObject,UIViewControllerTransitioningDelegate {

    //选择color View controller的动画,后面会写下这个类
    let colorAnimator = ColorAnimator()
    //设置返回 present viewController 动画的函数
    func animationControllerForPresentedController(presented: UIViewController, presentingController presenting: UIViewController, sourceController source: UIViewController) -> UIViewControllerAnimatedTransitioning? {
            colorAnimator.presenting = true
            return colorAnimator
    }

    //设置返回 dismiss viewController 动画的函数
    func animationControllerForDismissedController(dismissed: UIViewController) -> UIViewControllerAnimatedTransitioning? {
            colorAnimator.presenting = false
            return colorAnimator
    }

    //返回 viewController 的大小,后面会写下这个类
    func presentationControllerForPresentedViewController(presented: UIViewController, presentingViewController presenting: UIViewController, sourceViewController source: UIViewController) -> UIPresentationController? {

        let customPresent = CustomPresent.init(presentedViewController: presented,presentingViewController: presenting)

        return customPresent
    }
}
下面这个类是动画效果的
class ColorAnimator:NSObject, UIViewControllerAnimatedTransitioning{

    /*设置:1.是否presenting用来判断dismiss 或者 present Controller。
        2.动画时长,3.弹性,4.弹出的初始速度
*/

    var presenting = true;
    var duration = 0.5
    var spring:CGFloat = 0.5
    var springV:CGFloat = 0.2

    //返回 时长的函数
    func transitionDuration(transitionContext: UIViewControllerContextTransitioning?) -> NSTimeInterval {
        return duration
    }

    //动画效果
    func animateTransition(transitionContext: UIViewControllerContextTransitioning) {

        //以下用transitionContext获取变量如名,具体作用对照下图图表
        let toVC = transitionContext.viewControllerForKey(UITransitionContextToViewControllerKey)!
        let fromVC = transitionContext.viewControllerForKey(UITransitionContextFromViewControllerKey)!
        let toView = transitionContext.viewForKey(UITransitionContextToViewKey)
        let fromView = transitionContext.viewForKey(UITransitionContextFromViewKey)

        let containerView = transitionContext.containerView()!
        let containerFrame = transitionContext.containerView()!.frame

        //简单的标志
        let viewForAnimation = presenting ? toView! : fromView!
        let orignViewAniamtion = presenting ? fromVC.view : toVC.view

        let animationVC = presenting ? toVC  : fromVC

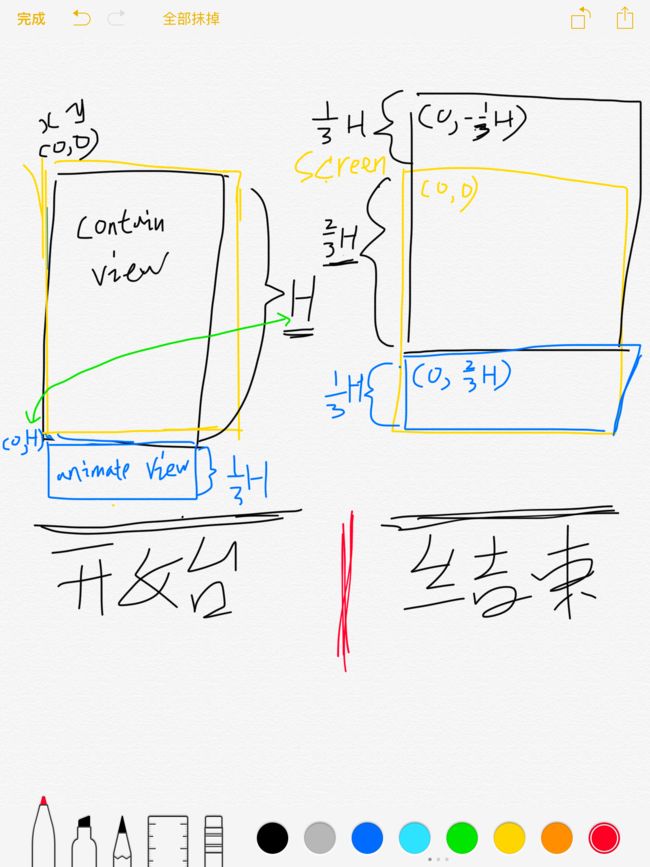
        //设置viewController的初始位置和大小,如动画示意图解释
        let initViewHight = CGRectGetHeight(transitionContext.finalFrameForViewController(animationVC))

        let initViewframe = CGRect(x: 0, y: CGRectGetHeight(containerFrame), width: CGRectGetWidth(containerFrame), height: initViewHight)

        if presenting{
            viewForAnimation.frame = initViewframe
            //如果是preset controller 要将view加入去进行动画移动
            containerView.addSubview(viewForAnimation)
        }

        //执行弹性动画
        UIView.animateWithDuration(self.transitionDuration(transitionContext), delay: 0, usingSpringWithDamping: spring, initialSpringVelocity: springV, options: .TransitionCurlUp, animations: { () in
            if(self.presenting){
            // present controller的结束位置
                viewForAnimation.frame = transitionContext.finalFrameForViewController(animationVC)
                orignViewAniamtion.frame.origin.y -= CGRectGetHeight(viewForAnimation.bounds)
            }else{
            //dismiss controller的结束位置
                viewForAnimation.frame = initViewframe
                orignViewAniamtion.center.y += CGRectGetHeight(viewForAnimation.bounds)
            }
            }){ h in
                if !self.presenting {
                    // 结束后如果是dissmiss controller的话要将之前的view移走
                    viewForAnimation.removeFromSuperview()
                }
                transitionContext.completeTransition(true)
            }

    }
}
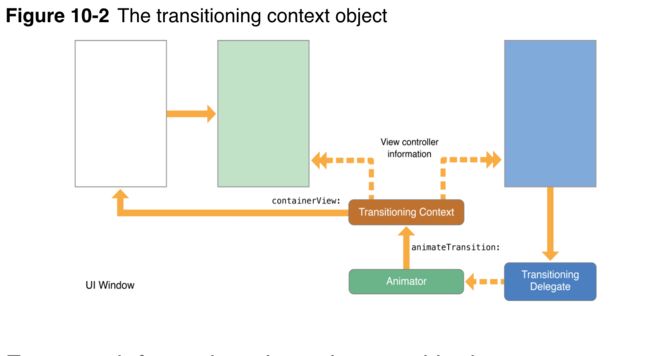
图片:
- transitioncontext
就是存储着动画用到的两个viewController的信息,如图:
- toView 和 fromView是不同状态下代表着controller的view
- 动画示意图
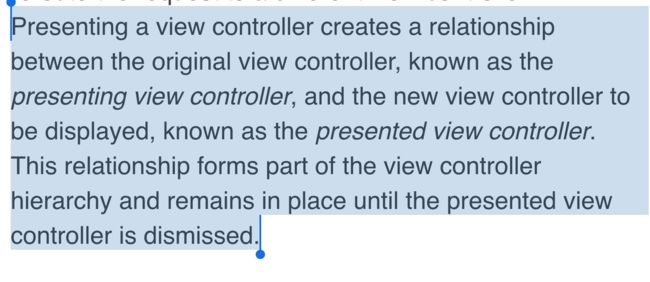
官方文档关于
Presenting和
Presented的解释,
presenting view controller就是已经存在的
view controller,而
presented view controller则是将要
present或者
dismissed的
controller,并且这种关系会持续到
presented view controller dissmissed为止.
最后一个调整要present 的controller的类
class CustomPresent: UIPresentationController {


    var dimingView:UIView!

    //设置最终viewController的位置和大小
    override func frameOfPresentedViewInContainerView() -> CGRect {

        let xOffset = 0
        let yOffset =  2 * CGRectGetHeight(containerView!.bounds) / 3
        let viewWidth = CGRectGetWidth(containerView!.bounds)
        let viewHight = 1 * CGRectGetHeight(containerView!.bounds) / 3
        return CGRectMake(xOffset, yOffset, viewWidth, viewHight)

    }

    // 初始化dimingView
    override init(presentedViewController: UIViewController, presentingViewController: UIViewController) {
        super.init(presentedViewController: presentedViewController, presentingViewController: presentingViewController)
        self.dimingView = UIView()
        self.dimingView.backgroundColor = UIColor(white: 0.0, alpha: 0.4)
        self.dimingView.alpha = 0
    }


    // present Controller 开始时执行的函数,用来动画diming view模糊背景
    override func presentationTransitionWillBegin() {
        //插入diming view
        let containerView = self.containerView!
        self.dimingView.frame = containerView.bounds
        self.dimingView.alpha = 0
        containerView.insertSubview(self.dimingView, atIndex: 0)

        //动画dimming view
        presentedViewController.transitionCoordinator()?.animateAlongsideTransition({
            i  in
            self.dimingView.alpha = 1.0
            }, completion: nil)
    }

    //present 动画结束
    override func presentationTransitionDidEnd(completed: Bool) {
        // 如果是突然中断则,移除diming view
        if(!completed){
            self.dimingView.removeFromSuperview()
        }
    }

    //dismiss 动画
    override func dismissalTransitionWillBegin() {
        presentedViewController.transitionCoordinator()?.animateAlongsideTransition({
            i in
            self.dimingView.alpha = 0.0
            }, completion: nil)
    }

    //dismiss 动画结束
    override func dismissalTransitionDidEnd(completed: Bool) {
    //如果dismiss成功则移除 dimingView
        if(completed){
            self.dimingView.removeFromSuperview()
        }
    }

}
像以上做的好处是,写好的动画和个性化present可以很好地抽象起来。如果别人要用到。直接复制粘贴,再将transitionDelegate赋值就可以达到同样的效果了。
这个 项目 这个文件用到了这技术
- [参考教程][6]
[6]: http://www.appcoda.com/presentation-controllers-tutorial/


