大多数程序猿都用过全球最大的git托管平台Github,上面有丰富的开源项目。在Github上托管开源项目是免费的,但是私有项目需要收取管理费。对于拥有云服务器的开发者或者团队,可以使用本文介绍的Gitlab平台。 话不多说,我们来看看具体的步骤。
系统环境:腾讯云服务器,配置1核心2G内存,系统Centos7.2
Step1:初始化服务器环境
1、设置系统Swap。根据gitlab官方的介绍,硬件建议使用双核4G内存的配置。本文主要介绍安装和配置方法,选用的是单核2G内存的机器,为了提高系统的响应,设置2G大小的Swap。设置过程简略,参考连接 https://www.digitalocean.com/community/tutorials/how-to-add-swap-on-centos-6 设置完成后运行,可以看到swap设置成功。
[root@VM_26_11_centos ~]# free -m
 total used free shared buff/cache available
 Mem: 1840 88 83 8 1668 1589
 Swap: 2047 0 2047
2、安装Nginx 为了使所有流量走80端口,本文使用Nginx做反向代理。 Nginx在Centos官方的源中是没有这个软件包的,需要运行
yum install epel-release
添加EPEL源,腾讯云的Centos上已经包含了EPEL源,直接运行
[root@VM_26_11_centos ~]# yum install nginx
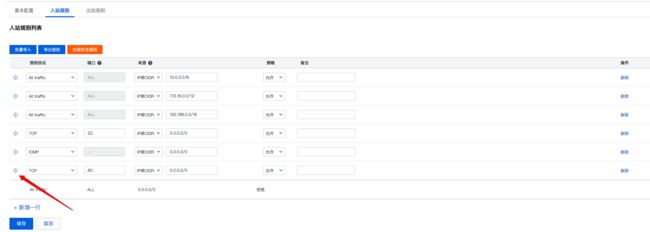
即可安装 这里需要注意的是腾讯云在云服务器的控制台这里配置了安全组策略,默认的linux安全策略组没有打开80端口,需要手动添加80端口的规则。
2、安装docker centos7安装docker非常方便,直接运行
[root@VM_26_11_centos ~]# yum install docker -y
3、启动docker
[root@VM_26_11_centos ~]# systemctl start docker.service
 [root@VM_26_11_centos ~]# docker ps -a
 CONTAINER ID IMAGE COMMAND CREATED STATUS PORTS NAMES
目前docker服务还没有任何容器 4、更新docker镜像源 由于docker的镜像服务器在国外,直接拉取镜像的时候速度非常慢。有很多国内的docker镜像,本文以daocloud.io为例,在daocloud注册后,会得到一个更新镜像源的命令:
[root@VM_26_11_centos ~]# curl -sSL https://get.daocloud.io/daotools/set_mirror.sh | sh -s http://b3d8b7d9.m.daocloud.io
 docker version >= 1.12
 {"registry-mirrors": ["http://b3d8b7d9.m.daocloud.io"],
 "live-restore": true
 }
 Success.
 You need to restart docker to take effect: sudo systemctl restart docker
 [root@VM_26_11_centos ~]# systemctl restart docker
到这里就已经初始化好了运行的环境
Step2:安装Gitlab
1、镜像选择 Gitlab官方在DockerHub上有镜像,一些第三方开发者也上传了自己的Gitlab镜像,通过运行搜索命令可以看到可用的docker镜像:
[root@VM_26_11_centos ~]# docker search gitlab
 INDEX NAME DESCRIPTION STARS OFFICIAL AUTOMATED
 docker.io docker.io/gitlab/gitlab-ce GitLab Community Edition docker image base... 1105 [OK]
 docker.io docker.io/sameersbn/gitlab Dockerized gitlab web server 873 [OK]
 docker.io docker.io/gitlab/gitlab-runner 177 [OK]
 docker.io docker.io/gitlab/gitlab-ee GitLab Enterprise Edition docker image bas... 57
 docker.io docker.io/twang2218/gitlab-ce-zh 这是汉化的 GitLab 社区版 Docker Image 30 [OK]
 docker.io docker.io/anapsix/gitlab-ci GitLab-CI Continuous Integration in Docker... 28 [OK]
 docker.io docker.io/centurylink/gitlab This image uses the image from sameersbn /... 24 [OK]
 docker.io docker.io/genezys/gitlab Dockerized GitLab using the official omnib... 15 [OK]
我们可以根据自己的喜好选择docker镜像。本文使用的是一个sameersbn/gitlab的镜像(有关这个镜像的详细说明参考 https://github.com/sameersbn/docker-gitlab) 2、拉取镜像 根据镜像的说明,还需要使用数据库和Redis,也可使用Docker镜像,如https://github.com/sameersbn/docker-gitlab 中介绍的docker镜像。本文使用的是已建好的Mysql和Redis资源,
[root@VM_26_11_centos ~]# docker pull docker.io/sameersbn/gitlab
 [root@VM_26_11_centos ~]# docker images
 REPOSITORY TAG IMAGE ID CREATED SIZE
 docker.io/sameersbn/gitlab latest c7cd44692430 30 hours ago 1.083 GB
由于我们之前设置了docker镜像源,拉取镜像的过程只需要两分钟就完成了。 3、创建容器
[root@VM_26_11_centos ~]# docker run --name gitlab -d
 -p 127.0.0.1:10443:443 -p 127.0.0.1:10022:22 -p 127.0.0.1:10080:80
 --env 'REDIS_HOST=redis.fin.red' --env 'REDIS_PORT=6379'
 --env 'DB_ADAPTER=mysql2' --env 'DB_HOST=mysql.fin.red'
 --env 'DB_NAME=gitlabhq_production_demo'
 --env 'DB_USER=root' --env 'DB_PASS=2017123456' --env 'DB_PORT=3306'
 --env 'GITLAB_HOST=gitlab.fin.red' --env 'GITLAB_ROOT_EMAIL=709729863@qq.com'
 --env 'GITLAB_SECRETS_DB_KEY_BASE=long-and-random-alpha-numeric-string'
 --env 'GITLAB_SECRETS_SECRET_KEY_BASE=long-and-random-alpha-numeric-string'
 --env 'GITLAB_SECRETS_OTP_KEY_BASE=long-and-random-alpha-numeric-string'
 --env 'GITLAB_MAX_OBJECT_SIZE=125829120'
 --volume /var/www/Docker/gitlab:/home/git/data
 docker.io/sameersbn/gitlab
检查容器运行情况
[root@VM_26_11_centos ~]# docker ps -a
 CONTAINER ID IMAGE COMMAND CREATED STATUS PORTS NAMES
 8e6bca607900 docker.io/sameersbn/gitlab "/sbin/entrypoint.sh " 51 seconds ago Up 50 seconds 0.0.0.0:10022->22/tcp, 0.0.0.0:10080->80/tcp, 0.0.0.0:10443->443/tcp gitlab
 [root@VM_26_11_centos ~]# netstat -nptl
 Active Internet connections (only servers)
 Proto Recv-Q Send-Q Local Address Foreign Address State PID/Program name
 tcp 0 0 127.0.0.1:10443 0.0.0.0:* LISTEN 5378/docker-proxy-c
 tcp 0 0 0.0.0.0:80 0.0.0.0:* LISTEN 24029/nginx: master
 tcp 0 0 0.0.0.0:22 0.0.0.0:* LISTEN 700/sshd
 tcp 0 0 127.0.0.1:10080 0.0.0.0:* LISTEN 5385/docker-proxy-c
 tcp 0 0 127.0.0.1:10022 0.0.0.0:* LISTEN 5392/docker-proxy-c
 tcp6 0 0 :::22 :::* LISTEN 700/sshd
说明gitlab的docker容器已经正常运行起来了。
Step3:安装Gerrit
1、镜像选择 类似Gitlab,先搜索gerrit镜像
[root@VM_26_11_centos ~]# docker search gerrit
 INDEX NAME DESCRIPTION STARS OFFICIAL AUTOMATED
 docker.io docker.io/openfrontier/gerrit The Gerrit docker support PostgreSQL MySQL... 45 [OK]
 docker.io docker.io/larrycai/gerrit The Gerrit code review system based on ubuntu 17 [OK]
 docker.io docker.io/gerritforge/gerrit-centos7 Gerrit Code Review on CentOS 7 13
 docker.io docker.io/gerritforge/gerrit-ubuntu15.04 Gerrit Code Review on Ubuntu 15.04 12
 docker.io docker.io/accenture/adop-gerrit ADOP Gerrit 5 [OK]
 docker.io docker.io/fabric8/gerrit 5 [OK]
Gerrit官方没有提供镜像,本文选择openfrontier/gerrit镜像
[root@VM_26_11_centos ~]# docker pull docker.io/openfrontier/gerrit
2、创建容器 本文采用github的Oauth登录方式,需要在Github先注册一个Oauth账号,注册内容如下
[root@VM_26_11_centos ~]# docker run
 --name gerrit
 -p 127.0.0.1:9418:8080
 -p 127.0.0.1:19418:29418
 -e WEBURL=http://gerrit.fin.red
 -e USER_NAME=gerrit
 -e USER_EMAIL=709729863@qq.com
 -e AUTH_TYPE=OAUTH
 -e OAUTH_ALLOW_EDIT_FULL_NAME=true
 -e OAUTH_ALLOW_REGISTER_NEW_EMAIL=true
 -e OAUTH_GITHUB_CLIENT_ID=4c70bd6eb7c87395ea69
 -e OAUTH_GITHUB_CLIENT_SECRET=1bb740e97d47d4b5af0b842702beaf818c6b980a
 -v /var/www/Docker/gerrit:/var/gerrit/review_site
 -d docker.io/openfrontier/gerrit
 [root@VM_26_11_centos ~]# docker ps -a
 CONTAINER ID IMAGE COMMAND CREATED STATUS PORTS NAMES
 0f261556de08 openfrontier/gerrit "/gerrit-entrypoint.s" 5 minutes ago Up 5 minutes 127.0.0.1:9418->8080/tcp, 127.0.0.1:19418->29418/tcp gerrit
 75b4f71615a2 docker.io/sameersbn/gitlab "/sbin/entrypoint.sh " 9 days ago Up 2 minutes 127.0.0.1:10022->22/tcp, 127.0.0.1:10080->80/tcp, 127.0.0.1:10443->443/tcp gitlab
 [root@VM_26_11_centos ~]# netstat -nptl
 Active Internet connections (only servers)
 Proto Recv-Q Send-Q Local Address Foreign Address State PID/Program name
 tcp 0 0 127.0.0.1:9418 0.0.0.0:* LISTEN 2752/docker-proxy-c
 tcp 0 0 127.0.0.1:10443 0.0.0.0:* LISTEN 3230/docker-proxy-c
 tcp 0 0 0.0.0.0:80 0.0.0.0:* LISTEN 3204/nginx: master
 tcp 0 0 0.0.0.0:22 0.0.0.0:* LISTEN 699/sshd
 tcp 0 0 127.0.0.1:19418 0.0.0.0:* LISTEN 2745/docker-proxy-c
 tcp 0 0 127.0.0.1:10080 0.0.0.0:* LISTEN 3237/docker-proxy-c
 tcp 0 0 127.0.0.1:10022 0.0.0.0:* LISTEN 3244/docker-proxy-c
 tcp6 0 0 :::22 :::* LISTEN 699/sshd
说明gerrit的容器已经正常运行起来了
Step4:Gerrit与Gitlab配置及使用
由于我们的服务器安全组只开了80端口,而Gerrit与Gitlab都不是工作在80端口,因此考虑使用Nginx做反向代理。 Nginx的反向代理很简单,在/etc/nginx/conf.d/目录下新建
[root@VM_26_11_centos ~]# cd /etc/nginx/conf.d/
 [root@VM_26_11_centos conf.d]# vi virtual.conf
输入以下内容并保存
#gitlab server
server
{
listen 80;
server_name gitlab.fin.red;
location / {
proxy_redirect off;
proxy_set_header Host $host;
proxy_set_header X-Real-IP $remote_addr;
proxy_set_header X-Forwarded-For $proxy_add_x_forwarded_for;
proxy_pass http://0.0.0.0:10080;
}
}gerrit server
server
{
listen 80;
server_name gerrit.fin.red;
location / {
proxy_redirect off;
proxy_set_header Host $host;
proxy_set_header X-Real-IP $remote_addr;
proxy_set_header X-Forwarded-For $proxy_add_x_forwarded_for;
proxy_pass http://0.0.0.0:9418;
}
}
测试配置文件有无错误并给ngixn发送reload指令
[root@VM_26_11_centos conf.d]# nginx -t
 nginx: the configuration file /etc/nginx/nginx.conf syntax is ok
 nginx: configuration file /etc/nginx/nginx.conf test is successful
 [root@VM_26_11_centos conf.d]# nginx -s reload
在浏览器中分别输入 gitlab.fin.red以及gerrit.fin.red
到这里就完成了Gitlab与Gerrit的安装安装


