ios开发-按拼音将城市分组
新建一个工程,模版选择Single View Application.
接下来对工程做一些初始配置
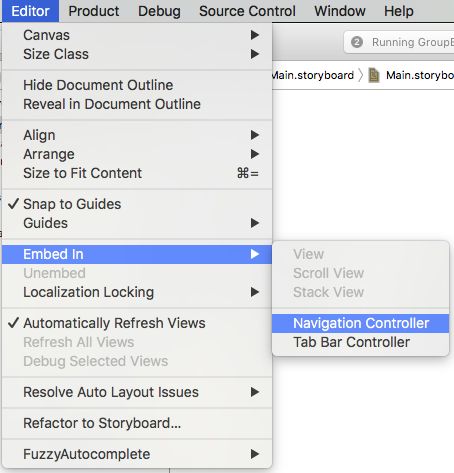
- 打开Main.storyboard,选中ViewController,把它嵌入到Navigation Controller中。
- 拖一个TableView到ViewController中,让它铺满整个ViewController中,点击右下角的Resolve Auto Layout Issues按钮,在弹出菜单中选择Add Missing Constraints。
-
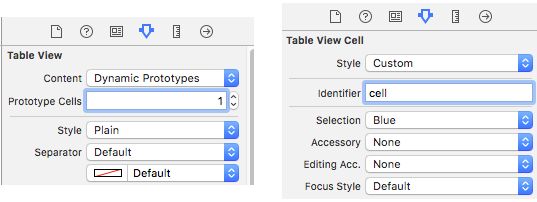
选中刚刚添加的TableView,把它的Prototype Cells设置为1,并把Table View Cell的reused identifier设置为cell。
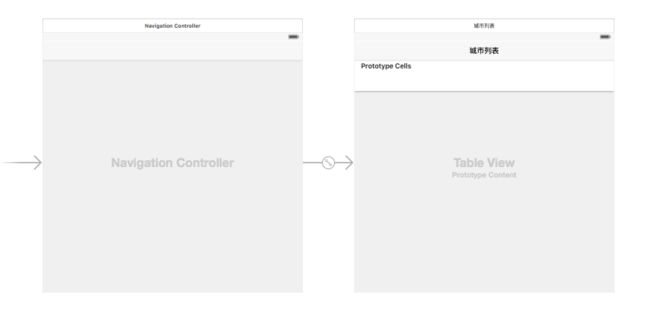
- 在Document Outline中选中Navigation Item把它的title改为"城市列表"。
下面是以上步骤完成后的屏幕截图.
接下来是代码部分
- 在storyboard中选中View Controller打开Assistant Editor为table View关联一个outlet,就叫做citysTableView好了。
- 打开ViewController.swift代码文件,在viewDidLoad()函数的上方添加一个叫做citys的城市数组。现在ViewController.swift代码文件的内容会和下面的代码段类似。
import UIKit

class ViewController: UIViewController {


    @IBOutlet weak var citysTableView: UITableView!

    let citys = ["北京市", "上海市", "天津市", "重庆市", "合肥市", "毫州市", "芜湖市", "马鞍山市", "池州市", "黄山市", "滁州市", "安庆市", "淮南市", "淮北市", "蚌埠市", "巢湖市", "宿州市", "六安市", "阜阳市", "铜陵市", "明光市", "天长市", "宁国市", "界首市", "桐城市", "广州市", "韶关市", "深圳市", "珠海市", "汕头市", "佛山市", "江门市", "湛江市", "茂名市", "肇庆市", "惠州市", "梅州市", "汕尾市", "河源市", "阳江市", "清远市", "东莞市", "中山市", "潮州市", "揭阳市", "云浮市", "昆明市", "曲靖市", "玉溪市", "保山市", "昭通市", "丽江市", "思茅市", "临沧市", "楚雄彝族自治州", "红河哈尼族彝族自治州", "文山壮族苗族自治州", "西双版纳傣族自治州", "大理白族自治州", "德宏傣族景颇族自治州", "怒江傈僳族自治州", "迪庆藏族自治州"]

    override func viewDidLoad() {
        super.viewDidLoad()

    }

}
3 在citys数组的下方定义两个变量,分别用来存储分组好的城市和每个组的标题。
var cityGroups = [String: [String]]()
var groupTitles = [String]()
cityGroups变量是一个字典,每个key都是城市名的第一个字母,对应的值是以这个key开头的城市。
4 现在定义一个方法,对城市按拼音的首字母进行分组。把这个方法添加到viewDidLoad()函数的下方。
func makeCityToGroup() {
    // 遍历citys数组中的所有城市
    for city in citys {

        // 将中文转换为拼音
        let cityMutableString = NSMutableString(string: city)
        CFStringTransform(cityMutableString, nil, kCFStringTransformToLatin, false)
        CFStringTransform(cityMutableString, nil, kCFStringTransformStripDiacritics, false)

        // 拿到首字母作为key
        let firstLetter = cityMutableString.substringToIndex(1).uppercaseString

        // 检查是否有firstLetter对应的分组存在, 有的话直接把city添加到对应的分组中
        // 没有的话, 新建一个以firstLetter为key的分组
        if var value = cityGroups[firstLetter] {
            value.append(city)
            cityGroups[firstLetter] = value
        }
        else {
            cityGroups[firstLetter] = [city]
        }
    }

    //拿到所有的key将它排序, 作为每个组的标题
    groupTitles = cityGroups.keys.sort()
}
5 接着对扩展ViewController,让它遵循UITableViewDataSource和UITableViewDelegate这个两个协议。把下面的两段代码添加到最后一个花括号的下面。
extension ViewController: UITableViewDataSource {

    func sectionIndexTitlesForTableView(tableView: UITableView) -> [String]? {
        return groupTitles
    }

    func numberOfSectionsInTableView(tableView: UITableView) -> Int {
        return cityGroups.count
    }

    func tableView(tableView: UITableView, numberOfRowsInSection section: Int) -> Int {
        let firstLetter = groupTitles[section]
        return cityGroups[firstLetter]!.count
    }

    func tableView(tableView: UITableView, cellForRowAtIndexPath indexPath: NSIndexPath) -> UITableViewCell {
        let firstLetter = groupTitles[indexPath.section]
        let citysInAGroup = cityGroups[firstLetter]!

        let cell = tableView.dequeueReusableCellWithIdentifier("cell", forIndexPath: indexPath)
        cell.textLabel!.text = citysInAGroup[indexPath.row]
        return cell
    }
}

extension ViewController: UITableViewDelegate {

    func tableView(tableView: UITableView, titleForHeaderInSection section: Int) -> String? {
        return groupTitles[section]
    }
}
这两段代码的作用还是非常直接明了的,就不写注释了。
然后在viewDidLoad()函数的中添加下面的3句代码。
citysTableView.dataSource = self
citysTableView.delegate = self

makeCityToGroup()
是时候运行看下结果啦........
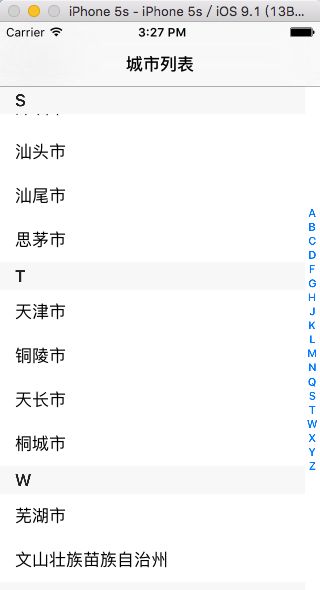
最后上一张运行结果图。再附上demo地址


