目的
无人值守批量安装CentOS7
安装条件
一台带有PXE协议支持NIC的待安装主机
一台存放安装文件的服务器,如NFS,HTTP或FTP服务器
Kickstart 生成的配置文件(ks.cfg)
DHCP服务器
TFTP服务器
HTTP服务器(Apache)
系统环境
服务器:CentOS Linux Release 7.3.1611
IP Address: 192.168.1.110/24
详细步骤
1、关闭SELinux和Firewalld
a)修改/etc/selinux/config,SELINUX的值改为disabled
# cat /etc/selinux/config
# This file controls the state of SELinux on the system.
# SELINUX= can take one of these three values:
# enforcing - SELinux security policy is enforced.
# permissive - SELinux prints warnings instead of enforcing.
# disabled - No SELinux policy is loaded.
#SELINUX=enforcing
SELINUX=disabled
# SELINUXTYPE= can take one of three two values:
# targeted - Targeted processes are protected,
# minimum - Modification of targeted policy. Only selected processes are protected.
# mls - Multi Level Security protection.
SELINUXTYPE=targeted
b)# systemctl stop firewalld
#systemctl disable firewalld
2、安装dhcp,tftp,http服务器,xinetd和system-config-kickstart
#yum -y install dhcp tftp-server http xinetd syslinux system-config-kickstart
3、下载CentOS7 光盘ISO文件到/usr/local/src下,并挂载到/mnt/cdrom目录下
# cd /usr/local/src
# wget http://mirrors.163.com/centos/7/isos/x86_64/CentOS-7-x86_64-DVD-1611.iso
# mkdir -p /mnt/cdrom
# mount -o loop CentOS-7-x86_64-DVD-1611.iso /mnt/cdrom
4、复制DVD ISO文件下所有内容到/var/www/html (Apache默认DocuementRoot目录)
#mkdir /var/www/html/CentOS-7
# cp -rf /mnt/cdrom/* /var/www/CentOS-7/
5、a)修改tftp服务的配置文件/etc/xinetd.d/tftp,将disable的值由yes改为no
service tftp
{
socket_type = dgram
protocol = udp
wait = yes
user = root
server = /usr/sbin/in.tftpd
server_args = -s /var/lib/tftpboot
disable = no
per_source = 11
cps = 100 2
flags = IPv4
}
b)
# systemctl start xinetd
# systemctl enable xinetd
6、配置支持PXE的启动程序syslinux。syslinux是一个功能强大的引导加载程序,而且兼容各种介质。它的目的是简化首次安装Linux的时间,并建立修护或其它特殊用途的启动盘。pxlinux是syslinux的一个派生品,用于支持从网络启动,pxlinux.0 是pxelinux的引导程序。
a)拷贝PXE启动需要的文件给tftp服务器
# cd /var/lib/tftp
# cp /usr/share/syslinux/pxelinux.0 .
# cp /var/www/html/CentOS-7/images/pxeboot/{initrd.img, vmlinuz} .
# cp /var/www/html/isolinux/{vesamenu.c32, *.msg} .
# mkdir pxelinux.cfg
# cp /var/www/html/CentOS-7/isolinux/isolinux.cfg pxelinux.cfg/default
b)修改sysconfig配置文件default
第1行default vesamenu.c32 修改为default linux, 系统将不会显示启动菜单的选择界面,而是直接进入lable linux 的安装项进行安装
第2行修改为timeout 1, 不需等待用户选择菜单,直接进入引导
第64行修改为
append initrd=initrd.img inst.stage2=http://192.168.1/110/CentOS-7 inst.ks=http://192.168.1.110/ks/ks.cfg
/var/lib/tftpboot/pxelinux.cfg/default 文件内容实例:
[root@luxvm1 tftpboot]# cat pxelinux.cfg/default
#default vesamenu.c32
#default menu.c32
default linux
timeout 1
#display boot.msg
# Clear the screen when exiting the menu, instead of leaving the menu displayed.
# For vesamenu, this means the graphical background is still displayed without
# the menu itself for as long as the screen remains in graphics mode.
menu clear
menu background splash.png
menu title CentOS Linux 7
menu vshift 8
menu rows 18
menu margin 8
#menu hidden
menu helpmsgrow 15
menu tabmsgrow 13
# Border Area
menu color border * #00000000 #00000000 none
# Selected item
menu color sel 0 #ffffffff #00000000 none
# Title bar
menu color title 0 #ff7ba3d0 #00000000 none
# Press [Tab] message
menu color tabmsg 0 #ff3a6496 #00000000 none
# Unselected menu item
menu color unsel 0 #84b8ffff #00000000 none
# Selected hotkey
menu color hotsel 0 #84b8ffff #00000000 none
# Unselected hotkey
menu color hotkey 0 #ffffffff #00000000 none
# Help text
menu color help 0 #ffffffff #00000000 none
# A scrollbar of some type? Not sure.
menu color scrollbar 0 #ffffffff #ff355594 none
# Timeout msg
menu color timeout 0 #ffffffff #00000000 none
menu color timeout_msg 0 #ffffffff #00000000 none
# Command prompt text
menu color cmdmark 0 #84b8ffff #00000000 none
menu color cmdline 0 #ffffffff #00000000 none
# Do not display the actual menu unless the user presses a key. All that is displayed is a timeout message.
menu tabmsg Press Tab for full configuration options on menu items.
menu separator # insert an empty line
menu separator # insert an empty line
label linux
menu label ^Install CentOS Linux 7
kernel vmlinuz
append initrd=initrd.img inst.stage2=http://192.168.1.110/CentOS-7 inst.ks=http://192.168.1.110/ks/ks.cfg quiet
label check
menu label Test this ^media & install CentOS Linux 7
kernel vmlinuz
menu default
append initrd=initrd.img inst.stage2=http://192.168.1.110/CentOS-7 rd.live.check inst.ks=http://192.168.1.110/ks/ks.cfg quiet
menu separator # insert an empty line
# utilities submenu
menu begin ^Troubleshooting
menu title Troubleshooting
label vesa
menu indent count 5
menu label Install CentOS Linux 7 in ^basic graphics mode
text help
Try this option out if you're having trouble installing
CentOS Linux 7.
endtext
kernel vmlinuz
append initrd=initrd.img inst.stage2=http://192.168.1.110/CentOS-7 xdriver=vesa nomodeset inst.ks=http://192.168.1.110/ks/ks.cfg quiet
label rescue
menu indent count 5
menu label ^Rescue a CentOS Linux system
text help
If the system will not boot, this lets you access files
and edit config files to try to get it booting again.
endtext
kernel vmlinuz
append initrd=initrd.img inst.stage2=http://192.168.1.110/CentOS-7 rescue quiet
label memtest
menu label Run a ^memory test
text help
If your system is having issues, a problem with your
system's memory may be the cause. Use this utility to
see if the memory is working correctly.
endtext
kernel memtest
menu separator # insert an empty line
label local
menu label Boot from ^local drive
localboot 0xffff
menu separator # insert an empty line
menu separator # insert an empty line
label returntomain
menu label Return to ^main menu
menu exit
menu end
7、修改dhcp配置文件/etc/dhcp/dhcpd.conf
allow booting;
allow bootp;
ddns-update-style interim;
ignore client-updates;
next-server 192.168.1.110;
filename "/pxelinux.0";
subnet 192.168.1.0 netmask 255.255.255.0 {
option subnet-mask 255.255.255.0;
option routers 192.168.1.1;
option domain-name "gw.local";
range dynamic-bootp 192.168.1.131 192.168.1.199;
default-lease-time 21600;
max-lease-time 43200;
}
8、创建Kickstart 配置文件ks.cfg
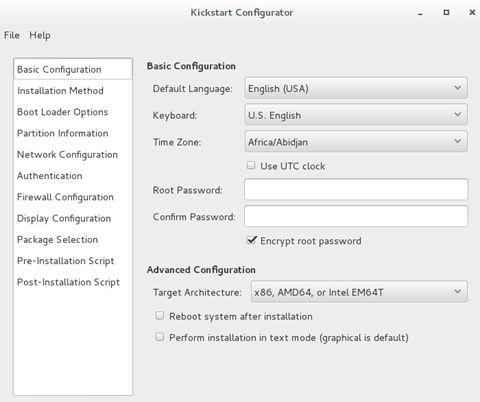
安装system-config-kickstart, 运行它即Kickstart Configurator来生成kickstart 配置文件ks.cfg.
# yum -y install system-config-kickstart
# system-config-kickstart
保存ks.cfg文件到/var/www/html/ks目录下
/var/www/html/ks/ks.cfg 文件内容如下:
(整个实验过程的重点和难点,请关注)
[root@luxvm1 ~]# cat /var/www/html/ks/ks.cfg
#platform=x86, AMD64, or Intel EM64T
#version=DEVEL
# Install OS instead of upgrade
install
# Keyboard layouts
keyboard 'us'
# Root password
rootpw --iscrypted $1$P2aQRXER$vJ1vvyd38QyNaOYQKOv19/
# Use network installation
url --url="http://192.168.1.110/CentOS-7"
# System language
lang en_US
# Firewall configuration
firewall --disabled
# System authorization information
auth --useshadow --passalgo=sha512
# Use graphical install
graphical
firstboot --disable
# SELinux configuration
selinux --disabled
# Network information
network --bootproto=dhcp --device=eth0
# Reboot after installation
reboot
# System timezone
timezone Asia/Shanghai
# System bootloader configuration
bootloader --location=mbr --driveorder=sda
autopart --type=lvm
# Clear the Master Boot Record
zerombr
# Partition clearing information
clearpart --all --initlabel
# Disk partitioning information
#
%packages
@^minimal
@core
chrony
kexec-tools
openscap
openscap-scanner
scap-security-guide
%end
%addon org_fedora_oscap
content-type = scap-security-guide
profile = standard
%end
%addon com_redhat_kdump --enable --reserve-mb='auto'
%end
%anaconda
pwpolicy root --minlen=6 --minquality=50 --notstrict --nochanges --notempty
pwpolicy user --minlen=6 --minquality=50 --notstrict --nochanges --notempty
pwpolicy luks --minlen=6 --minquality=50 --notstrict --nochanges --notempty
%end
附加:
PXE CentOS7 information


