一、Spring整合Mybatis:
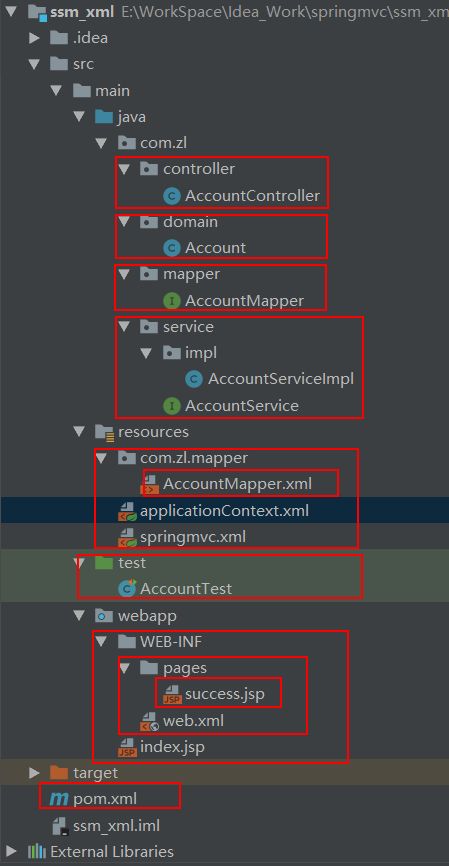
首先新建web-maven工程,工程结构如下图:然后导入依赖:
  4.0.0

  com.zl
  ssm_xml
  1.0-SNAPSHOT
  war

  ssm_xml Maven Webapp

  http://www.example.com


    UTF-8
    1.8
    1.8
    5.0.2.RELEASE
    1.6.6
    1.2.12
    5.1.6
    3.4.5


      org.aspectj
      aspectjweaver
      1.6.8


      org.springframework
      spring-aop
      ${spring.version}


      org.springframework
      spring-context
      ${spring.version}


      org.springframework
      spring-web
      ${spring.version}


      org.springframework
      spring-webmvc
      ${spring.version}


      org.springframework
      spring-test
      ${spring.version}


      org.springframework
      spring-tx
      ${spring.version}


      org.springframework
      spring-jdbc
      ${spring.version}


      junit
      junit
      4.12
      compile


      mysql
      mysql-connector-java
      ${mysql.version}


      javax.servlet
      servlet-api
      2.5
      provided


      javax.servlet.jsp
      jsp-api
      2.0
      provided


      jstl
      jstl
      1.2


      log4j
      log4j
      ${log4j.version}


      org.slf4j
      slf4j-api
      ${slf4j.version}


      org.slf4j
      slf4j-log4j12
      ${slf4j.version}


      org.mybatis
      mybatis
      ${mybatis.version}


      org.mybatis
      mybatis-spring
      1.3.0


      c3p0
      c3p0
      0.9.1.2
      jar
      compile


    ssm_xml


          maven-clean-plugin
          3.1.0


          maven-resources-plugin
          3.0.2


          maven-compiler-plugin
          3.8.0


          maven-surefire-plugin
          2.22.1


          maven-war-plugin
          3.2.2


          maven-install-plugin
          2.5.2


          maven-deploy-plugin
          2.8.2
1)本地数据库:
SET NAMES utf8mb4;
SET FOREIGN_KEY_CHECKS = 0;

-- ----------------------------
-- Table structure for account
-- ----------------------------
DROP TABLE IF EXISTS `account`;
CREATE TABLE `account`  (
  `id` int(11) NOT NULL AUTO_INCREMENT,
  `name` varchar(20) CHARACTER SET utf8 COLLATE utf8_general_ci DEFAULT NULL,
  `money` double DEFAULT NULL,
  PRIMARY KEY (`id`) USING BTREE
) ENGINE = InnoDB AUTO_INCREMENT = 7 CHARACTER SET = utf8 COLLATE = utf8_general_ci ROW_FORMAT = Compact;

-- ----------------------------
-- Records of account
-- ----------------------------
INSERT INTO `account` VALUES (1, '张三', 1000);
INSERT INTO `account` VALUES (2, '李四', 2000);
INSERT INTO `account` VALUES (3, '王五', 3000);
INSERT INTO `account` VALUES (4, '赵六', 4000);

SET FOREIGN_KEY_CHECKS = 1;
2)新建实体类:
在src-main-java下新建com.zl.domain.Account实体类:
package com.zl.domain;

import java.io.Serializable;

public class Account implements Serializable {
    private Integer id;
    private String name;
    private Double money;

    public Integer getId() {
        return id;
    }

    public void setId(Integer id) {
        this.id = id;
    }

    public String getName() {
        return name;
    }

    public void setName(String name) {
        this.name = name;
    }

    public Double getMoney() {
        return money;
    }

    public void setMoney(Double money) {
        this.money = money;
    }

    @Override
    public String toString() {
        return "Account{" +
                "id=" + id +
                ", name='" + name + '\'' +
                ", money=" + money +
                '}';
    }
}
3)新建Mapper接口:
在src.main.java下新建com.zl.mapper.AccountMapper接口:
package com.zl.mapper;

import com.zl.domain.Account;

public interface AccountMapper {
    /**
     * 根据id查询账户
     * @param id
     * @return
     */
    Account findById(Integer id);
}
4)新建mapper接口映射文件:
在resouces根目录下新建com/zl/mapper/AccountMapper.xml:
5)使用spring来管理mybatis:
在resources根目录下新建applicationContext.xml:
6)测试mybatis是否连通:
在src.main下新建test.AccountTest测试类:
import com.zl.domain.Account;
import com.zl.mapper.AccountMapper;
import com.zl.service.AccountService;
import org.junit.Test;
import org.springframework.context.ApplicationContext;
import org.springframework.context.support.ClassPathXmlApplicationContext;

public class AccountTest {

    /**
     * 测试Mapper层
     */
    @Test
    public void testMapper(){
        ApplicationContext ac = new ClassPathXmlApplicationContext("applicationContext.xml");
        AccountMapper accountMapper = ac.getBean(AccountMapper.class);
        Account account = accountMapper.findById(4);
        System.out.println(account);
    }
}
二、Spring管理Service层:
1)新建Service接口及实现类:
在src.main下新建com.zl.serivce.AccountService接口:
package com.zl.service;

import com.zl.domain.Account;

public interface AccountService {
    /**
     * 根据id查询账户
     * @param id
     * @return
     */
    Account findById(Integer id);
}
在src.main下新建com.zl.serivce.impl.AccountServiceImpl实现类:
package com.zl.service.impl;

import com.zl.domain.Account;
import com.zl.mapper.AccountMapper;
import com.zl.service.AccountService;
import org.springframework.beans.factory.annotation.Autowired;
import org.springframework.stereotype.Service;

@Service
public class AccountServiceImpl implements AccountService {

    @Autowired
    private AccountMapper accountMapper;

    @Override
    public Account findById(Integer id) {
        return accountMapper.findById(id);
    }
}
3)在Spring的applicationContext.xml配置文件加上关于Service的配置:
4)测试Service层是否连通:
在测试类中加入以下方法:
/**
     * 测试Service层
     */
    @Test
    public void testService(){
        ApplicationContext ac = new ClassPathXmlApplicationContext("applicationContext.xml");
        AccountService accountService = ac.getBean(AccountService.class);
        Account account = accountService.findById(4);
        System.out.println(account);
    }
三、Spring管理SpringMVC:
1)新建Controller类:
在src.main下新建com.zl.controller.AccountController类:
package com.zl.controller;

import com.zl.domain.Account;
import com.zl.service.AccountService;
import org.springframework.beans.factory.annotation.Autowired;
import org.springframework.stereotype.Controller;
import org.springframework.ui.Model;
import org.springframework.web.bind.annotation.RequestMapping;

@Controller
@RequestMapping("account")
public class AccountController {

    @Autowired
    private AccountService accountService;


    @RequestMapping("findById")
    public String findById(Model model){
        Account account = accountService.findById(6);
        model.addAttribute("account",account);
        return "success";
    }
}
2)新建Springmvc主配置文件:
在resources根目录下新建springmvc.xml配置文件:
3)在web.xml中管理加载spring及其他容器:
    characterEncodingFilter
    org.springframework.web.filter.CharacterEncodingFilter

      encoding
      UTF-8


    characterEncodingFilter
    /*


    org.springframework.web.context.ContextLoaderListener


    contextConfigLocation
    classpath:applicationContext.xml


    springmvc
    org.springframework.web.servlet.DispatcherServlet

      contextConfigLocation
      classpath:springmvc.xml

    1


    springmvc
    /
4)jsp相关:
index.jsp
<%@ page contentType="text/html;charset=UTF-8" language="java" %>


    Title


    查询账户
resources/pages/success.jsp
<%@ page contentType="text/html;charset=UTF-8" language="java" %>


    Title


    查询到的数据:${account}
完整的spring主配置文件如下: