参考:https://blog.csdn.net/qq_33619378/article/details/96991237
Nacos-server启动
这里就不说了
新建配置
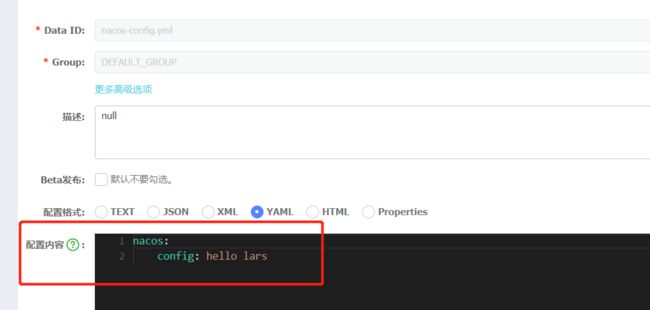
在Nacos-Server中新建配置,其中Data ID它的定义规则是:${prefix}-${spring.profile.active}.${file-extension}
prefix 默认为 spring.application.name 的值,也可以通过配置项 spring.cloud.nacos.config.prefix 来配置。
spring.profile.active 即为当前环境对应的 profile,可以通过配置项 spring.profile.active 来配置。
file-exetension 为配置内容的数据格式,可以通过配置项 spring.cloud.nacos.config.file-extension 来配置。目前只支持 properties 和 yaml 类型。
注意:当 spring.profile.active 为空时,对应的连接符 - 也将不存在,dataId 的拼接格式变成 prefix.{prefix}.prefix.{file-extension}
这里我创建Data Id 为nacos-config.yml的配置文件,其中Group为默认的DEFAULT_GROUP,配置文件的格式也相应的选择yaml,其内添加配置nacos.config=hello_nacos,如图所示
创建应用
1,在聚合工程Nacos下新建Module,创建一个名为nacos-config的子工程,其pom.xml文件内容如下
xml version="1.0" encoding="UTF-8"?>
<project xmlns="http://maven.apache.org/POM/4.0.0"
         xmlns:xsi="http://www.w3.org/2001/XMLSchema-instance"
         xsi:schemaLocation="http://maven.apache.org/POM/4.0.0 http://maven.apache.org/xsd/maven-4.0.0.xsd">
    <parent>
        <artifactId>nacosartifactId>
        <groupId>com.examplegroupId>
        <version>1.0-SNAPSHOTversion>
    parent>
    <modelVersion>4.0.0modelVersion>

    <artifactId>nacos-configartifactId>

    <properties>
        <java.version>1.8java.version>
    properties>

    <dependencies>
        <dependency>
            <groupId>org.springframework.cloudgroupId>
            <artifactId>spring-cloud-starter-alibaba-nacos-discoveryartifactId>
        dependency>
        <dependency>
            <groupId>org.springframework.cloudgroupId>
            <artifactId>spring-cloud-starter-alibaba-nacos-configartifactId>
        dependency>
    dependencies>

    <build>
        <plugins>
            <plugin>
                <groupId>org.springframework.bootgroupId>
                <artifactId>spring-boot-maven-pluginartifactId>
            plugin>
        plugins>
    build>

project>
2,创建配置文件名为bootstrap.yml,注意是bootstrap.xxx,而不是application或者其他。原因如
Nacos同springcloud-config一样,在项目初始化时,要保证先从配置中心进行配置拉取,拉取配置之后,才能保证项目的正常启动。springboot中配置文件的加载是存在优先级顺序的,bootstrap优先级高于application
PS:项目启动的时候先加载 bootstrap.yml,然后再加载application.yml,所以在使用配置中心的时候,项目中使用bootstrap.yml,在其中配置一些固定不变的信息,在配置中心配置可变信息
这里的配置文件类型可以根据个人习惯选择,我这里用的时yml类型,配置内容如下
spring:
  application:
    name: nacos-config
  cloud:
    nacos:
      discovery:
        server-addr: localhost:8848
      config:
        server-addr: localhost:8848
        file-extension: yml
可以看到必须可少的配置项spring.application.name
spring.cloud.nacos.discovery.server-addr指定注册中心的地址,如果你不需要注册该服务,也可以去掉该项,并删除discovery依赖
spring.cloud.nacos.config.server-addr指定配置中心的地址
file-extension指定配置中心中配置文件的格式
上面的配置是为了保证服务的正常注册和配置获取,以及配置DataID的正确性
3,在启动类上增加@EnableDiscoveryClient注解
package com.example.nacosconfig;

import org.springframework.boot.SpringApplication;
import org.springframework.boot.autoconfigure.SpringBootApplication;
import org.springframework.cloud.client.discovery.EnableDiscoveryClient;

@SpringBootApplication
@EnableDiscoveryClient
public class NacosConfigApplication {

    public static void main(String[] args) {
        SpringApplication.run(NacosConfigApplication.class, args);
    }
}
4,创建对外接口
package com.example.nacosconfig.controller;

import org.springframework.beans.factory.annotation.Value;
import org.springframework.cloud.context.config.annotation.RefreshScope;
import org.springframework.web.bind.annotation.GetMapping;
import org.springframework.web.bind.annotation.RestController;

/**
 * @Description
 * @Author clj
 * @Date 2019/12/10 14:18
 */
@RestController
@RefreshScope
public class ConfigController {

    @Value("${nacos.config}")
    private String config;

    @GetMapping("/helloConfig")
    public String helloConfig(){
        return config;
    }

}
其中通过@Value注解,去读取key为nacosconfig的配置的值,并通过/getValue接口返回。
加入@RefreshScope注解,可以使当前类下的配置支持动态更新。
到此代码部分的工作已经完成
启动测试
1,保证Nacos-server已经启动
2,检查配置文件是否已经添加
3,启动nacos-config项目,默认是8080端口
启动成功后在Nacos控制台中可以看到我们注册的服务
此时调用接口进行测试 http://localhost:8080/helloConfig,可以看到返回结果
此时说明已经成功读取到配置,下面我将Nacos-Server上的配置修改为hello_lars,看看能否动态更新
此时调用接口进行测试 http://localhost:8080/helloConfig,可以看到返回结果
可以看到我通过Nacos-server的控制台进行配置的修改,客户端服务nacos-config也相应的进行热更新。


