在前不久完成的实验二中,我们为了熟悉Open vSwitch的命令,曾经让大家使用ovs命令直接在交换机上下发流表实现VLAN。当时的操作是需要每台交换机分别配置,这并不是“软件定义”。本次实验将使用上一次实验学习的Ryu控制器,实现同样的功能。
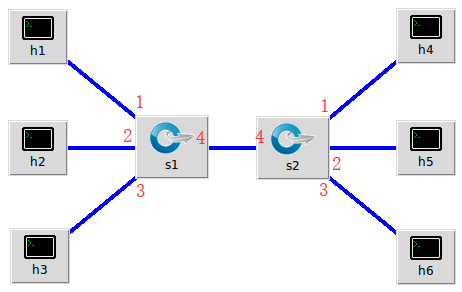
1.实验拓扑
实验拓扑
见2019 SDN上机第2次作业
建立拓扑
python脚本代码
from mininet.topo import Topo
Hcount=3
Scount=2
class MyTopo(Topo):
    def __init__(self):
        Topo.__init__(self)
        global Hcount,Scount
        switchs = []
        for i in range(Scount):
            swit = self.addSwitch("s{}".format(i + 1))
            switchs.append(swit)
        c = 1
        for sw in switchs:
            for i in range(Hcount):
                hx = self.addHost("h{}".format(c))
                self.addLink(sw, hx)
                c+=1
        self.addLink(switchs[0], switchs[1])
topos = {"mytopo": (lambda : MyTopo()) }
使用以下命令创建拓扑
sudo mn --custom fly.py --topo mytopo --controller=remote,ip=127.0.0.1,port=6633 --switch ovsk,protocols=OpenFlow13
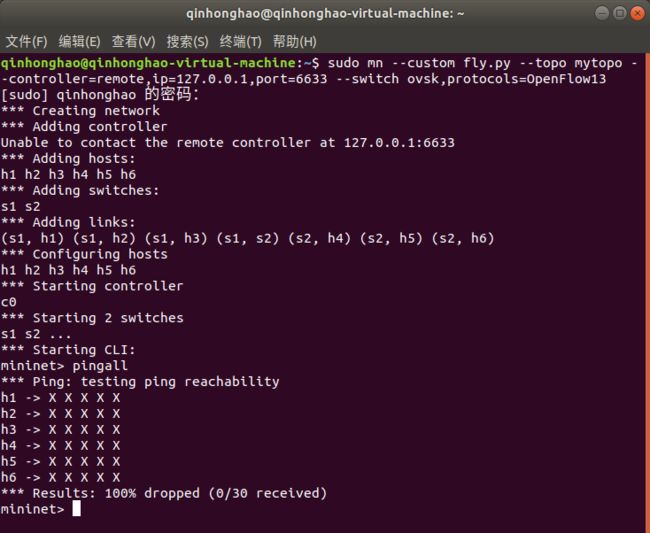
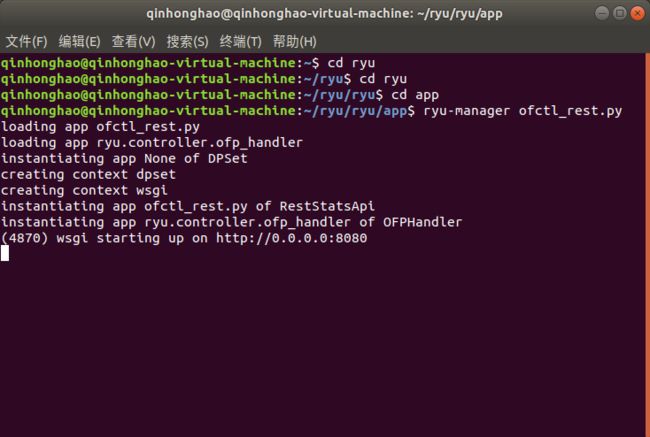
通过以下的命令连接ryu控制器
ryu-manager ofctl_rest.py
2.使用Ryu的REST API下发流表实现和第2次实验同样的VLAN
参考资料
REST API:可以在线学习中国大学MOOC 《软件定义网络》第六讲 北向接口
https://ryu.readthedocs.io/en/latest/app/ofctl_rest.html#description-of-match-on-request-messages
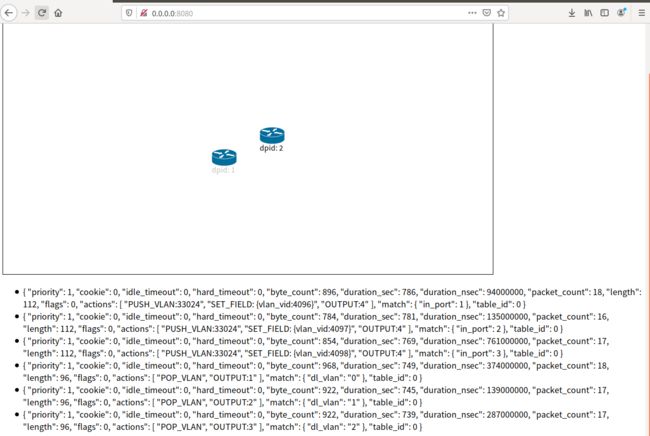
https://ryu.readthedocs.io/en/latest/gui.html
https://www.cnblogs.com/wpqwpq/p/6556942.html
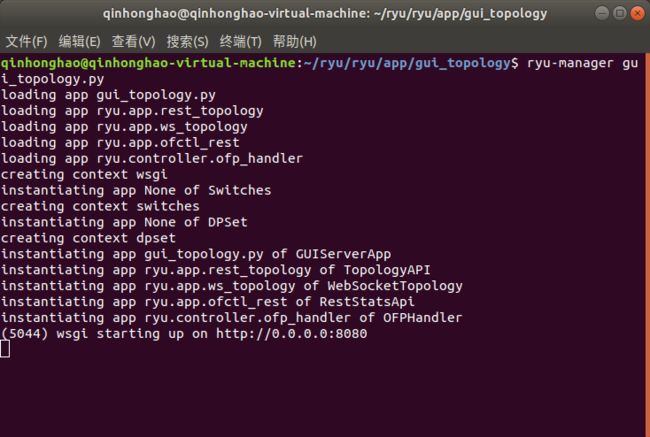
进入RYU/ryu/ryu/app/gui_topology目录使用下列命令
ryu-manager gui_topology.py
脚本代码
#s1的流表
curl -X POST -d '{
    "dpid": 1,
    "priority":1,
    "match":{
        "in_port":1
    },
    "actions":[
        {
            "type": "PUSH_VLAN",
            "ethertype": 33024
        },
        {
            "type": "SET_FIELD",
            "field": "vlan_vid",
            "value": 4096
        },
        {
            "type": "OUTPUT",
            "port": 4
        }
    ]
}' http://127.0.0.1:8080/stats/flowentry/add

curl -X POST -d '{
    "dpid": 1,
    "priority":1,
    "match":{
        "in_port":2
    },
    "actions":[
        {
            "type": "PUSH_VLAN",
            "ethertype": 33024
        },
        {
            "type": "SET_FIELD",
            "field": "vlan_vid",
            "value": 4097
        },
        {
            "type": "OUTPUT",
            "port": 4
        }
    ]
}' http://127.0.0.1:8080/stats/flowentry/add

curl -X POST -d '{
    "dpid": 1,
    "priority":1,
    "match":{
        "in_port":3
    },
    "actions":[
        {
            "type": "PUSH_VLAN",
            "ethertype": 33024
        },
        {
            "type": "SET_FIELD",
            "field": "vlan_vid",
            "value": 4098
        },
        {
            "type": "OUTPUT",
            "port": 4
        }
    ]
}' http://127.0.0.1:8080/stats/flowentry/add

curl -X POST -d '{
    "dpid": 1,
    "priority":1,
    "match":{
        "dl_vlan": "0"
    },
    "actions":[
        {
            "type": "POP_VLAN",
        },
        {
            "type": "OUTPUT",
            "port": 1
        }
    ]
}' http://localhost:8080/stats/flowentry/add

curl -X POST -d '{
    "dpid": 1,
    "priority":1,
    "match":{
        "dl_vlan": "1"
    },
    "actions":[
        {
            "type": "POP_VLAN",
        },
        {
            "type": "OUTPUT",
            "port": 2
        }
    ]
}' http://localhost:8080/stats/flowentry/add

curl -X POST -d '{
    "dpid": 1,
    "priority":1,
    "match":{
        "dl_vlan": "2"
    },
    "actions":[
        {
            "type": "POP_VLAN",
        },
        {
            "type": "OUTPUT",
            "port": 3
        }
    ]
}' http://localhost:8080/stats/flowentry/add

#s2的流表
curl -X POST -d '{
    "dpid": 2,
    "priority":1,
    "match":{
        "in_port":1
    },
    "actions":[
        {
            "type": "PUSH_VLAN",
            "ethertype": 33024
        },
        {
            "type": "SET_FIELD",
            "field": "vlan_vid",
            "value": 4096
        },
        {
            "type": "OUTPUT",
            "port": 4
        }
    ]
}' http://127.0.0.1:8080/stats/flowentry/add

curl -X POST -d '{
    "dpid": 2,
    "priority":1,
    "match":{
        "in_port":2
    },
    "actions":[
        {
            "type": "PUSH_VLAN",
            "ethertype": 33024
        },
        {
            "type": "SET_FIELD",
            "field": "vlan_vid",
            "value": 4097
        },
        {
            "type": "OUTPUT",
            "port": 4
        }
    ]
}' http://127.0.0.1:8080/stats/flowentry/add

curl -X POST -d '{
    "dpid": 2,
    "priority":1,
    "match":{
        "in_port":3
    },
    "actions":[
        {
            "type": "PUSH_VLAN",
            "ethertype": 33024
        },
        {
            "type": "SET_FIELD",
            "field": "vlan_vid",
            "value": 4098
        },
        {
            "type": "OUTPUT",
            "port": 4
        }
    ]
}' http://127.0.0.1:8080/stats/flowentry/add

curl -X POST -d '{
    "dpid": 2,
    "priority":1,
    "match":{
        "dl_vlan": "0"
    },
    "actions":[
        {
            "type": "POP_VLAN",
        },
        {
            "type": "OUTPUT",
            "port": 1
        }
    ]
}' http://localhost:8080/stats/flowentry/add

curl -X POST -d '{
    "dpid": 2,
    "priority":1,
    "match":{
        "dl_vlan": "1"
    },
    "actions":[
        {
            "type": "POP_VLAN",
        },
        {
            "type": "OUTPUT",
            "port": 2
        }
    ]
}' http://localhost:8080/stats/flowentry/add

curl -X POST -d '{
    "dpid": 2,
    "priority":1,
    "match":{
        "dl_vlan": "2"
    },
    "actions":[
        {
            "type": "POP_VLAN",
        },
        {
            "type": "OUTPUT",
            "port": 3
        }
    ]
}' http://localhost:8080/stats/flowentry/add
运行

可以看到下发的流表accept

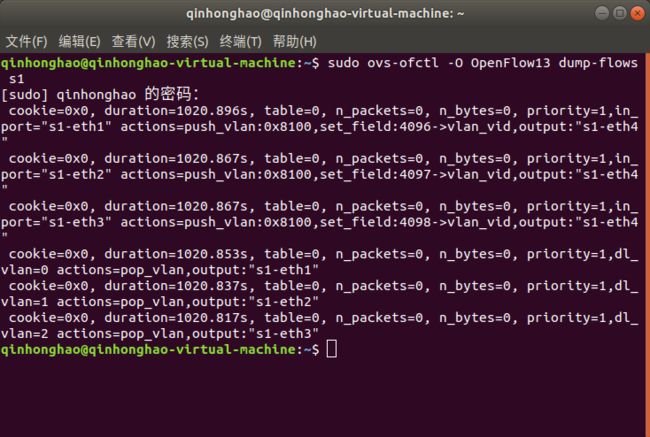
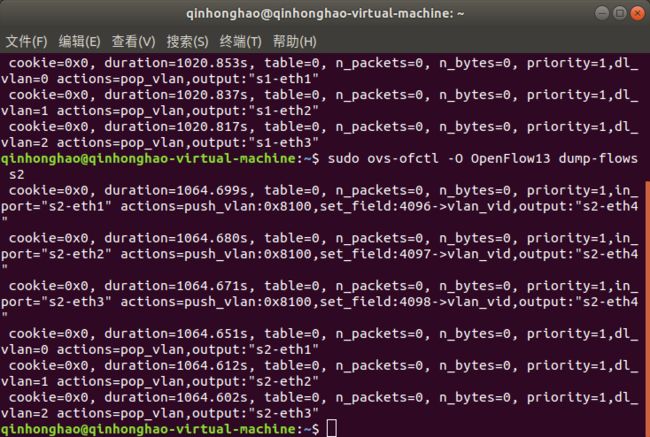
查看s1、s2的流表
sudo ovs-ofctl -O OpenFlow13 dump-flows s1
sudo ovs-ofctl -O OpenFlow13 dump-flows s2
查看主机之间的连通性
pingall

查看图形界面