1 规划新添加的hadoop节点的角色和配置
1.1 角色
slave: 即datanode节点或者tasktracker节点
1.2 配置
主机名:hadoop03
IP: 192.168.88.173
hadoop用户:xiaoyu
2. 部署新的节点
2.1 安装操作系统
2.3 关闭不必要的服务
建议只保留以下服务:abrt-ccpp abrt-oops autofs crond haldaemon lvm2-monitor mdmonitor messagebus netfs network nfslock ntpd portreserve rsyslog sshd udev-post
2.4 网络配置
2.4.1 网卡地址
示例配置文件如下,请根据实际所处的网络配置。
# cat /etc/sysconfig/network-scripts/ifcfg-eth0
DEVICE=eth0
TYPE=Ethernet
ONBOOT=yes
NM_CONTROLLED=no
BOOTPROTO=none
IPADDR=
192.168.88.173
NETMASK=
255.255.255.0
GATEWAY=
192.168.88.2
DNS1=
192.168.88.2
IPV6INIT=no
USERCTL=no
2.4.2 修改主机名
# sudo vim /etc/sysconfig/network
修改HOSTNAME值为主机名
HOSTNAME=hadoop03
# hostname hadoop03
2.4.3 配置密钥对
[xiaoyu@hadoop03 ~]
$ ssh-keygen -t rsa
Generating public/private rsa key pair.
Enter file in which to save the key (/home/xiaoyu/.ssh/id_rsa):
Enter passphrase (empty for no passphrase):
Enter same passphrase again:
Your identification has been saved in /home/xiaoyu/.ssh/id_rsa.
Your public key has been saved in /home/xiaoyu/.ssh/id_rsa.pub.
The key fingerprint is:
45:41:8d:17:3b:0c:20:e0:5d:3f:38:ed:1f:e6:b9:7a xiaoyu@hadoop03
The key's randomart p_w_picpath is:
+--[ RSA 2048]----+
| ... oo=+.. |
| . . o =.oo. |
| . . o =.+ |
| + . . |
| S . o |
| + o |
| + |
| E. |
| .o. |
+-----------------+
[xiaoyu@hadoop03 ~]$
可以把这个操作写成一行命令,甚至写到脚本中:
$ expect -c "spawn ssh-keygen ; set timeout 5; expect \":\"; send \"\r\n\"; set timeout 3; expect \":\"; send \"\r\n\";set timeout 3; expect \":\"; send \"\r\n\"; expect eof;"
2.4.4 配置ssh免密码认证
看到过许多大牛,都是远程scp把公钥拷贝来拷贝去的。其实openssh客户端应用程序包已经提供了专门的命令来处理这个操作。
[xiaoyu@hadoop03 ~]
$ ssh-copy-id -i .ssh/id_rsa.pub 192.168.88.171
The authenticity of host '192.168.88.171 (192.168.88.171)' can't be established.
RSA key fingerprint is a8:24:3f:34:86:f3:46:67:c0:a6:b0:42:86:a2:f2:c9.
Are you sure you want to continue connecting (yes/no)? yes
Warning: Permanently added '192.168.88.171' (RSA) to the list of known hosts.
Address 192.168.88.171 maps to localhost, but this does not map back to the address - POSSIBLE BREAK-IN ATTEMPT!
[email protected]'s password:
Now try logging into the machine, with "ssh '192.168.88.171'", and check in:
.ssh/authorized_keys
to make sure we haven't added extra keys that you weren't expecting.
[xiaoyu@hadoop03 ~]$
3. 在hadoop集群节点上配置
3.1 修改hosts节点
把新的集群节点的主机名和IP对应关系都放到hosts,便于本地解析
# sudo vim /etc/hosts
增加如下行:
192.168.88.171 hadoop01
192.168.88.172 hadoop02
# sudo vim /etc/hosts
增加如下行:
192.168.88.171 hadoop01
192.168.88.172 hadoop02
192.168.88.173 hadoop03
可以通过ping <主机名>做简单测试
3.2 添加ssh免密码认证
方法和2.4.4 中的方法是一致的。
3.3 修改conf/slave
$ vim conf/slaves
hadoop02
hadoop03
hadoop03
3.4 同步配置文件到新节点上
[xiaoyu@hadoop01 hadoop-1.1.2]
$ scp -r conf hadoop03:~/hadoop-1.1.2/
log4j.properties 100% 4441 4.3KB/s 00:00
capacity-scheduler.xml 100% 7457 7.3KB/s 00:00
configuration.xsl 100% 535 0.5KB/s 00:00
fair-scheduler.xml 100% 327 0.3KB/s 00:00
hdfs-site.xml 100% 319 0.3KB/s 00:00
slaves 100% 18 0.0KB/s 00:00
ssl-server.xml.example 100% 1195 1.2KB/s 00:00
hadoop-policy.xml 100% 4644 4.5KB/s 00:00
taskcontroller.cfg 100% 382 0.4KB/s 00:00
mapred-queue-acls.xml 100% 2033 2.0KB/s 00:00
ssl-client.xml.example 100% 1243 1.2KB/s 00:00
masters 100% 9 0.0KB/s 00:00
core-site.xml 100% 441 0.4KB/s 00:00
hadoop-env.sh 100% 2271 2.2KB/s 00:00
hadoop-metrics2.properties 100% 1488 1.5KB/s 00:00
mapred-site.xml 100% 261 0.3KB/s 00:00
4. 启动新节点
4.1 在新节点启动集群服务
[xiaoyu@hadoop03 hadoop-1.1.2]
$ bin/hadoop-daemon.sh start datanode
starting datanode, logging to /home/xiaoyu/hadoop-1.1.2/libexec/../logs/hadoop-xiaoyu-datanode-hadoop03.out
[xiaoyu@hadoop03 hadoop-1.1.2] $ bin/hadoop-daemon.sh start tasktracker
starting datanode, logging to /home/xiaoyu/hadoop-1.1.2/libexec/../logs/hadoop-xiaoyu-datanode-hadoop03.out
[xiaoyu@hadoop03 hadoop-1.1.2] $ bin/hadoop-daemon.sh start tasktracker
starting tasktracker, logging to /home/xiaoyu/hadoop-1.1.2/libexec/../logs/hadoop-xiaoyu-tasktracker-hadoop03.out
5. 检查新节点的启动情况
在这里hadoop01为namenode节点
这里有三种方法,当然执行命令的方法最简便。
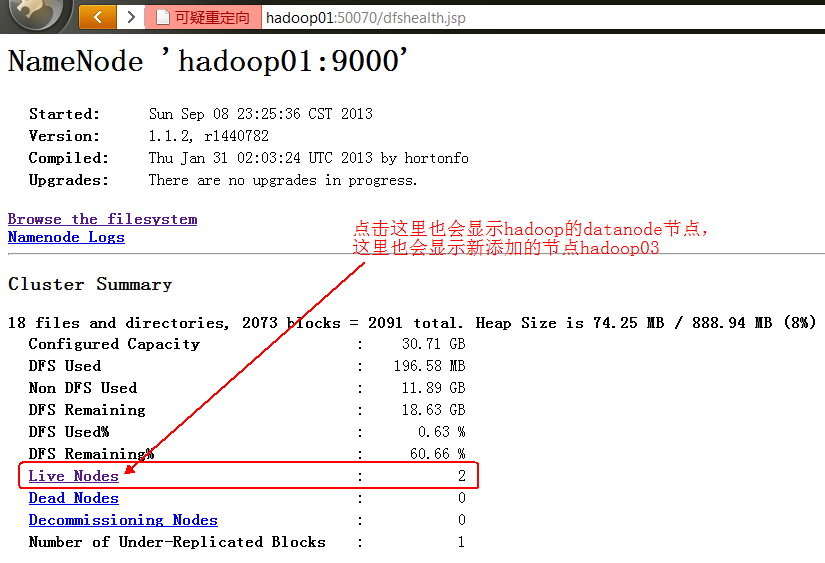
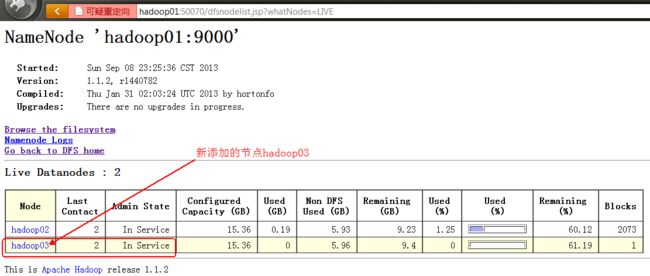
5.1 Namenode状态页面:http://hadoop01:50070
具体信息如下图
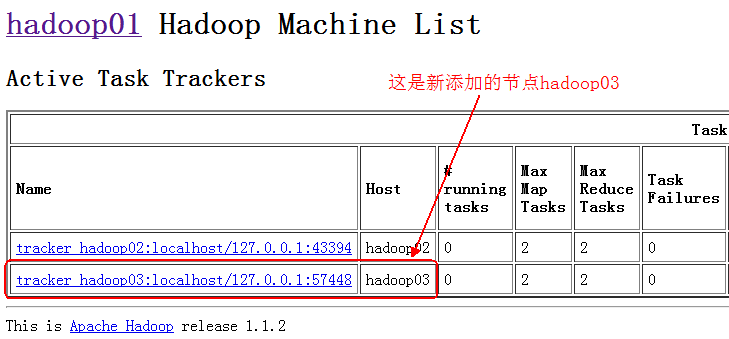
5.2 Jobtracker状态页面:
http://hadoop01:50030
具体信息如下图:
5.3 任意节点为上执行
$ bin/hadoop dfsadmin -report
Configured Capacity: 32977600512 (30.71 GB)
Present Capacity: 20209930240 (18.82 GB)
DFS Remaining: 20003794944 (18.63 GB)
DFS Used: 206135296 (196.59 MB)
DFS Used%: 1.02%
Under replicated blocks: 1
Blocks with corrupt replicas: 0
Missing blocks: 0
-------------------------------------------------
Datanodes available: 2 (2 total, 0 dead)
Name: 192.168.88.172:50010
Decommission Status : Normal
Configured Capacity: 16488800256 (15.36 GB)
DFS Used: 205955072 (196.41 MB)
Non DFS Used: 6369054720 (5.93 GB)
DFS Remaining: 9913790464(9.23 GB)
DFS Used%: 1.25%
DFS Remaining%: 60.12%
Last contact: Fri Sep 13 03:35:51 CST 2013
Name: 192.168.88.173:50010
Decommission Status : Normal
Configured Capacity: 16488800256 (15.36 GB)
DFS Used: 180224 (176 KB)
Non DFS Used: 6398615552 (5.96 GB)
DFS Remaining: 10090004480(9.4 GB)
DFS Used%: 0%
DFS Remaining%: 61.19%
Last contact: Fri Sep 13 03:35:50 CST 2013
6. 使正在运行的计算分布到新的数据节点上
[xiaoyu@hadoop01 hadoop-1.1.2]$ ./bin/start-balancer.sh
starting balancer, logging to /home/xiaoyu/hadoop-1.1.2/libexec/../logs/hadoop-xiaoyu-balancer-hadoop01.out
[xiaoyu@hadoop01 hadoop-1.1.2]$
这个脚本很有用,大家也可以根据实际需要修改这个脚本。
7. 参考资料
Is there a way to add nodes to a running Hadoop cluster?
http://stackoverflow.com/questions/13159184/is-there-a-way-to-add-nodes-to-a-running-hadoop-cluster
1> Update the /etc/hadoop/conf/slaves list with the new node-name
2> Sync the full configuration /etc/hadoop/conf to the new datanode from the Namenode. If the file system isn't shared.
2> Restart all the hadoop services on Namenode/Tasktracker and all the services on the new Datanode.
3> Verify the new datanode from the browser http://namenode:50070
4> Run the balancer script to readjust the data between the nodes.


