网上有很多类似的配置文档,本人也参考了些资料.想自己写个,方便以后自己回顾.关于集群存储这一块儿,由于自学.没有很好的学习环境.我手上就一个过了气的笔记本,我用真实机做SCSI 服务器,使用IP-SAN技术提供集群节点的共享存储.然后用两台XEN的虚拟机做集群节点.当然真实环境会有所不同.而且虚拟机做,还有很多地方都不能实现集群应有的特色.有些地方都不完善.本文旨在拟出高可用性集群应用于web服务的大致框架.(本人对集群存储很感兴趣.很新的新手.请老手们指教.)
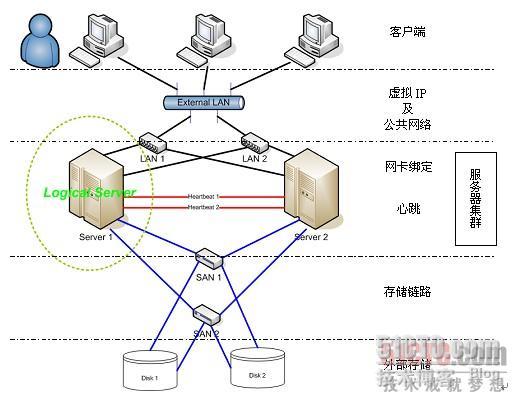
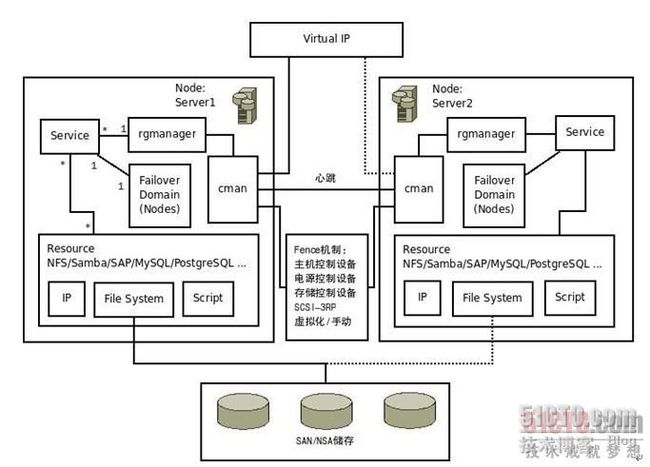
在网上找了两张很好的图贴上
环境说明:
SCSI Server: 192.168.1.206 station1.example.com
Cluster node1(scsi client): 192.168.1.209 virt1.example.com
Cluster node2(scsi client): 192.168.1.207 virt2.example.com
共享存储部分:
SCSI Server配置:
软件包安装:
[root@station1 ~]# yum list | grep scsi
This system is not registered with RHN.
RHN support will be disabled.
iscsi-initiator-utils.i386 6.2.0.871-0.10.el5 installed
lsscsi.i386 0.17-3.el5 base
scsi-target-utils.i386 0.0-5.20080917snap.el5 ClusterStorage
[root@station1 ~]#
[root@station1 ~]# yum -y install scsi-target-utils
服务启动相关设置:
[root@station1 ~]# /etc/init.d/tgtd start
Starting SCSI target daemon: [ OK ]
[root@station1 ~]# chkconfig --level 35 tgtd on
[root@station1 ~]#
创建一个共享设备:
[root@station1 ~]# lvcreate -L 100M -n storage vg01
Logical volume "storage" created
[root@station1 ~]#
新增一个
tid
为
1,合格授权名
为
iqn.2010-06.com.sys.disk1
的设备
将
/dev/vg01/storage
加入
tid1
的
lun1(
逻辑单元号为
1)
设备设备访问权限,允许所有。
[root@station1 ~]# tgtadm --lld iscsi --op new --mode target --tid 1 -T iqn.2010-06.com.sys.disk1
[root@station1 ~]# tgtadm --lld iscsi --op new --mode logicalunit --tid 1 --lun 1 -b /dev/vg01/storage
[root@station1 ~]# tgtadm --lld iscsi --op bind --mode target --tid 1 -I ALL
[root@station1 ~]#
其他访问权限设置:
[root@station1 ~]# tgtadm --lld iscsi --op bind --mode target --tid 1 -I 192.168.1.0
[root@station1 ~]# tgtadm --lld iscsi --op bind --mode target --tid 1 -I 192.168.1.0/24
查看:
[root@station1 ~]# tgtadm --lld iscsi --mode target --op show
Target 1: iqn.2010-06.com.sys.disk1
System information:
Driver: iscsi
State: ready
I_T nexus information:
I_T nexus: 1
Initiator: iqn.1994-05.com.redhat:9d81f945fd95
Connection: 0
IP Address: 192.168.1.209
I_T nexus: 2
Initiator: iqn.1994-05.com.redhat:9d81f945fd95
Connection: 0
IP Address: 192.168.1.207
LUN information:
LUN: 0
Type: controller
SCSI ID: deadbeaf1:0
SCSI SN: beaf10
Size: 0 MB
Online: Yes
Removable media: No
Backing store: No backing store
LUN: 1
Type: disk
SCSI ID: deadbeaf1:1
SCSI SN: beaf11
Size: 2147 MB
Online: Yes
Removable media: No
Backing store: /dev/vg01/storage
Account information:
ACL information:
ALL
[root@station1 ~]#
写入开机脚本:
[root@station1 ~]# tail -3 /etc/rc.local
tgtadm --lld iscsi --op new --mode target --tid 1 -T iqn.2010-06.com.sys.disk1
tgtadm --lld iscsi --op new --mode logicalunit --tid 1 --lun 1 -b /dev/vg01/storage
tgtadm --lld iscsi --op bind --mode target --tid 1 -I ALL
[root@station1 ~]#
SCSI Client配置部分:
[root@station1 ~]# virsh start virt1
Domain virt1 started
[root@station1 ~]# ssh
-
X virt1
Last login: Sat Jun 26 17:48:59 2010 from 192.168.1.206
[root@virt1 ~]#
安装
iscsi-initiator-utils
软件包:
[root@virt1 ~]# yum list | grep scsi
This system is not registered with RHN.
RHN support will be disabled.
iscsi-initiator-utils.i386 6.2.0.871-0.10.el5 base
lsscsi.i386 0.17-3.el5 base
scsi-target-utils.i386 0.0-5.20080917snap.el5 ClusterStorage
[root@virt1 ~]# yum -y install iscsi-*
启动
iscsi:
[root@virt1 ~]# /etc/init.d/iscsi start
iscsid is stopped
Turning off network shutdown. Starting iSCSI daemon: [ OK ]
[ OK ]
Setting up iSCSI targets: iscsiadm: No records found!
[ OK ]
[root@virt1 ~]# chkconfig iscsi --level 35 on
[root@virt1 ~]#
发现
scsi
服务器的共享磁盘并登录:
[root@virt1 ~]# iscsiadm -m discovery -t sendtargets -p 192.168.1.206:3260
192.168.1.206:3260,1 iqn.2010-06.com.sys.disk1
[root@virt1 ~]# iscsiadm -m node -T iqn.2010-06.com.sys.disk1 -p 192.168.1.206:3260 -l
Logging in to [iface: default, target: iqn.2010-06.com.sys.disk1, portal: 192.168.1.206,3260]
Login to [iface: default, target: iqn.2010-06.com.sys.disk1, portal: 192.168.1.206,3260]: successful
[root@virt1 ~]#
发现新的磁盘
/dev/sda:
[root@virt1 ~]# fdisk -l
Disk /dev/xvda: 6442 MB, 6442450944 bytes
255 heads, 63 sectors/track, 783 cylinders
Units = cylinders of 16065 * 512 = 8225280 bytes
Device Boot Start End Blocks Id System
/dev/xvda1 * 1 13 104391 83 Linux
/dev/xvda2 14 535 4192965 83 Linux
/dev/xvda3 536 568 265072+ 83 Linux
/dev/xvda4 569 783 1726987+ 5 Extended
/dev/xvda5 569 633 522081 82 Linux swap / Solaris
Disk /dev/sda: 2147 MB, 2147483648 bytes
4 heads, 50 sectors/track, 20971 cylinders
Units = cylinders of 200 * 512 = 102400 bytes
Disk /dev/sda doesn't contain a valid partition table
[root@virt1 ~]#
注销与删除操作:
[root@virt1 ~]# iscsiadm -m node -T iqn.2010-06.com.sys.disk1 -p 192.168.1.206:3260 -u
Logging out of session [sid: 2, target: iqn.2010-06.com.sys.disk1, portal: 192.168.1.206,3260]
Logout of [sid: 2, target: iqn.2010-06.com.sys.disk1, portal: 192.168.1.206,3260]: successful
[root@virt1 ~]# iscsiadm -m node -o delete -T iqn.2010-06.com.sys.disk1 -p 192.168.1.206:3260
[root@virt1 ~]#
[root@virt1 ~]# fdisk -l
Disk /dev/xvda: 6442 MB, 6442450944 bytes
255 heads, 63 sectors/track, 783 cylinders
Units = cylinders of 16065 * 512 = 8225280 bytes
Device Boot Start End Blocks Id System
/dev/xvda1 * 1 13 104391 83 Linux
/dev/xvda2 14 535 4192965 83 Linux
/dev/xvda3 536 568 265072+ 83 Linux
/dev/xvda4 569 783 1726987+ 5 Extended
/dev/xvda5 569 633 522081 82 Linux swap / Solaris
[root@virt1 ~]#
安装
RHCS与web相关套件:
[root@virt1 ~]# yum -y groupinstall "Cluster Storage" "Clustering"
[root@virt1 ~]# yum -y install httpd
复制虚拟机:
[root@station1 ~]# lvcreate -L 6144M -s -n virt2 /dev/vg01/virt1
Logical volume "virt2" created
[root@station1 ~]# uuidgen
d9236207-8906-4343-aa0a-f32ad303463c
[root@station1 ~]# cp -p /etc/xen/virt1 /etc/xen/virt2
[root@station1 ~]# vim /etc/xen/virt2
[root@station1 ~]# cat /etc/xen/virt2
name = "virt2"
uuid = "d9236207-8906-4343-aa0a-f32ad303463c"
maxmem = 256
memory = 256
vcpus = 1
bootloader = "/usr/bin/pygrub"
on_poweroff = "destroy"
on_reboot = "restart"
on_crash = "restart"
vfb = [ "type=vnc,vncunused=1,keymap=en-us" ]
disk = [ "phy:/dev/vg01/virt2,xvda,w" ]
vif = [ "mac=00:16:36:15:87:b3,bridge=xenbr0,script=vif-bridge" ]
[root@station1 ~]#
[root@station1 ~]# virsh start virt2
Domain virt2 started
[root@station1 ~]#
创建集群:
修改以上三台服务器的
hosts
文件:
[root@station1 ~]# cat /etc/hosts
# Do not remove the following line, or various programs
# that require network functionality will fail.
127.0.0.1 localhost.localdomain localhost
::1 localhost6.localdomain6 localhost6
192.168.1.206 station1.example.com station1
192.168.1.209 virt1.example.com virt1
192.168.1.207 virt2.example.com virt2
[root@station1 ~]#
开启基于
cluster
的
lvm
[root@virt1 ~]# lvmconf --enable-cluster
也可直接修改
/etc/lvm/lvm.conf
locking_type = 3
启动
cman
和
rgmanager
[root@virt1 ~]# /etc/init.d/cman start
Starting cluster:
Loading modules... done
Mounting configfs... done
Starting ccsd... done
Starting cman... done
Starting daemons... done
Starting fencing... done
[ OK ]
[root@virt1 ~]# /etc/init.d/rgmanager start
Starting Cluster Service Manager:
[root@virt1 ~]#
初始化
luci
:
[root@station1 ~]# luci_admin init
登录
luci
:
https://station1.example.com:8084
创建集群框架:
注:如果出现问题尝试重新启动
cman
和
rgmanager.
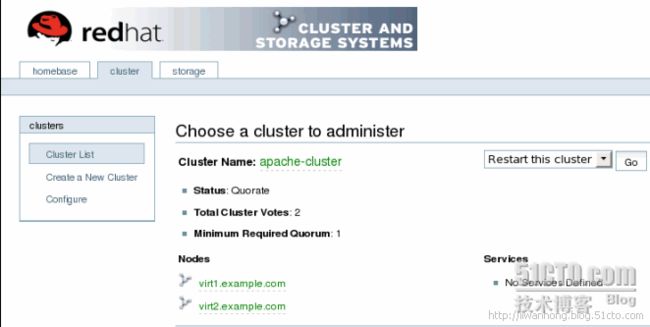
绿色即为集群框架创建成功:
集群节点的配置:
创建集群框架后就可以正常启动
clvmd
了。
[root@virt1 ~]# /etc/init.d/clvmd start
Starting clvmd: [ OK ]
Activating VGs: [ OK ]
[root@virt1 ~]# chkconfig clvmd on
[root@virt1 ~]#
[root@virt2 ~]# /etc/init.d/clvmd start
Starting clvmd: [ OK ]
Activating VGs: [ OK ]
[root@virt2 ~]# chkconfig clvmd on
[root@virt2 ~]#
使用共享磁盘:
root@virt2 ~]# fdisk -l
Disk /dev/xvda: 6442 MB, 6442450944 bytes
255 heads, 63 sectors/track, 783 cylinders
Units = cylinders of 16065 * 512 = 8225280 bytes
Device Boot Start End Blocks Id System
/dev/xvda1 * 1 6 48163+ 83 Linux
/dev/xvda2 7 745 5936017+ 83 Linux
/dev/xvda3 746 758 104422+ 82 Linux swap / Solaris
/dev/xvda4 759 783 200812+ 5 Extended
/dev/xvda5 759 764 48163+ 83 Linux
Disk /dev/sda: 2147 MB, 2147483648 bytes
4 heads, 50 sectors/track, 20971 cylinders
Units = cylinders of 200 * 512 = 102400 bytes
Device Boot Start End Blocks Id System
/dev/sda1 1 20971 2097075 83 Linux
[root@virt2 ~]#
[root@virt1 ~]# partprobe
将共享磁盘转换成逻辑卷.
[root@virt1 ~]# pvcreate /dev/sda1
Physical volume "/dev/sda1" successfully created
[root@virt1 ~]# vgcreate vg01 /dev/sda1
Volume group "vg01" successfully created
[root@virt1 ~]# lvcreate -L 1024M -n lvweb vg01
Rounding up size to full physical extent 52.00 MB
Logical volume "lvweb" created
[root@virt2 ~]# lvdisplay
--- Logical volume ---
LV Name /dev/vg01/lvweb
VG Name vg01
LV UUID NmxRNB-zaZI-72VH-jiN7-Whq3-LaVk-ALTGk4
LV Write Access read/write
LV Status available
# open 0
LV Size 1.00 GB
Current LE 256
Segments 1
Allocation inherit
Read ahead sectors auto
- currently set to 256
Block device 253:0
[root@virt2 ~]#
将逻辑卷格式化为
gfs
文件系统:
[root@virt1 ~]# gfs_mkfs -t apache-cluster:webgfs -p lock_dlm -j 2 /dev/vg01/lvweb
This will destroy any data on /dev/vg01/lvweb.
Are you sure you want to proceed? [y/n] y
Device: /dev/vg01/lvweb
Blocksize: 4096
Filesystem Size: 196564
Journals: 2
Resource Groups: 8
Locking Protocol: lock_dlm
Lock Table: apache-cluster:webgfs
Syncing...
All Done
[root@virt1 ~]#
注:
-t
指定只有
apache-cluster
集群成员才能载入此文件系统,
webgfs
为这个文件系统的标识名。
然后,设定分布式锁管理器的锁钥类型,指明你需要两份
journal(
因为这是一个双节点集群
)
。如果你
预计未来要增加更多的节点,那么你需要在这时设定足够高的
journal
数量。
登录
luci
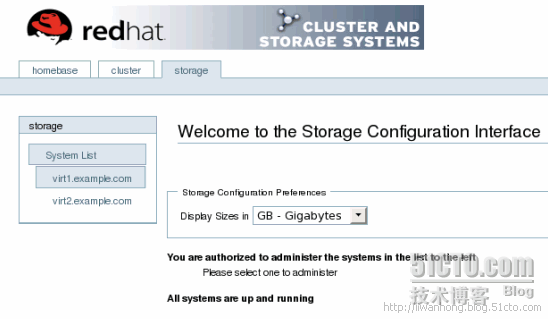
,设置共享存储:
选择一个集群节点:
找到之前做的逻辑卷:
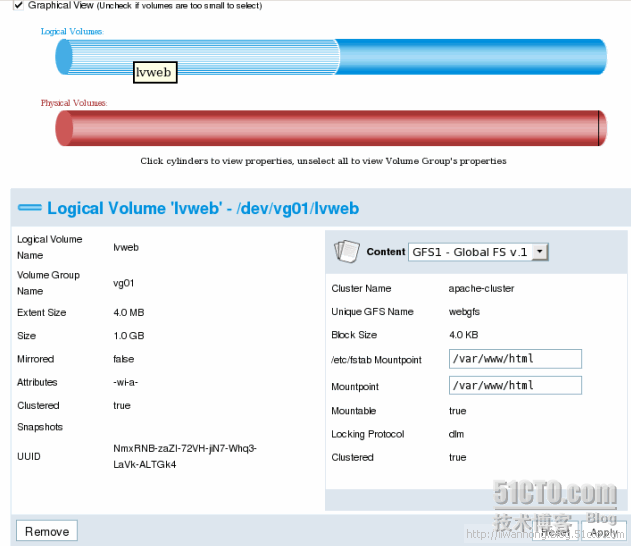
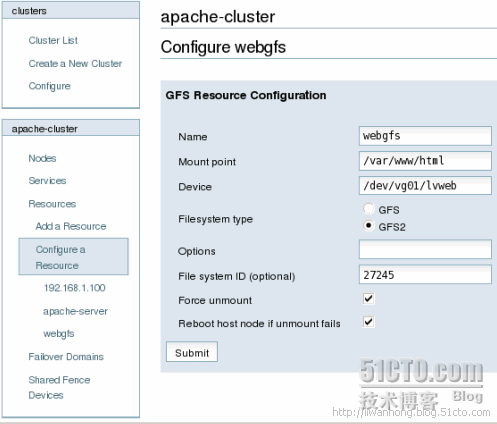
选择gfs文件系统.添加挂载点并添加写入/etc/fstab里的条目:
注:整理文档的时候才注意到,文件系统类型选择的是GFS1而后面且是GFS2.这里是个问题.
到集群节点
virt1
上查看是否设定成功:
[root@virt1 ~]# mount
/dev/xvda2 on / type ext3 (rw)
proc on /proc type proc (rw)
sysfs on /sys type sysfs (rw)
devpts on /dev/pts type devpts (rw,gid=5,mode=620)
/dev/xvda5 on /home type ext3 (rw)
/dev/xvda1 on /boot type ext3 (rw)
tmpfs on /dev/shm type tmpfs (rw)
none on /proc/sys/fs/binfmt_misc type binfmt_misc (rw)
sunrpc on /var/lib/nfs/rpc_pipefs type rpc_pipefs (rw)
none on /sys/kernel/config type configfs (rw)
/dev/mapper/vg01-lvweb on /var/www/html type gfs (rw,hostdata=jid=0:id=65537:first=1)
[root@virt1 ~]# cat /etc/fstab
LABEL=/ / ext3 defaults 1 1
LABEL=/home /home ext3 defaults 1 2
LABEL=/boot /boot ext3 defaults 1 2
tmpfs /dev/shm tmpfs defaults 0 0
devpts /dev/pts devpts gid=5,mode=620 0 0
sysfs /sys sysfs defaults 0 0
proc /proc proc defaults 0 0
LABEL=SWAP-xvda3 swap swap defaults 0 0
/dev/vg01/lvweb /var/www/html gfs defaults 0 0
[root@virt1 ~]#
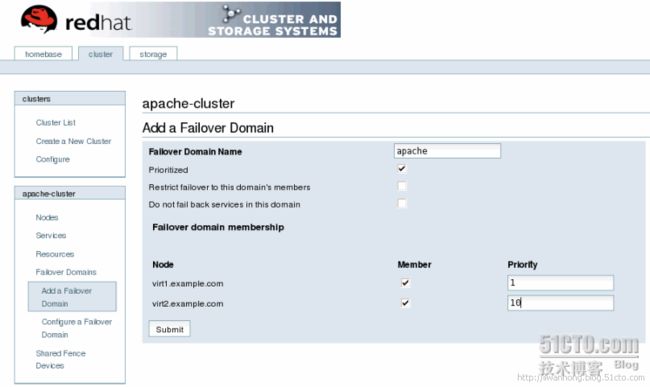
登录
luci
,为
apache-cluster
设置失效域并设置优先级
(
数小优先
)
:
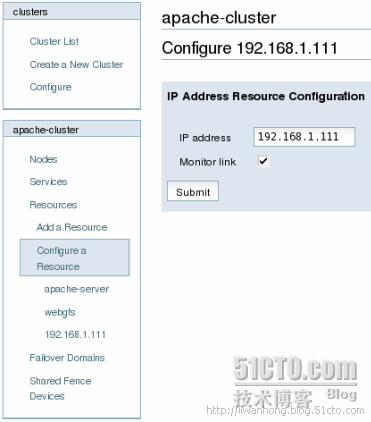
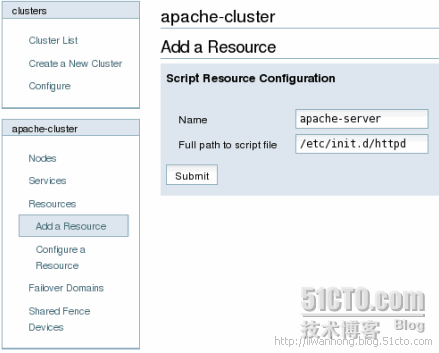
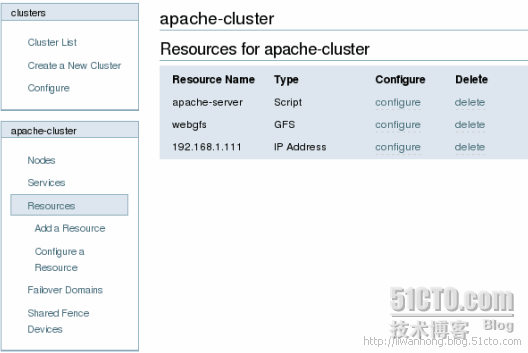
为集群添加资源:
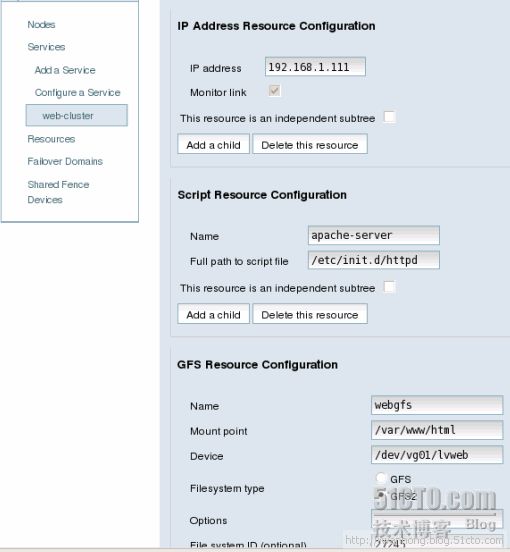
为集群添加服务:
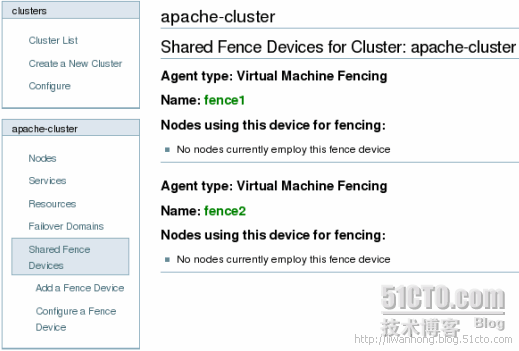
添加fence设备:
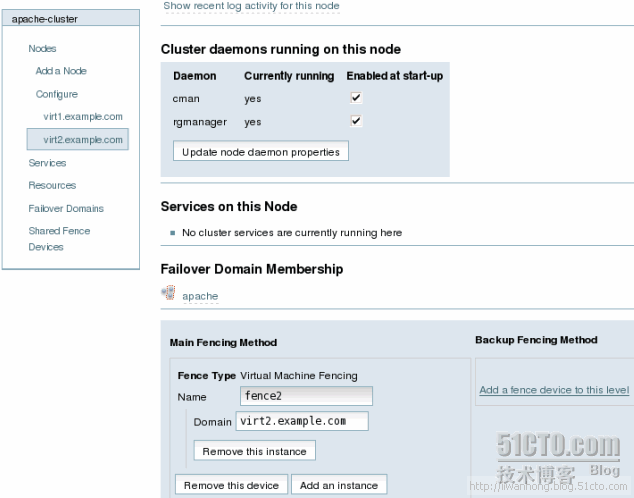
为集群节点绑定fence设备:
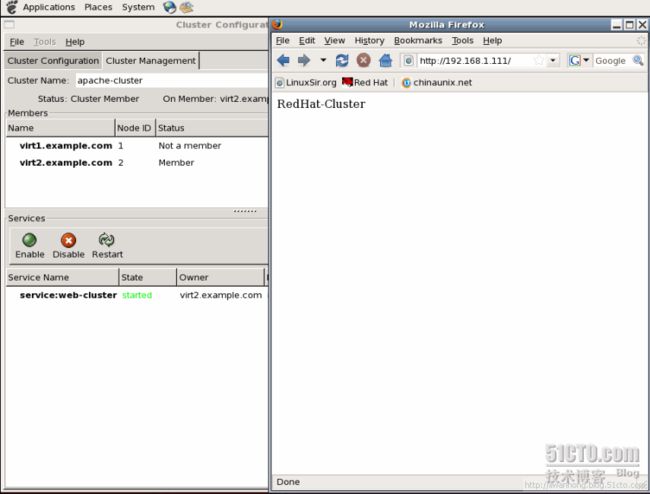
启动集群服务:
在集群节点上查看状态:
[root@virt1 ~]# clustat
Cluster Status for apache-cluster @ Wed Jul 7 14:28:09 2010
Member Status: Quorate
Member Name ID Status
------ ---- ---- ------
virt1.example.com 1 Online, Local, rgmanager
virt2.example.com 2 Online, rgmanager
Service Name Owner (Last) State
------- ---- ----- ------ -----
service:web-cluster virt1.example.com starting
[root@virt1 ~]#
问题:启动集群服务的时候,virt1接管服务,然后又跳到virt2.来回跳.重启服务也是.启动失败.将virt1关机.virt2不能自动接管服务.要手动启动.虚拟机做出来的实验效果很不尽人意.现在还有许多迷惑.渴望有人指点迷津.
