Notification知识点分享
[TOC]
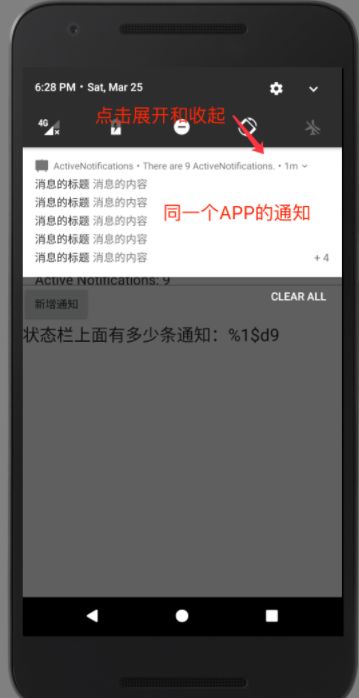
堆叠通知 setGroup
Android N开始支持通知归类功能
StatusBarNotification:每一个通知的状态类,包含notification原始的tag,id等信息,由notify(String, int, Notification)发出的通知,可以使用getTag(),getId(),getNotification()等拿到对应的信息
实现思路:发送通知时,给我们的通知设置一个groupKey,并发送;因为发送的是一个普通的通知,所以我们还需要去检查是否有同样groupKey的通知,如果有,就再发送一个整理-归类的通知,让系统帮我们归类具有相同groupKey的通知成一个二级菜单列表。
Talk is cheap.Show me the code
    private static final String CHANNEL_NOTIFICATION_ID = "channel_id";    //创建channelid
    private static final String NOTIFICATION_GROUP = "my_notification_group";    //需要归类的通知key,setGroup参数,
    private static final int NOTIFICATION_GROUP_SUMMARY_ID = 1;    //notify通知的堆叠id
    private static int mNotificationId = NOTIFICATION_GROUP_SUMMARY_ID + 1;    //notify单条通知id

    //发送系统通知
    public void sendNotification() {
        final NotificationCompat.Builder builder = new NotificationCompat.Builder(this, getChannelId())
                .setSmallIcon(R.mipmap.ic_launcher)
                .setContentTitle("我是通知标题")
                .setContentText("我是通知内容")
                .setAutoCancel(true)
                .setDeleteIntent(mDeletePendingIntent)
                .setGroup(NOTIFICATION_GROUP);
        Notification notification = builder.build();
        mNotificationManager.notify(getNotificationId(), notification);
        updateSummaryNotification();
    }

    private int getNotificationId() {
        int notificationId = mNotificationId++;
        return notificationId;
    }

    //更新堆叠归类概要通知  summary概要
    private void updateSummaryNotification() {
        int numberOfNotifications = getNumberOfNotification();
        if (numberOfNotifications > 1) {
            NotificationCompat.Builder builder = new NotificationCompat.Builder(this, getChannelId())
                    .setSmallIcon(R.mipmap.ic_launcher)
                    .setStyle(new NotificationCompat.BigTextStyle().setSummaryText("通知堆叠信息"))
                    .setGroup(NOTIFICATION_GROUP)
                    .setGroupSummary(true);
            Notification notification = builder.build();
            mNotificationManager.notify(NOTIFICATION_GROUP_SUMMARY_ID, notification);
        } else {
            mNotificationManager.cancel(NOTIFICATION_GROUP_SUMMARY_ID);
        }
    }

    //android 8.0后需要创建channelid,仅针对targetSdk版本是8.0后需要,否则会crash
    private String getChannelId() {
        if (Build.VERSION.SDK_INT < Build.VERSION_CODES.O) {
            return CHANNEL_NOTIFICATION_ID;
        }
        NotificationChannel channel = new NotificationChannel(CHANNEL_NOTIFICATION_ID, "test", NotificationManager.IMPORTANCE_DEFAULT);
        channel.setDescription("test desc");
        channel.setSound(null, null);
        mNotificationManager.createNotificationChannel(channel);
        return CHANNEL_NOTIFICATION_ID;
    }
Start an Activity from a Notification 通过通知打开activity
创建有返回栈的Notification
TaskStackBuilder:Android 3.0之后引入的一个很实用的手动合成返回栈的任务导航类
使用TaskStackBuilder需要在清单文件中定义应用的 Activity 层次结构。
- 添加对 Android 4.0.3 及更低版本的支持。为此,请通过添加
元素作为 的子项来指定正在启动的 Activity 的父项。
对于此元素,请设置android:name="android.support.PARENT_ACTIVITY"。设置android:value=",其中," android:name值。请参阅下面的 XML 示例。 - 同样添加对 Android 4.1 及更高版本的支持。为此,请将
android:parentActivityName属性添加到正在启动的 Activity 的
最终的 XML 应如下所示:
//mintargetsdk>4.1直接用该配置
Talk is cheap.Show me the code
以下代码段演示了该流程:
...
Intent resultIntent = new Intent(this, ResultActivity.class);
TaskStackBuilder stackBuilder = TaskStackBuilder.create(this);
// Adds the back stack          PS:给ResultActivity添加它返回的任务栈,即TaskStackBuilder的parentStack,会创建任务栈
stackBuilder.addParentStack(ResultActivity.class);
// Adds the Intent to the top of the stack    PS:给任务栈添加下一个Intent,此处看出Google开发取名的深意
stackBuilder.addNextIntent(resultIntent);
// Gets a PendingIntent containing the entire back stack  一个api
PendingIntent resultPendingIntent =
        stackBuilder.getPendingIntent(0, PendingIntent.FLAG_UPDATE_CURRENT);
...
NotificationCompat.Builder builder = new NotificationCompat.Builder(this);
builder.setContentIntent(resultPendingIntent);
NotificationManager mNotificationManager =
    (NotificationManager) getSystemService(Context.NOTIFICATION_SERVICE);
mNotificationManager.notify(id, builder.build());
ps:注意这里的taskStackBuilder.addParentStack方法里的参数,是不是有点迷
如果是minSdkVersion>4.0的话,你可以用TaskStackBuilder的另外一个api
// Create an Intent for the activity you want to start
Intent resultIntent = new Intent(this, ResultActivity.class);
// Create the TaskStackBuilder and add the intent, which inflates the back stack
TaskStackBuilder stackBuilder = TaskStackBuilder.create(this);
stackBuilder.addNextIntentWithParentStack(intent);
// Get the PendingIntent containing the entire back stack
PendingIntent resultPendingIntent =
        stackBuilder.getPendingIntent(0, PendingIntent.FLAG_UPDATE_CURRENT);
addNextIntentWithParentStack
This is equivalent to callingaddParentStackwith the resolved ComponentName of nextIntent (if it can be resolved), followed byaddNextIntentwith nextIntent.
其实要实现任务返回栈的功能还有另外一种处理方法,借鉴了主站上次app入口改造的经验,即使用ContextCompat.startActivities(Context context, Intent[] intents, Bundle options)
Start a set of activities as a synthesized task stack 启动一系列activity作为一个合成的任务栈
这样也可以实现返回到app首页的需求
创建不需要返回栈的Notification
-
在你的manifest中给
android:taskAffinity=""
Combined with the FLAG_ACTIVITY_NEW_TASK flag that you'll use in code, setting this attribute blank ensures that this activity doesn't go into the app's default task. Any existing tasks that have the app's default affinity are not affected.
结合FLAG_ACTIVITY_NEW_TASK创建一个跟app默认的任务栈不同的栈,即不在app默认栈里,app栈不受影响。android:excludeFromRecents="true"
Excludes the new task from Recents, so that the user can't accidentally navigate back to it.
该属性是为了配置是否在android系统中的最近任务中是否可见,默认是false,即可通过点击安卓的home键旁边的查看最近任务按键可见
- 构建一个notification对象
Set the Activity to start in a new, empty task by calling setFlags() with the flags FLAG_ACTIVITY_NEW_TASK and FLAG_ACTIVITY_CLEAR_TASK.
Intent notifyIntent = new Intent(this, ResultActivity.class);
// Set the Activity to start in a new, empty task
notifyIntent.setFlags(Intent.FLAG_ACTIVITY_NEW_TASK
                    | Intent.FLAG_ACTIVITY_CLEAR_TASK);
// Create the PendingIntent
PendingIntent notifyPendingIntent = PendingIntent.getActivity(
        this, 0, notifyIntent, PendingIntent.FLAG_UPDATE_CURRENT
);
NotificationCompat.Builder builder = new NotificationCompat.Builder(this, CHANNEL_ID);
builder.setContentIntent(notifyPendingIntent);
...
NotificationManagerCompat notificationManager = NotificationManagerCompat.from(this);
notificationManager.notify(NOTIFICATION_ID, builder.build());
自定义Notification
使用setStyle() RemoteViews setCustomContentView() setCustomBigContentView() 可对通知栏进行自定义样式
// Get the layouts to use in the custom notification
RemoteViews notificationLayout = new RemoteViews(getPackageName(), R.layout.notification_small);
RemoteViews notificationLayoutExpanded = new RemoteViews(getPackageName(), R.layout.notification_large);

// Apply the layouts to the notification
Notification customNotification = new NotificationCompat.Builder(context, CHANNEL_ID)
        .setSmallIcon(R.drawable.notification_icon)
        .setStyle(new NotificationCompat.DecoratedCustomViewStyle())
        .setCustomContentView(notificationLayout)
        .setCustomBigContentView(notificationLayoutExpanded)
        .build();
可通过设置自定义标题的style属性
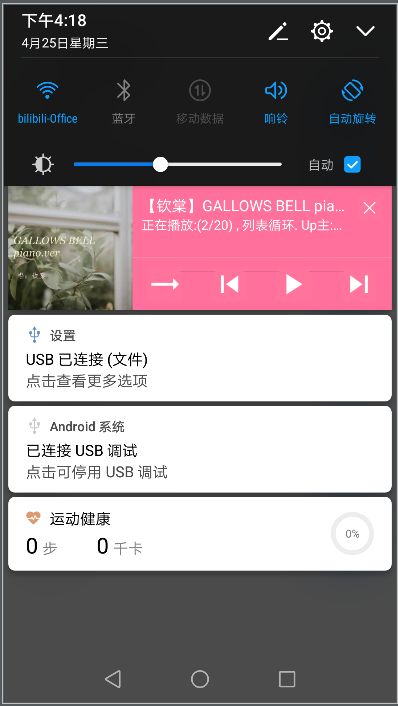
自定义通知栏可参考音乐中对通知栏的设置 BgmscNotificatioBuilderHelper
public Notification buildNotification(Bitmap bmp) {
        this.notificationStyle = mService.getNotificationStyle();
        if (notificationStyle.mode == 1)
            return buildDefaultNotification(bmp);
        else if (notificationStyle.mode == 0) {
            if (Build.VERSION.SDK_INT >= Build.VERSION_CODES.LOLLIPOP)
                return buildJBNotification(bmp);
            else
                return buildDefaultNotification(bmp);
        } else {
            if (Build.VERSION.SDK_INT >= Build.VERSION_CODES.JELLY_BEAN)
                return buildJBNotification(bmp);
            else
                return buildICSNotification(bmp);
        }
    }
    @SuppressLint("NewApi")
    private Notification buildJBNotification(Bitmap bmp) {
        ...
        RemoteViews collapseRv = new RemoteViews(mService.getPackageName(), R.layout.notification_custom_collapse_layout);
        RemoteViews expRv = new RemoteViews(mService.getPackageName(), R.layout.notification_custom_expanded_layout);

        int mNotificationColor = notificationStyle.backgroundColor;
        Bitmap themeColorBmp = BitmapUtil.createBitmapFromColor(5, 5, mNotificationColor);
        collapseRv.setImageViewBitmap(R.id.background, themeColorBmp);
        expRv.setImageViewBitmap(R.id.background, themeColorBmp);

        //Text1 Text2 文本
        expRv.setTextViewText(R.id.text1, desc.getTitle());
        expRv.setTextViewText(R.id.text2, desc.getSubtitle());

        collapseRv.setTextViewText(R.id.text1, desc.getTitle());
        collapseRv.setTextViewText(R.id.text2, desc.getSubtitle());

        //模式
        if (isModeEnable()) {
            expRv.setViewVisibility(R.id.action1, View.VISIBLE);
            expRv.setImageViewResource(R.id.action1, createModeIcon());
            expRv.setOnClickPendingIntent(R.id.action1, mModeIntent);
        }

        //上一首
        if ((getPlaybackState().getActions() & PlaybackStateCompat.ACTION_SKIP_TO_PREVIOUS) != 0) {
            expRv.setViewVisibility(R.id.action2, View.VISIBLE);
            expRv.setImageViewResource(R.id.action2, R.drawable.ic_notification_action_skip_previous);
            expRv.setOnClickPendingIntent(R.id.action2, mPrevIntent);
        }

        //播放,暂停
        int icon;
        PendingIntent intent;
        if (getPlaybackState().getState() == PlaybackStateCompat.STATE_PLAYING) {
            icon = R.drawable.ic_notification_action_pause;
            intent = mPauseIntent;
        } else {
            icon = R.drawable.ic_notification_action_play;
            intent = mPlayIntent;
        }
        collapseRv.setViewVisibility(R.id.action2, View.VISIBLE);
        collapseRv.setImageViewResource(R.id.action2, icon);
        collapseRv.setOnClickPendingIntent(R.id.action2, intent);

        expRv.setViewVisibility(R.id.action3, View.VISIBLE);
        expRv.setImageViewResource(R.id.action3, icon);
        expRv.setOnClickPendingIntent(R.id.action3, intent);

        //下一首
        if ((getPlaybackState().getActions() & PlaybackStateCompat.ACTION_SKIP_TO_NEXT) != 0) {
            expRv.setViewVisibility(R.id.action4, View.VISIBLE);
            expRv.setImageViewResource(R.id.action4, R.drawable.ic_notification_action_skip_next);
            expRv.setOnClickPendingIntent(R.id.action4, mNextIntent);

            collapseRv.setViewVisibility(R.id.action3, View.VISIBLE);
            collapseRv.setImageViewResource(R.id.action3, R.drawable.ic_notification_action_skip_next);
            collapseRv.setOnClickPendingIntent(R.id.action3, mNextIntent);
        }

        //Stop 关闭
        expRv.setOnClickPendingIntent(R.id.stop, mStopIntent);
        collapseRv.setOnClickPendingIntent(R.id.stop, mStopIntent);

        NotificationCompat.Builder builder = new NotificationCompat.Builder(mService, getChannelId());
        builder.setColor(mNotificationColor)
                .setSmallIcon(R.drawable.ic_notification_background_music)
                .setUsesChronometer(false)
                .setWhen(0)
                .setContentIntent(createContentIntent());

        if (Build.VERSION.SDK_INT >= Build.VERSION_CODES.LOLLIPOP) {
            builder.setVisibility(Notification.VISIBILITY_PUBLIC);
        }

        setNotificationPlaybackState(builder);

       ...

        builder.setContent(collapseRv);
        if (Build.VERSION.SDK_INT >= Build.VERSION_CODES.LOLLIPOP) {
            builder.setVisibility(Notification.VISIBILITY_PUBLIC);
        }
        Notification notification = builder.build();
        notification.bigContentView = expRv;

        return notification;
    }
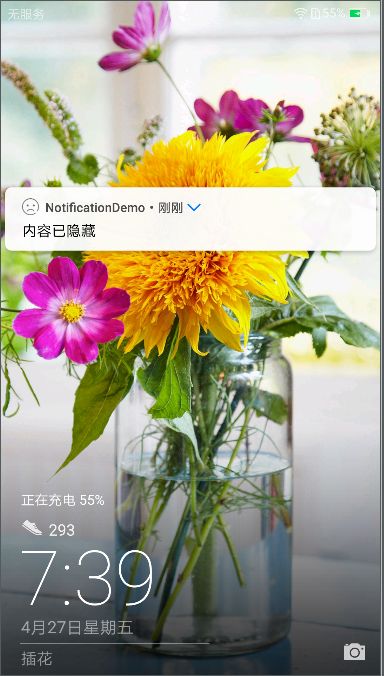
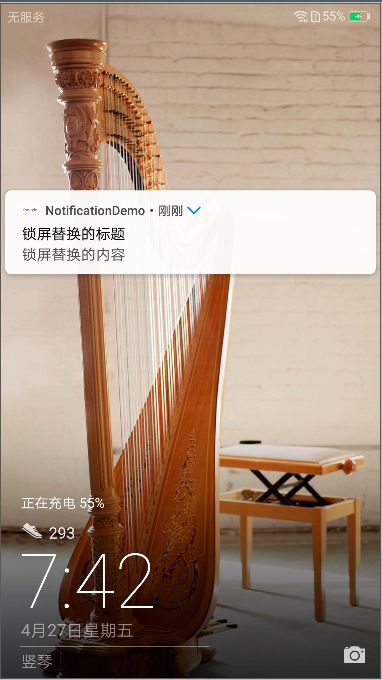
setPublicVersion 锁屏状态下隐私保护
An additional method on the builder – .setPublicVersion(notification) – allows you to provide a replacement notification to display on the lock screen when the visibility is set to private and you still want something to display on the lock screen.
int requestCode = (int) SystemClock.uptimeMillis();
        PendingIntent pendingIntent = PendingIntent.getActivity(context, requestCode, intent, PendingIntent.FLAG_CANCEL_CURRENT);

        NotificationCompat.BigPictureStyle style = new NotificationCompat.BigPictureStyle();
        style.bigPicture(BitmapFactory.decodeResource(context.getResources(), R.drawable.google));
        style.setBigContentTitle(title);
        style.setSummaryText(text);
        NotificationCompat.Builder builder = new NotificationCompat.Builder(context);

        builder.setLargeIcon(largeIcon)
                .setSmallIcon(R.drawable.cry)
                .setTicker(context.getString(R.string.app_name))
                .setWhen(System.currentTimeMillis())
                .setContentTitle(title)
                .setContentText(text)
                .setStyle(style)
                .setAutoCancel(isAutoCancel)
                .setContentIntent(pendingIntent);
        if (isSound) {
            builder.setSound(Uri.parse("android.resource://" + context.getPackageName() + "/" + R.raw.message));
        } else {
            builder.setDefaults(Notification.DEFAULT_ALL);
        }
        if (isShowLock) {
//            builder.setVisibility(NotificationCompat.VISIBILITY_PUBLIC);
            builder.setVisibility(NotificationCompat.VISIBILITY_PRIVATE);

            Notification publishNotification = new NotificationCompat.Builder(context)
                    .setSmallIcon(R.drawable.google)
                    .setContentIntent(pendingIntent)
                    .setContentTitle("锁屏替换的标题")
                    .setContentText("锁屏替换的内容").build();
            builder.setPublicVersion(publishNotification);
        }
        builder.setPriority(isHeads ? NotificationCompat.PRIORITY_MAX : NotificationCompat.PRIORITY_DEFAULT);

        NotificationManager notificationManager = (NotificationManager) context.getSystemService(Context.NOTIFICATION_SERVICE);
        notificationManager.notify(isOnly ? ID_FOR_BIG_PICTURE : (int) System.currentTimeMillis(), builder.build());
测试机型:华为P9 android 7.0
此api生效的前提是,在手机设置中开启了锁屏隐藏通知内容选项。如果未开启并不会生效,仅仅设置为
VISIBILITY_PRIVATE属性,则系统会隐藏内容。相信google这样做的好处是防止陌生人偷窥推送信息。*
Heads-Up Notifications 浮动通知
版本要求:Android 5.0之后,并且设置抬头浮动通知的前提需要在通知设置中开启在屏幕顶部悬浮显示 的选项
Intent notificationIntent = new Intent(Intent.ACTION_VIEW);
notificationIntent.setData(Uri.parse("http://www.wgn.com"));
PendingIntent contentIntent = PendingIntent.getActivity(this, 0, notificationIntent, 0);

Notification notification = new NotificationCompat.Builder(this)
.setCategory(Notification.CATEGORY_PROMO)
.setContentTitle(title)
.setContentText(text)
.setSmallIcon(icon)
.setAutoCancel(true)
.setVisibility(visibility)
.addAction(android.R.drawable.ic_menu_view, "View details", contentIntent)
.setContentIntent(contentIntent)
.setPriority(Notification.PRIORITY_HIGH)
.setVibrate(new long[]{1000, 1000, 1000, 1000, 1000}).build();
NotificationManager notificationManager =
(NotificationManager) getSystemService(NOTIFICATION_SERVICE);
notificationManager.notify(notification_id, notification);
根据android通知栏design guidelines,如果想引起用户的足够重视,最好能加个action,告诉用户点击此action执行你想通知给用户的intent意图。
| 优先级 | 用户 |
|---|---|
| MAX | 重要而紧急的通知,通知用户这个事件是时间上紧迫的或者需要立即处理 |
| HIGH | 高优先级用于重要的通信内容,例如短消息或者聊天,这些都是对用户来说比较有兴趣的。 |
| DEFAULT | 默认优先级用于没有特殊优先级分类的通知。 |
| LOW | 低优先级可以通知用户但又不是很紧急的事件。 |
| MIN | 用于后台消息 (例如天气或者位置信息)。最低优先级通知将只在状态栏显示图标,只有用户下拉通知抽屉才能看到内容。 |
setFullScreenIntent
public NotificationCompat.Builder setFullScreenIntent (PendingIntent intent, boolean highPriority)
An intent to launch instead of posting the notification to the status bar. Only for use with extremely high-priority notifications demanding the user's immediate attention, such as an incoming phone call or alarm clock that the user has explicitly set to a particular time. If this facility is used for something else, please give the user an option to turn it off and use a normal notification, as this can be extremely disruptive.
On some platforms, the system UI may choose to display a heads-up notification, instead of launching this intent, while the user is using the device.
Parameters
intent: The pending intent to launch.
highPriority: Passing true will cause this notification to be sent even if other notifications are suppressed.
A notification won't automatically expand when a static notification is displayed on top (could be custom bar with wifi, bluetooth and sound control)
响应紧急事件(比如来电)
Intent intent = new Intent(ACTION);
intent.putExtra("op", op);
PendingIntent pi = PendingIntent.getBroadcast(this, 0, intent, 0);
builder.setFullScreenIntent(pi, true);
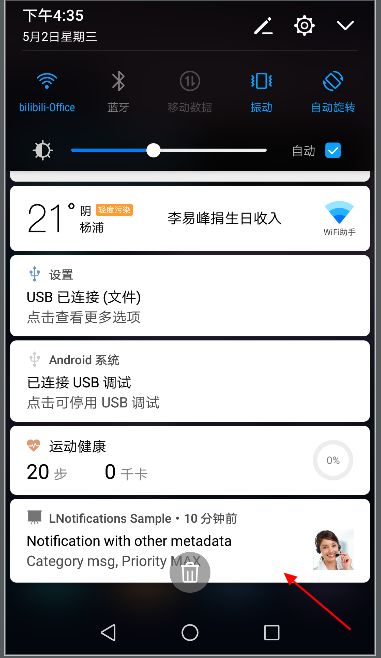
addPerson()
addPerson() 允许您向通知添加人员名单。您的应用可以使用此名单指示系统将指定人员发出的通知归成一组,或者将这些人员发出的通知视为更重要的通知。
private Notification createNotification(Priority priority, Category category, Uri contactUri) {
    Notification.Builder notificationBuilder = new Notification.Builder(getActivity())
            .setContentTitle("Notification with other metadata")
            .setSmallIcon(R.drawable.ic_launcher_notification)
            .setPriority(priority.value)
            .setCategory(category.value)
            .setContentText(String.format("Category %s, Priority %s", category.value,
                    priority.name()));
    if (contactUri != null) {
        notificationBuilder.addPerson(contactUri.toString());
        Bitmap photoBitmap = loadBitmapFromContactUri(contactUri);
        if (photoBitmap != null) {
            notificationBuilder.setLargeIcon(photoBitmap);
        }
    }
    return notificationBuilder.build();
}
addPerson接口的作用,根据文档意思是,可以通过设置手机通讯录里不同用户来设置通知的重要性。但遗憾的是,目前我还没能在手边现有的手机上验证这一功能,大家可以在设置通知里看看是否有根据联系人来自定义通知特性。
taskStackBuilder.addParentStack方法的解释
这里注意一下,之前一直不明白TaskStackBuilder.addParentStack(ResultActivity.class) 这里的class为啥要跟PendingIntent里的Intent的class要一样的,官方的解释是
/**
 * Add the activity parent chain as specified by the
 * {@link android.R.attr#parentActivityName parentActivityName} attribute of the activity
 * (or activity-alias) element in the application's manifest to the task stack builder.
 *
 * @param sourceActivityClass All parents of this activity will be added
 * @return This TaskStackBuilder for method chaining
 */
public TaskStackBuilder addParentStack(Class sourceActivityClass) {
    return addParentStack(new ComponentName(mSourceContext, sourceActivityClass));
}
public TaskStackBuilder addParentStack(ComponentName sourceActivityName) {
    final int insertAt = mIntents.size();
    PackageManager pm = mSourceContext.getPackageManager();
    try {
        ActivityInfo info = pm.getActivityInfo(sourceActivityName, 0);
        String parentActivity = info.parentActivityName;
        while (parentActivity != null) {
            final ComponentName target = new ComponentName(info.packageName, parentActivity);
            info = pm.getActivityInfo(target, 0);
            parentActivity = info.parentActivityName;
            final Intent parent = parentActivity == null && insertAt == 0
                    ? Intent.makeMainActivity(target)
                    : new Intent().setComponent(target);
            mIntents.add(insertAt, parent);
        }
    } catch (NameNotFoundException e) {
        Log.e(TAG, "Bad ComponentName while traversing activity parent metadata");
        throw new IllegalArgumentException(e);
    }
    return this;
}
查看源码发现是根据这个sourceActivityClass然后去读取manifest里面该activityClass的配置信息ActivityInfo,找到parentActivityName配置,然后TaskStackBuilder里面维护了一个ArrayList
因此,要想使用TaskStackBuilder,就必须对Activity在manifest中配置parentActivityName
各位客官,接下来知道怎么做了
