之前写了一个FJImageBrowser,是用UIScrollView来写的,不支持横竖屏和上下拉拖动,而且写得有点凌乱,因此现在重写了下。
新版的支持:上下拖动、横竖屏旋转、支持加载过程先居中,加载完成后放大和直接放大两种效果、支持本地图片和网络图片自动判断。
github链接地址: FJPictureBrowser
集成方法:
- 静态:手动将
FJPictureBrowser文件夹拖入到工程中。 - 动态:
CocoaPods:pod 'FJPictureBrowser', '~> 1.0.0。
效果图:
一. 思路分析
将原始图片和请求图片的
URL地址放在FJImageModel的属性里面,然后放进数组中当调用
FJPictureBrowser,将存放FJImageModel的数组和当前选中的索引selectedIndex传递给FJPictureBrowserFJPictureBrowser根据数组内容设置内部TMMuiLazyScrollView并显示,同时根据selectedIndex,定位到选定的图片判断当前是不是第一次显示,如果是第一次显示就对图片进行放大过程的处理,如果不是第一次就根据
photoBrowserType对图片进行展示。对
TMMuiLazyScrollView内部的FJPictureBrowserPhotoView添加单击退出、双击放大、上下拖动渐变等效果。
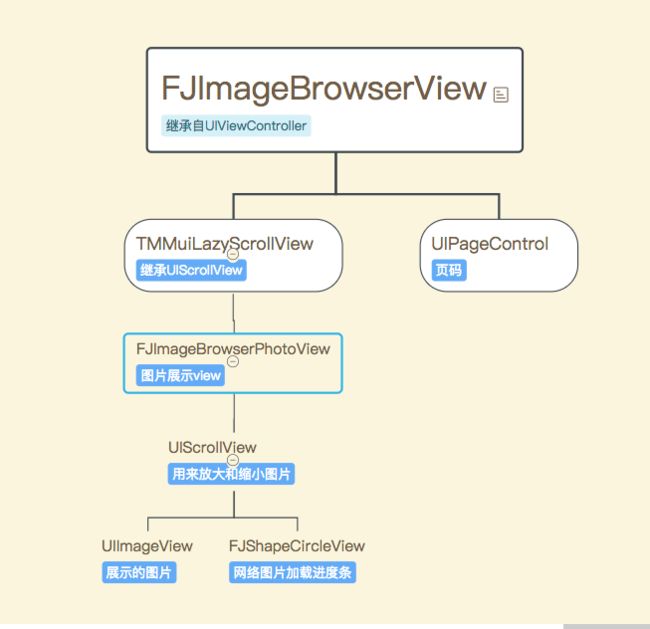
FJImageBrowser的最外围是FJImageBrowserView,继承自UIViewController。FJImageBrowserView内部有TMMuiLazyScrollView和UIPageControl,TMMuiLazyScrollView 是一个高性能的scrollView重用布局框架, 实现了视图的重用和自动加载;而UIPageControl则主要用来显示页码。FJImageBrowserPhotoView是TMMuiLazyScrollView的视图,里面主要包含一个当前显示图片UIImageView和 一个 显示加载进度的FJShapeCircleView。
其实FJImageBrowser的结构很简单,就是一个用于滚动的TMMuiLazyScrollView里面包含着一个用于放大、缩小的UIScrollView来展现当前的图片。
二. 属性分析
1. photoBrowserType:
/**
 浏览 显示 模式
 */
@property (nonatomic, assign) FJPictureViewShowType photoBrowserType;
FJPictureViewShowType 有两种方式:
// 显示 模式
typedef NS_ENUM(NSInteger, FJPictureViewShowType){
    // 模仿微博显示
    FJPictureViewShowTypeWeiBo = 0,
    // 模仿微信显示
    FJPictureViewShowTypeWeiXin = 1,
};
FJPictureViewShowTypeWeiBo 模式: 就是加载过程中直接放大,类似微博图片浏览器的效果。
FJPictureViewShowTypeWeiXin模式:是加载过程中先将小图居中,加载完成后在放大。类似早起微信图片浏览器的效果,现在微信图片浏览器也改成加载过程中直接放大的效果。
2. photoModeArray:
/**
 视图模型数据源(不需要自己 实现代理,如果实现,代理优先级高)
 */
@property (nonatomic, copy, nonnull) NSMutableArray  *photoModeArray;
photoModeArray是数据源,里面包含的是FJImageModel模型。
@interface FJImageModel : NSObject
// 图片url / 图片image
@property (nonatomic, weak) id imageInfo;
// 原图
@property (nonatomic, weak) UIImageView *imageView;
@end
FJImageModel有两个属性:
imageInfo是数据源,比如图片URL地址或是本地图片的imageimageView是原图,这个属性主要用来作为占位图、获取原图位置等。
如果传入的是这个视图模型数据源,就不需要实现获取占位图和原来位置的代理,库里面会自动计算,但如果外部实现代理,代理的优先级高。
3. photoDataArray:
/**
 图片数据源(需要自己实现代理)
 */
@property (nonatomic, copy, nonnull) NSArray  *photoDataArray;
photoDataArray 图片数据源,里面主要包含图片URL或是本地图片的image,如果传入这个参数,就需要实现代理来获取占位图和原图位置。
4. isForbidLandscape:
是否禁止横屏,如果为YES,横屏时,图片浏览依然保持竖屏状态。如果为NO,横屏时就进行横屏适配。
5. isHidesOriginal:
图片浏览拖动时候是否隐藏原来的图片。
三. 使用方法
1. photoModeArray的使用方法(UICollectionView中)
- 生成
imageModels:
self.imageModels = [NSMutableArray array];

// *************************绑定JKPhotoModel*********************************

[self.bigImageArray enumerateObjectsUsingBlock:^(NSString *imageUrl, NSUInteger idx, BOOL * _Nonnull stop) {

   FJImageModel * photoModel = [[FJImageModel alloc] init];
   photoModel.imageInfo = imageUrl;
   [self.imageModels addObject:photoModel];
}];
- 对原图赋值
- (UICollectionViewCell *)collectionView:(UICollectionView *)collectionView cellForItemAtIndexPath:(NSIndexPath *)indexPath {
    FJCollectionImageViewCell *cell = [FJCollectionImageViewCell cellWithCollectionView:collectionView atIndexPath:indexPath];
    [cell.imageView sd_setImageWithURL:[NSURL URLWithString:self.smallImageArray[indexPath.row]] placeholderImage:[UIImage imageNamed:KFJPhotoBrowserDefaultImage]];

    // *************************绑定cell和imageView*********************************

    FJImageModel * photoModel = self.imageModels[indexPath.row];
    photoModel.imageView = cell.imageView;
    return cell;
}
- 显示图片浏览器
- (void)collectionView:(UICollectionView *)collectionView didSelectItemAtIndexPath:(NSIndexPath *)indexPath {

    FJPictureBrowserView *photosView = [[FJPictureBrowserView alloc] init];
    photosView.photoBrowserType = self.switchShowBtn.selected;
    photosView.photoModeArray = self.imageModels;
    photosView.selectedIndex = indexPath.row;
    photosView.isHidesOriginal = YES;
    [photosView showPhotoBrowser];
}
2. photoDataArray的使用方法(UICollectionView中)
- 显示图片浏览器
- (void)tableView:(UITableView *)tableView didSelectRowAtIndexPath:(NSIndexPath *)indexPath {

    [tableView deselectRowAtIndexPath:indexPath animated:NO];
    FJImageBrowserView *photosView = [[FJImageBrowserView alloc] init];
    photosView.photoDataArray = self.bigImageArray;
    photosView.selectedIndex = indexPath.row;
    photosView.photoBrowserDelegate = self;
    [photosView showPhotoBrowser];
}
- 实现代理方法
************************************* PhotosViewDelegate ***************************************/

// 返回图片占位小图
- (UIImageView *)photoBrowser:(FJPictureBrowserView *)browser placeholderImageForIndex:(NSInteger)index {
    ChatTableViewCell *cell = (ChatTableViewCell *)[self tableView:self.tableView cellForRowAtIndexPath:[NSIndexPath indexPathForItem:index inSection:0]];
    return cell.imgView;
}

// 返回原图片位置
- (CGRect)photoBrowser:(FJPictureBrowserView *)browser targetRectForIndex:(NSInteger)index {

    NSIndexPath *tmpIndexPath = [NSIndexPath indexPathForItem:index inSection:0];

     ChatTableViewCell *cell = (ChatTableViewCell *)[self tableView:self.tableView cellForRowAtIndexPath:tmpIndexPath];
      CGRect newImageViewFrame = [cell.imgView convertRect:cell.imgView.bounds toView:self.view];

    // 先计算cell的位置,再转化到view中的位置.
    CGRect rectInTableView = [self.tableView rectForRowAtIndexPath:tmpIndexPath];

    CGRect rectInSuperView = [self.tableView convertRect:rectInTableView toView:[UIApplication sharedApplication].keyWindow];
    newImageViewFrame.origin = CGPointMake(newImageViewFrame.origin.x, rectInSuperView.origin.y + 10);

    return newImageViewFrame;
}
四. 难点分析
1.拖动和左右滑动的兼容
// 让 scrollView 能够 同时 相应 上下拖动 和 作用滑动 两种手势
- (BOOL)gestureRecognizer:(UIGestureRecognizer *)gestureRecognizer shouldRecognizeSimultaneouslyWithGestureRecognizer:(UIGestureRecognizer *)otherGestureRecognizer {

    return YES;
}
同时还要防止手势之间测冲突,因为拖动也包括左右的拖动这就和左右的滑动产生了冲突,所以需要在最外层的TMMuiLazyScrollView的UIScrollViewDelegate里面添加判断。
- (void)scrollViewDidScroll:(UIScrollView *)scrollView {

    self.isHorizontalScrolling = YES;
    NSInteger index = (NSInteger)roundf(scrollView.contentOffset.x / self.photoBrowserScrollView.width);
    self.pageControl.currentPage = index;

}

- (void)scrollViewDidEndDecelerating:(UIScrollView *)scrollView {

    self.isHorizontalScrolling = NO;
}
如果当前正在左右滑动,那拖动手势不响应,如果没有正在左右滑动,则响应拖动手势。
2.上下拖动的同时改变图片大小
这里的规则是:
当图片超过中心线往上拖,图片大小保持不变,背景色透明度也不变只是左右随拖动手势进行改变,如果图片超过中心线往下拖,图片位置和大小随拖动手势进行改变,背景色透明度也随着改变。
当图片拖动结束后,如果图片低于下半部分中心线则直接返回原图位置,如果没有低于中心线则直接返回图片浏览的中心。
// 拖曳 手势
- (void)handlePanGesture:(UIPanGestureRecognizer *)recognizer {
    // 非滚动图 和 非禁止pan手势
    if (self.parentPhotosView.isBanPanGesture == NO && self.presentImageView.height <= self.scrollView.height) {
        CGPoint location = [recognizer locationInView:self];
        if (recognizer.state == UIGestureRecognizerStateBegan) {
            // 记录初始点
            self.isScrollHorizontal = NO;
            self.panGestureBeginPoint = location;
        }

        else if (recognizer.state == UIGestureRecognizerStateChanged && [self.parentPhotosView isHorizontalScrolling] == NO) {

            CGFloat verticalMargin = location.y - self.panGestureBeginPoint.y;
            CGFloat horizontalMargin = location.x - self.panGestureBeginPoint.x;

            if (fabs(verticalMargin) < fabs(horizontalMargin) && self.isScrollHorizontal == NO) {
                self.isScrollHorizontal = YES;
                return;
            }
            // 上下 移动 禁止 左右 滑动 手势
            if ([self.parentPhotosView isPanGestureRecognizerEnable]) {
                [self.parentPhotosView setPanGestureRecognizerEnable:NO];
            }
            // 向下
            self.isPanGestureDirectionDown = verticalMargin;
            CGFloat height = self.bounds.size.height / 2.0;
            CGFloat zoomScale = 1 - (verticalMargin / height) * 0.6;
            if (zoomScale >= 1) {
                zoomScale = 1.0f;
            }else {
                [self.parentPhotosView setStatusBarHiddenStatus:NO];
            }
            [self hiddenOriginImageView];
            self.scrollView.zoomScale = zoomScale;
            self.parentPhotosView.view.backgroundColor = [[UIColor blackColor] colorWithAlphaComponent:zoomScale];
            self.presentImageView.center = CGPointMake(self.imageViewOriginalCenter.x + horizontalMargin, self.imageViewOriginalCenter.y + verticalMargin);
        }
        else if (recognizer.state == UIGestureRecognizerStateEnded ) {

            if ([self.parentPhotosView isPanGestureRecognizerEnable] == NO) {
                [self.parentPhotosView setPanGestureRecognizerEnable:YES];
                // 最后的手势不是向下,则将imageView还原到1.0比例,并移到原始中心点
                if (self.isPanGestureDirectionDown == NO) {
                    [self restorePresentImageViewOriginalPosition];
                }
                else {
                    if (self.scrollView.zoomScale > 0.6) {
                        [self restorePresentImageViewOriginalPosition];
                    }
                    else {
                        [self handleSingleTap:nil];
                    }
                }
            }
        }
    }
}
这里随手势拖动改变self.scrollView的大小主要是通过改变self.scrollView.zoomScale 的属性,我之前是通过计算frame来改变,效果显得特别不自然。
3.横竖屏转换
这里有两个难点:
- 当前手机横屏之后,点击图片进行拖动,背景透明,可以看到原来界面必须还是竖屏时候的操作。
这里主要在屏幕旋转UIApplicationDidChangeStatusBarOrientationNotification的通知中,获取原来界面的视图,根据方向进行将原来viewController的view的transform进行改变,同时屏幕旋转之后要根据方向重新设置TMMuiLazyScrollView和UIPageControls的frame;
// 屏幕 旋转 通知
- (void)didChangeStatusBarOrientationNotification: (NSNotification*)notify {

    self.isHorizontalScrolling = NO;
    CGFloat itemSizeHeight = [UIScreen mainScreen].bounds.size.height;
    CGFloat itemSizeWidth = [UIScreen mainScreen].bounds.size.width;

    //收到的消息是上一个InterfaceOrientation的值
    UIInterfaceOrientation currInterfaceOrientation = [[UIApplication sharedApplication] statusBarOrientation];

    //计算旋转角度
    CGFloat tmpAngle = -M_PI_2;
    if (currInterfaceOrientation == UIInterfaceOrientationLandscapeLeft) {
        tmpAngle = M_PI_2;
    }
    else if(currInterfaceOrientation == UIInterfaceOrientationPortrait) {
        tmpAngle = 0;
    }
    CGAffineTransform transform = CGAffineTransformMakeRotation(tmpAngle);
    [[UIViewController fj_navigationTopViewController].tabBarController.view setTransform:transform];
    [UIViewController fj_navigationTopViewController].tabBarController.view.frame = CGRectMake(0, 0, itemSizeWidth, itemSizeHeight);


    CGFloat currentPageIndex = self.pageControl.currentPage;
    self.photoBrowserScrollView.frame = CGRectMake(0, 0, itemSizeWidth+ [self getCellSpacing], itemSizeHeight);
    self.photoBrowserScrollView.contentSize = CGSizeMake(self.photoBrowserScrollView.width * self.photoModeArray.count, self.view.frame.size.height);
    self.pageControl.frame = CGRectMake(0, itemSizeHeight -40, itemSizeWidth, 40);
    [self.photoBrowserScrollView setContentOffset:CGPointMake(currentPageIndex* self.photoBrowserScrollView.frame.size.width, 0) animated:NO];

    [self.photoBrowserScrollView reloadData];
    dispatch_after(dispatch_time(DISPATCH_TIME_NOW, (int64_t)(0.01 * NSEC_PER_SEC)), dispatch_get_main_queue(), ^{
        self.isHorizontalScrolling = NO;
    });
}
- 手机横屏之后,图片的显示规则以及图片旋转的效果。
我最开始用UICollectionView来做,但是UICollectionView在图片旋转的过程中,会看到图片旋转的阴影,这个问题我写了demo看了下,好像UICollectionView都会这样,所以最后才用UIScroollView来写。
横屏之后图片的显示,需要先获取当前图片的宽高比跟当前屏幕的宽高比进行比较,如果大于:
 imageH = imageH * (screenHeight / imageW);
 imageW = screenHeight;
如果小于:
  if (imageH <= imageW/2) {
        imageH = screenHeight - 80.0f;
  }
  else {
      imageH = screenHeight;
  }
  imageW = imageH * ratio;
  if (imageW > screenWidth) {
       imageW = screenWidth;
  }
这样的显示主要是根据微信图片浏览器的展示效果来调节出来的。
以上三点是重写过程中耗时比较大,其他的问题,都还好。
五.最后
有兴趣的同学,可以看下,如果用问题,烦请您指出来。谢谢!

