一、证书相关
1、首先我们要配置两个证书:推送测试证书、推送正式证书。 先打开AppID的推送功能
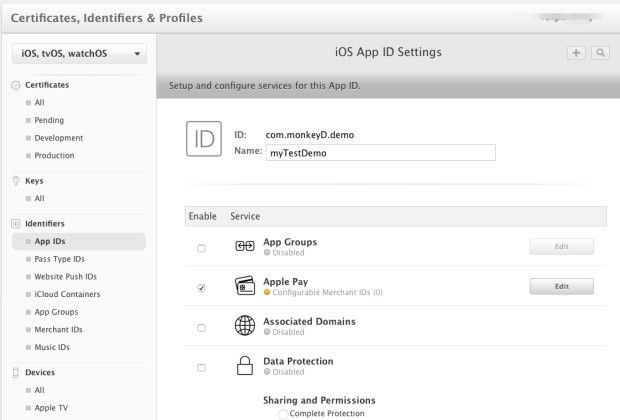

在配置证书界面,Certificates-Development(这是开发证书即测试用,Production这是生产证书即正式)

<1.测试证书:选择 Apple Push Notification service SSL (Sandbox) 选择 App ID 选择 创建mac的csr文件(csr创建步 骤:选择钥匙串访问工具-- 证书助理--从证书颁发机构请求证书--存到磁盘)

下载并安装测试证书
<2.正式证书:选择 App Store and Ad Hoc 其他与测试证书步骤一致
2.为后台服务方提供p12文件
不论是使用第三方(极光友盟等)还是后端人员自己写的推送,都需要将安装的证书导出为P12文件:在mac的钥匙串中,选择安装的推送证书,右键选择导出,选择.p12
(一定要是创建证书的电脑才可以导出为p12)。 有的推送第三方需要.pem文件,则需要对p12文件进行转换,具体:https://www.jianshu.com/p/cc952ea07a08?mType=Group
二、代码
1.打开项目中的推送开关
Capabilities--Push Notifications 若AppID的推送打开,且证书安装好,则Push Notifications下的两步都会打钩,证明准备步骤都已就绪

2.各种方法的作用,Appdelegate要遵守UNUserNotificationCenterDelegate协议
首先是启动方法didFinishLaunchingWithOptions,在这里注册推送服务
// 程序第一次启动的时候调用(点击通知启动 和 点击app图标启动 都会走这个方法,所以这种情况下 要在这里获取推送的内容)
-(BOOL)application:(UIApplication *)application didFinishLaunchingWithOptions:(NSDictionary *)launchOptions
{
self.isFirstLaunch = YES;
//这里是获取推送内容
NSDictionary* remoteNotification = [launchOptions objectForKey:UIApplicationLaunchOptionsRemoteNotificationKey];
if (remoteNotification) {
//点击通知框进入app可以在此接收通知(只在杀死状态下可以接收到),之后会调用didReceiveRemoteNotification,因为此方法调用时,控制器已经创建完毕,可以跳转
}else{
//点击图标进入app
}
//这里要注册推送服务
if (kOS >= 10.0) { // 设置能够接收通知 的类型
UNUserNotificationCenter * center = [UNUserNotificationCenter currentNotificationCenter];
[center setDelegate:self];
UNAuthorizationOptions type = UNAuthorizationOptionBadge|UNAuthorizationOptionSound|UNAuthorizationOptionAlert;
[center requestAuthorizationWithOptions:type completionHandler:^(BOOL granted, NSError * _Nullable error) {
if (granted) {
Log(@"注册成功");
[center getNotificationSettingsWithCompletionHandler:^(UNNotificationSettings * _Nonnull settings) {
Log(@"%@",settings);
}];
}else{
Log(@"注册失败");
}
}];
} else if (kOS >= 8.0){
UIUserNotificationType notificationTypes = UIUserNotificationTypeBadge |
UIUserNotificationTypeSound |
UIUserNotificationTypeAlert;
UIUserNotificationSettings *settings = [UIUserNotificationSettings settingsForTypes:notificationTypes categories:nil];
[application registerUserNotificationSettings:settings];
}
// 注册通知
[application registerForRemoteNotifications];
return YES;
}
接下来这是获得deviceToken的方法(deviceToken,是apns服务给每个设备的标示,通过这个标示才能推送到指定设备,且deviceToken是变化的,一般在应用卸载重装,或者系统升级才会改变)
// 1 每次程序启动都会调用
- (void)application:(UIApplication *)application
didRegisterForRemoteNotificationsWithDeviceToken:(NSData *)deviceToken
{
//在这里把token传给后台
NSString *deviceTokenStr = [[[[deviceToken description]
stringByReplacingOccurrencesOfString:@"<" withString:@""]
stringByReplacingOccurrencesOfString:@">" withString:@""]
stringByReplacingOccurrencesOfString:@" " withString:@""];
Log(@"deviceTokenStr:\n%@",deviceTokenStr);
NSUserDefaults *defaults = [NSUserDefaults standardUserDefaults];
[defaults setObject:deviceTokenStr forKey:@"deviceToken"];
[defaults synchronize];
//这个方法 是我向后端数据库更新token的请求,如果用第三方推送可忽略
[PushService updateDeviceToken];
}
didFailToRegisterForRemoteNotificationsWithError这个方法就不多说了,是token获取失败调用,我们可以在这里向后台注销这个用户的token
willPresentNotification这个方法在iOS10才有的,用来设置应用在前台运行时,收到通知的提醒模型
#pragma mark- UNUserNotificationCenterDelegate(iOS10以上)
//在前台收到通知(程序运行时走此方法)
- (void)userNotificationCenter:(UNUserNotificationCenter *)center willPresentNotification:(UNNotification *)notification withCompletionHandler:(void (^)(UNNotificationPresentationOptions))completionHandler{
// 需要执行这个方法,选择是否提醒用户,有Badge、Sound、Alert三种类型可以设置
//如果加上这三个枚举,则用户即使在前台收到通知也会出现,有声音和角标。如果去掉在前台则不会收到
completionHandler(UNNotificationPresentationOptionBadge|
UNNotificationPresentationOptionSound|
UNNotificationPresentationOptionAlert);
}
didReceiveNotificationResponse是应用处于任何状态下,用户点击了推送通知的弹框,就会调用
// iOS 10之后 任何状态用户点击了通知 (用户点击了通知时走此方法)
- (void)userNotificationCenter:(UNUserNotificationCenter *)center didReceiveNotificationResponse:(UNNotificationResponse *)response withCompletionHandler:(void (^)())completionHandler{
NSDictionary *userInfo = response.notification.request.content.userInfo;
//这里可以处理收到的推送消息
if (userInfo[@"aps"][@"url"]) {
[ToolsHelper receiveMessageAndPushcontroller:userInfo[@"aps"][@"url"]];
}
}
completionHandler();
return;
}
didReceiveRemoteNotification 这个方法在iOS10以下,应用在前台的时候,有推送来,会直接来到这个方法,但通知栏不会有提示,角标也不会有,应用如果在后台后者关闭状态,点击推送来的消息也会来到这个方法,我们可以在这里处理业务逻辑(由于要处理iOS10以前设备在前台收到通知的提醒,所以要将通知转为本地通知进行弹窗提示)
- (void)application:(UIApplication *)application didReceiveRemoteNotification:(NSDictionary *)userInfo fetchCompletionHandler:(void (^)(UIBackgroundFetchResult))completionHandler {
Log(@"userInfo: %@", userInfo.description);
if ( application.applicationState == UIApplicationStateActive) {
// 程序在运行过程中收到推送通知,转换成一个本地通知,显示到通知栏
UILocalNotification *localNotification = [[UILocalNotification alloc] init];
localNotification.userInfo = userInfo;
localNotification.soundName = UILocalNotificationDefaultSoundName;
localNotification.alertBody = [[userInfo objectForKey:@"aps"]objectForKey:@"alert"];
localNotification.fireDate = [NSDate date];
[[UIApplication sharedApplication] scheduleLocalNotification:localNotification];
} else {
//在后台或者关闭状态收到推送通知
}
completionHandler(UIBackgroundFetchResultNewData);
}
以上就是常规推送需要处理的方法
在iOS10,推送已经可以推图片,git图,短视频了,也可以自定义弹窗的操作按钮。接下来就看一下,怎么推送简单的图片,这种推送有自己的UI和方法,也相当于一个target了。所以创建方法也跟普通推送不太一样。
选择File-New-Target
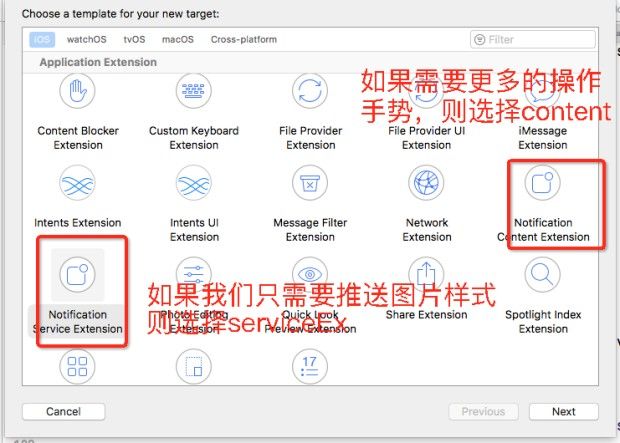
创建后,系统会生成一个PushServiceEx的文件夹,里面有一个NotificationService的类,同时也会有一个PushServiceEx的target生成,如果未找到这个target 就在manger Schemes里面勾上。

下面是NotificationService类中的代码,这个类的方法会在手机接收到带图片的推送时调用,且负责下载这个图片,然后保存展示。(imageUrl是推送时,定义图片url的字段)
- (void)didReceiveNotificationRequest:(UNNotificationRequest *)request withContentHandler:(void (^)(UNNotificationContent * _Nonnull))contentHandler {
self.contentHandler = contentHandler;
self.bestAttemptContent = [request.content mutableCopy];
NSDictionary *dict = self.bestAttemptContent.userInfo;
NSDictionary *notiDict = dict[@"aps"];
NSString *imgUrl = [NSString stringWithFormat:@"%@",notiDict[@"imageUrl"]];
if (!imgUrl.length) {
self.contentHandler(self.bestAttemptContent);
}else{
//这是下载推片的方法
[self loadAttachmentForUrlString:imgUrl withType:@"image" completionHandle:^(UNNotificationAttachment *attach) {
if (attach) {
self.bestAttemptContent.attachments = [NSArray arrayWithObject:attach];
}
self.contentHandler(self.bestAttemptContent);
}];
}
}
- (void)loadAttachmentForUrlString:(NSString *)urlStr
withType:(NSString *)type
completionHandle:(void(^)(UNNotificationAttachment *attach))completionHandler{
__block UNNotificationAttachment *attachment = nil;
NSURL *attachmentURL = [NSURL URLWithString:urlStr];
NSString *fileExt = [self fileExtensionForMediaType:type];
NSURLSession *session = [NSURLSession sessionWithConfiguration:[NSURLSessionConfiguration defaultSessionConfiguration]];
[[session downloadTaskWithURL:attachmentURL
completionHandler:^(NSURL *temporaryFileLocation, NSURLResponse *response, NSError *error) {
if (error != nil) {
NSLog(@"%@", error.localizedDescription);
} else {
NSFileManager *fileManager = [NSFileManager defaultManager];
NSURL *localURL = [NSURL fileURLWithPath:[temporaryFileLocation.path stringByAppendingString:fileExt]];
[fileManager moveItemAtURL:temporaryFileLocation toURL:localURL error:&error];
NSError *attachmentError = nil;
attachment = [UNNotificationAttachment attachmentWithIdentifier:@"" URL:localURL options:nil error:&attachmentError];
if (attachmentError) {
// log(@"%@", attachmentError.localizedDescription);
}
}
completionHandler(attachment);
}] resume];
}
- (NSString *)fileExtensionForMediaType:(NSString *)type {
NSString *ext = type;
if ([type isEqualToString:@"image"]) {
ext = @"jpg";
}
if ([type isEqualToString:@"video"]) {
ext = @"mp4";
}
if ([type isEqualToString:@"audio"]) {
ext = @"mp3";
}
return [@"." stringByAppendingString:ext];
}
要完成这个图片推送 PushServiceEx target有几个要注意的点:
第一个:测试一定要选择这个target进行安装。
第二个:这个target支持的development target 版本一定要填对,我之前就因为填了iOS11,但是用10的机子测了半天都只是普通推送没有图片。
第三个:target的版本不能小于项目的版本,否则会在提交应用到appstore的时候,有警告
第四个: "mutable-content" : 1 推送时一定要有这个参数,不然就会被手机认为是普通推送。推送的json应该像这样 。
{
"aps" : {
"alert" : "Your message here.",
"badge" : 9,
"sound" : "default",
"mutable-content" : 1,
"imageUrl" : "https://www.xxxxxxxx.png"
},
}
三、测试
1.推送工具
如果后台的小伙伴没时间跟我们测试推送,就可以自己用推送小工具,只需要我们下载的推送证书(后缀为cer的文件),自己进行推送测试,这里是工具地址:https://itunes.apple.com/cn/app/easy-apns-provider/id989622350?mt=12
注意,推送只能进行真机测试,模拟器是没有token的。 我们需要添加要推送设备的token,然后选择证书,如果是正式就选连接至sandbox那个选项。然后就可以开始推送了

2.推送的环境说明
不论是这个小工具还是服务器推送,如果APP是生产环境(Appstore下载的或Adhoc环境),则选择正式证书。我们自己开发安装的则选择测试证书。所以我们是没办法用生产证书进行上线前测试的(Adhoc除外)