欢迎加QQ群讨论:157672725
前言
iOS开发中,main函数是我们认为的入口,但其实从程序启动到main方法被调用之间,还发生了许多事情。比如runtime的初始化、动态库的加载链接等。想要真正了解程序启动,需要了解程序的内部结构。因此,本章将从分析程序(.ipa)的结构开始,到main函数被调用分析程序的启动。
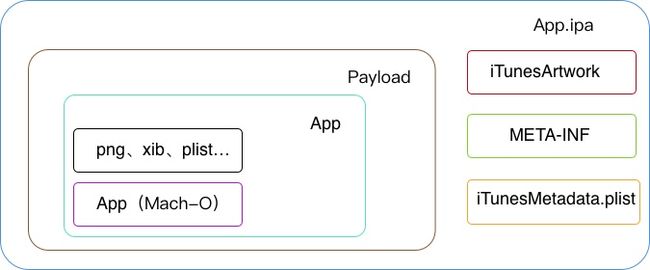
程序(.ipa)结构
iTunesArtwork: 高分别率图标,通常为JPG图像文件
iTunesMetadata.plist:属性列表文件
App(Mach-O):App的可执行文件
可执行文件(Mach-O)
进程是特殊文件在内存中加载得到的结果。这种文件必须使用操作系统能够理解的格式,这样操作系统才能解析、建立依赖、初始化并开始执行。这种特殊文件就是可执行文件。
在UNIX中,我们可以使用chmod+x将文件标记为可执行文件,但不能保证该文件可以执行,因为标记只是告诉操作系统内核将文件读入内存,然后寻找一个头签名,这个头签名通常称为“魔数”。当文件读入时,通过“魔数”可帮助判断文件的二进制格式,如果是被支持的二进制格式,才会调用加载器函数。每个平台都有自己的可执行文件格式,Mach-O则是 OS X 与 iOS 系统上的可执行文件格式。
下面我们以QQ为例,借助MachOView来分析Mach-O文件。
魔数
在OS X上,可执行文件的标识有这样几个魔数:
- cafebabe
- feedface
- feadfacf
- ...
cafebabe就是跨处理器架构的通用格式,feedface和feedfacf则分别是某一处理器架构下的Mach-O格式。
Mach-O 32位魔数是 0xfeedface
Mach-O 64位魔数是 0xfeedfacf
QQ支持ARM32&64所以可以看到两个Mach Header
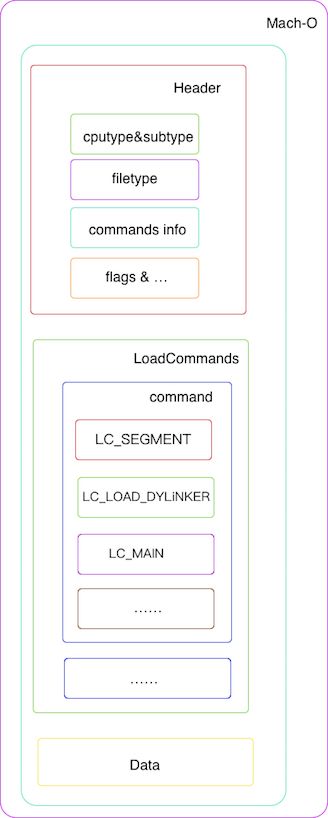
Mach-O格式
- Header:CPU类型和子类型、文件类型、加载命令的条数和大小、动态连接器标志等
- LoadCommands:加载命令。比如文件的段与进程地址映射、 调用dyld、开启Mach线程等
- Data:数据
加载过程
系统加载可执行文件后,通过Fat Header,找到对应平台的地址,
然后根据相应的Header,获取LoadCommands的信息,并加载。
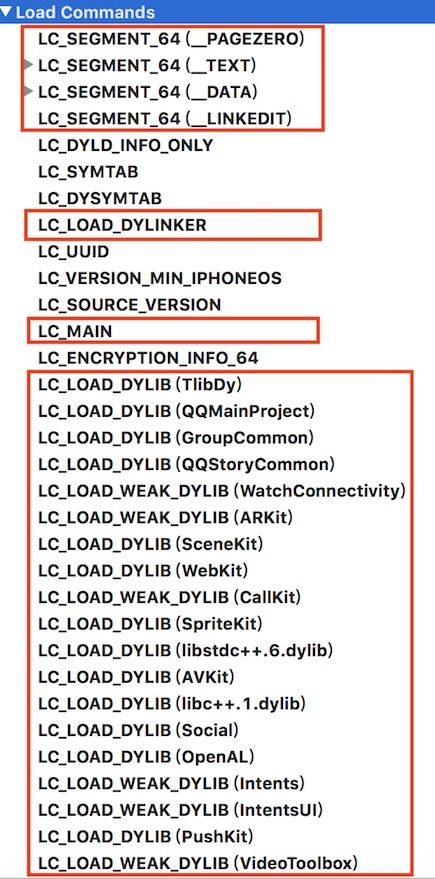
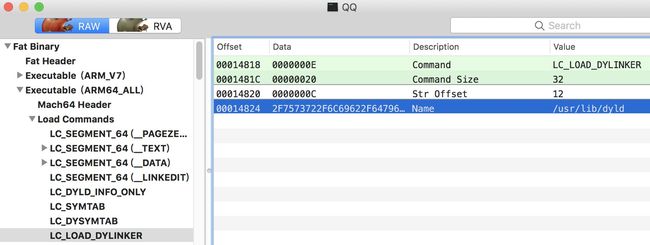
查看Load Commands可知,系统通过LC_SEGEMNT命令将可执行文件段映射到进程地址空间后通过LC_LOAD_DYLINKER调用dyld(通常在/usr/lib/dyld),当dyld的工作完成之后由LC_MAIN(旧版本中的LC_UNIXTHREAD)命令负责设置主线程的入口地址和栈大小。
dyld (the dynamic link editor)
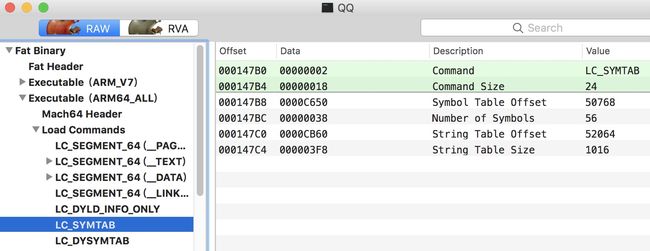
在讲解dyld之前我们先来看一下Load Commands中的LC_SYMTAB、LC_DYSYMTAB以及LC_LOAD_DYLB。
我们可以看到Mach-O镜像中有很多“空洞”,即由LC_SYMTAB命令提供的符号表和LC_LOAD_DYLB加载的额外动态库,这些空洞需要在程序启动的时填补。这项工作就需要dyld来完成,这个过程有时候也称为符号绑定(binding)。
注:细心的朋友可以看到在加载libSystem的时候使用的地址是/usr/lib/而QQMainProject的地址是@rpath/。在iOS系统中,几乎所有的程序都会用到动态库,而动态库在加载的时候都需要用dyld进行链接。很多系统库几乎都是每个程序都要用到的,与其在每个程序运行的时候一个一个将这些动态库都加载进来,还不如先把它们打包好,一次加载进来来的快。这就是dyld的共享库缓存。
dyld是开源的,下面我们就从代码的角度分析dyld。
uintptr_t
_main(const macho_header* mainExecutableMH, uintptr_t mainExecutableSlide,
        int argc, const char* argv[], const char* envp[], const char* apple[],
        uintptr_t* startGlue)
{
        //...
        // 1.instantiate ImageLoader for main executable
       sMainExecutable = instantiateFromLoadedImage(mainExecutableMH, mainExecutableSlide, sExecPath);
        ...
        // 2.load any inserted libraries
       if( sEnv.DYLD_INSERT_LIBRARIES != NULL ) {
            for (const char* const* lib = sEnv.DYLD_INSERT_LIBRARIES; *lib != NULL; ++lib)
            loadInsertedDylib(*lib);
        }
        ...
       //3.link main executable
        link(sMainExecutable, sEnv.DYLD_BIND_AT_LAUNCH, true, ImageLoader::RPathChain(NULL, NULL));
        ...
       //4. link any inserted libraries
       // do this after linking main executable so that any dylibs pulled in by inserted
       // dylibs (e.g. libSystem) will not be in front of dylibs the program uses
       if ( sInsertedDylibCount > 0 ) {
            for(unsigned int i=0; i < sInsertedDylibCount; ++i) {
                ImageLoader* image = sAllImages[i+1];
                link(image, sEnv.DYLD_BIND_AT_LAUNCH, true, ImageLoader::RPathChain(NULL, NULL));
                ...
       }
        ...
        //5. run all initializers
        initializeMainExecutable();
        ...
}
1. instantiateFromLoadedImage
dyld通过instantiateFromLoadedImage方法初始化ImageLoader并将我们可执行文件加载进内存,生成对应的image(镜像)。每个Mach-O 文件都会对应一个ImageLoader实例。ImageLoader是一个抽象类,每一种具体的Mach-O 文件都会继承 ImageLoader。在加载时会根据Mach-O的格式不同选择生成不用的实例(如:ImageLoaderMachOClassic、ImageLoaderMachOCompressed)。而sMainExecutable对应可执行文件,里面包含了我们项目中所有新建的类。
//
// ImageLoader is an abstract base class.  To support loading a particular executable
// file format, you make a concrete subclass of ImageLoader.
//
// For each executable file (dynamic shared object) in use, an ImageLoader is instantiated.
//
// The ImageLoader base class does the work of linking together images, but it knows nothing
// about any particular file format.
//
//
class ImageLoader {
public:

    typedef uint32_t DefinitionFlags;
    static const DefinitionFlags kNoDefinitionOptions = 0;
    static const DefinitionFlags kWeakDefinition = 1;

    typedef uint32_t ReferenceFlags;
    static const ReferenceFlags kNoReferenceOptions = 0;
    static const ReferenceFlags kWeakReference = 1;
    static const ReferenceFlags kTentativeDefinition = 2;

    enum PrebindMode { kUseAllPrebinding, kUseSplitSegPrebinding, kUseAllButAppPredbinding, kUseNoPrebinding };
    enum BindingOptions { kBindingNone, kBindingLazyPointers, kBindingNeverSetLazyPointers };
    enum SharedRegionMode { kUseSharedRegion, kUsePrivateSharedRegion, kDontUseSharedRegion, kSharedRegionIsSharedCache };

    struct Symbol;  // abstact symbol
    ...
}
2. loadInsertedDylib
dyld通过loadInsertedDylib方法将插入的lib加载进内存,生成对应的image。
static void loadInsertedDylib(const char* path)
{
    ImageLoader* image = NULL;
    try {
        LoadContext context;
        context.useSearchPaths      = false;
        context.useFallbackPaths    = false;
        context.useLdLibraryPath    = false;
        context.implicitRPath       = false;
        context.matchByInstallName  = false;
        context.dontLoad            = false;
        context.mustBeBundle        = false;
        context.mustBeDylib         = true;
        context.canBePIE            = false;
        context.origin              = NULL; // can't use @loader_path with DYLD_INSERT_LIBRARIES
        context.rpath               = NULL;
        image = load(path, context);
    }
    ...
}
3. link sMainExecutable
链接instantiateFromLoadedImage生成的Images。
4. link image
链接loadInsertedDylib生成的Images。
Link操作其实是调用Imageloader的Link方法,负责对image进行load(加载)、UpdateDepth(更新深度)、rebase(基地址复位)、bind(外部符号绑定)等。
void link(ImageLoader* image, bool forceLazysBound, bool neverUnload, const ImageLoader::RPathChain& loaderRPaths)
{
    ...
    // process images
    try {
        image->link(gLinkContext, forceLazysBound, false, neverUnload, loaderRPaths);
    }
    ...
}
void ImageLoader::link(const LinkContext& context, bool forceLazysBound, bool preflightOnly, bool neverUnload, const RPathChain& loaderRPaths)
{
    ...
    this->recursiveLoadLibraries(context, preflightOnly, loaderRPaths);
    ...
    this->recursiveUpdateDepth(context.imageCount());
    ...
    this->recursiveRebase(context);
    ...
    this->recursiveBind(context, forceLazysBound, neverUnload);
    ...
    this->recursiveGetDOFSections(context, dofs);
    ...
}
recursiveLoadLibraries
递归加载依赖的动态链接库。
可以使用otool -L 二进制文件路径来列出程序的动态链接库。
cenghaihandeMacBook-Pro:QQ.app catchzeng$ otool -L QQ
QQ (architecture armv7):
    @rpath/TlibDy.framework/TlibDy (compatibility version 1.0.0, current version 1.0.0)
    @rpath/QQMainProject.framework/QQMainProject (compatibility version 1.0.0, current version 1.0.0)
    @rpath/GroupCommon.framework/GroupCommon (compatibility version 1.0.0, current version 1.0.0)
    /System/Library/Frameworks/Foundation.framework/Foundation (compatibility version 300.0.0, current version 1444.12.0)
    /usr/lib/libz.1.dylib (compatibility version 1.0.0, current version 1.2.11)
    /System/Library/Frameworks/UIKit.framework/UIKit (compatibility version 1.0.0, current version
    /System/Library/Frameworks/CFNetwork.framework/CFNetwork (compatibility version 1.0.0, current version 887.0.0)
    /usr/lib/libicucore.A.dylib (compatibility version 1.0.0, current version 59.1.0)
    /usr/lib/libobjc.A.dylib (compatibility version 1.0.0, current version 228.0.0)
    /usr/lib/libSystem.B.dylib (compatibility version 1.0.0, current version 1252.0.0)
    ...
UIKit 、Foundation、CFNetwork 等框架相信大家已经很熟悉了。而其中的libobjc.A.dylib 包含 runtime,libSystem.B.dylib 则包含像 libdispatch、libsystem_c 等系统级别的库,二者都是被默认添加到程序中的。由于动态链接库本身还可能依赖其他动态链接库,所以整个加载过程是递归进行的,以下几个操作同理都是递归的。
recursiveRebase
在以前,程序每次加载其在内存中的堆栈基地址都是一样的,这意味着你的方法,变量等地址每次都一样的,这使得程序很不安全,后面就出现ASLR(Address space layout randomization),程序每次启动后地址都会随机变化,这样程序里所有的代码地址都是错的,需要重新对代码地址进行计算修复才能正常访问,这个操作就是Rebase。
recursiveBind
由于符号在不同的库里面,所以需要符号绑定(Bind)这个过程。
举个简单的例子,代码里面调用了 NSClassFromString. 但是NSClassFromString的代码和符号都是在 Foundation.framework 这个动态库里面。还没绑定之前就“不认识”NSClassFromString,所以需要Bind。
5. initializeMainExecutable
调用所有image的Initalizer方法进行初始化。
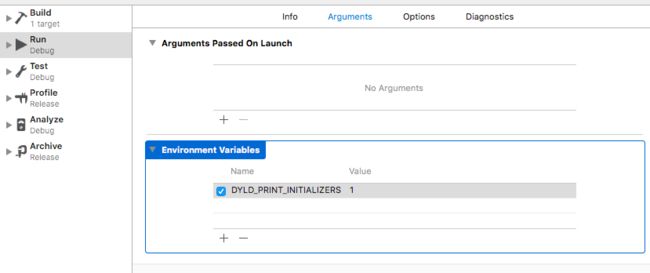
这里可以利用环境变量DYLD_PRINT_INITIALIZERS=1来打印出程序的各种依赖库的initializer方法:
dyld: calling initializer function 0x103c5f9fe in /Applications/Xcode.app/Contents/Developer/Platforms/iPhoneOS.platform/Developer/Library/CoreSimulator/Profiles/Runtimes/iOS.simruntime/Contents/Resources/RuntimeRoot/usr/lib/libSystem.dylib
dyld: calling -init function 0x10278a3c6 in /Applications/Xcode.app/Contents/Developer/Platforms/iPhoneOS.platform/Developer/Library/CoreSimulator/Profiles/Runtimes/iOS.simruntime/Contents/Resources/RuntimeRoot/usr/lib/libBacktraceRecording.dylib
dyld: calling initializer function 0x1068e4d91 in /Applications/Xcode.app/Contents/Developer/Platforms/iPhoneOS.platform/Developer/Library/CoreSimulator/Profiles/Runtimes/iOS.simruntime/Contents/Resources/RuntimeRoot/usr/lib/libc++.1.dylib
dyld: calling -init function 0x107ba0f80 in /Applications/Xcode.app/Contents/Developer/Platforms/iPhoneOS.platform/Developer/Library/CoreSimulator/Profiles/Runtimes/iOS.simruntime/Contents/Resources/RuntimeRoot/System/Library/Frameworks/CoreFoundation.framework/CoreFoundation
dyld: calling initializer function 0x107d002c0 in /Applications/Xcode.app/Contents/Developer/Platforms/iPhoneOS.platform/Developer/Library/CoreSimulator/Profiles/Runtimes/iOS.simruntime/Contents/Resources/RuntimeRoot/System/Library/Frameworks/CoreFoundation.framework/CoreFoundation
dyld: calling initializer function 0x10a4ac8c0 in /Applications/Xcode.app/Contents/Developer/Platforms/iPhoneOS.platform/Developer/Library/CoreSimulator/Profiles/Runtimes/iOS.simruntime/Contents/Resources/RuntimeRoot/usr/lib/libnetwork.dylib
dyld: calling initializer function 0x10753973e in /Applications/Xcode.app/Contents/Developer/Platforms/iPhoneOS.platform/Developer/Library/CoreSimulator/Profiles/Runtimes/iOS.simruntime/Contents/Resources/RuntimeRoot/System/Library/Frameworks/CFNetwork.framework/CFNetwork
dyld: calling initializer function 0x107456500 in /Applications/Xcode.app/Contents/Developer/Platforms/iPhoneOS.platform/Developer/Library/CoreSimulator/Profiles/Runtimes/iOS.simruntime/Contents/Resources/RuntimeRoot/System/Library/Frameworks/CFNetwork.framework/CFNetwork
dyld: calling initializer function 0x107456529 in /Applications/Xcode.app/Contents/Developer/Platforms/iPhoneOS.platform/Developer/Library/CoreSimulator/Profiles/Runtimes/iOS.simruntime/Contents/Resources/RuntimeRoot/System/Library/Frameworks/CFNetwork.framework/CFNetwork
dyld: calling initializer function 0x10745653d in /Applications/Xcode.app/Contents/Developer/Platforms/iPhoneOS.platform/Developer/Library/CoreSimulator/Profiles/Runtimes/iOS.simruntime/Contents/Resources/RuntimeRoot/System/Library/Frameworks/CFNetwork.framework/CFNetwork
dyld: calling initializer function 0x107456551 in /Applications/Xcode.app/Contents/Developer/Platforms/iPhoneOS.platform/Developer/Library/CoreSimulator/Profiles/Runtimes/iOS.simruntime/Contents/Resources/RuntimeRoot/System/Library/Frameworks/CFNetwork.framework/CFNetwork
dyld: calling initializer function 0x1076189b3 in /Applications/Xcode.app/Contents/Developer/Platforms/iPhoneOS.platform/Developer/Library/CoreSimulator/Profiles/Runtimes/iOS.simruntime/Contents/Resources/RuntimeRoot/System/Library/Frameworks/CFNetwork.framework/CFNetwork
dyld: calling initializer function 0x102f3b5e1 in /Applications/Xcode.app/Contents/Developer/Platforms/iPhoneOS.platform/Developer/Library/CoreSimulator/Profiles/Runtimes/iOS.simruntime/Contents/Resources/RuntimeRoot/System/Library/Frameworks/Foundation.framework/Foundation
dyld: calling -init function 0x1027c11c3 in /Applications/Xcode.app/Contents/Developer/Platforms/iPhoneOS.platform/Developer/Library/CoreSimulator/Profiles/Runtimes/iOS.simruntime/Contents/Resources/RuntimeRoot/usr/lib/libMainThreadChecker.dylib
这里最开始调用的libSystem.dylib的initializer比较特殊,因为runtime初始化就在这一阶段。
/*
 * libsyscall_initializer() initializes all of libSystem.dylib
 */
static __attribute__((constructor))
void libSystem_initializer(int argc, const char* argv[], const char* envp[], const char* apple[], const struct ProgramVars* vars)
{
    _libkernel_functions_t libkernel_funcs = {
        .get_reply_port = _mig_get_reply_port,
        .set_reply_port = _mig_set_reply_port,
        .get_errno = __error,
        .set_errno = cthread_set_errno_self,
        .dlsym = dlsym,
    };

    _libkernel_init(libkernel_funcs);

    bootstrap_init();
    mach_init();
    pthread_init();
    __libc_init(vars, libSystem_atfork_prepare, libSystem_atfork_parent, libSystem_atfork_child, apple);
    __keymgr_initializer();
    _dyld_initializer();
//!!!就是这里了
    libdispatch_init();
    _libxpc_initializer();

    __stack_logging_early_finished();

    /*
     * C99 standard has the following in section 7.5(3):
     * "The value of errno is zero at program startup, but is never set
     * to zero by any library function."
     */
    errno = 0;
}
libdispatch_init初始化会调用runtime的_objc_init初始化方法,这里我们利用符号断点调试可以看到程序的调用栈,也能验证以上的过程。
Main
当所有的依赖库库的lnitializer都调用完后,dyld的main函数会返回程序的main函数地址,main函数被调用。
int main(int argc, char * argv[]) {
    @autoreleasepool {
        return UIApplicationMain(argc, argv, nil, NSStringFromClass([AppDelegate class]));
    }
}
UIApplicationMain,它主要是创建了一个application对象和设置事件循环(autoreleasepool)。至此程序便开始运行。
总结
本章从ipa文件-》Mach-O-》dyld-》Main简单讲解了程序启动的一些事情,但并不代表着启动的全部,有兴趣的朋友可以继续往深挖。本章是iOS进阶的第一篇,后续会持续更新。如果大家有感兴趣的主题,也可以到Q群里联系我。
