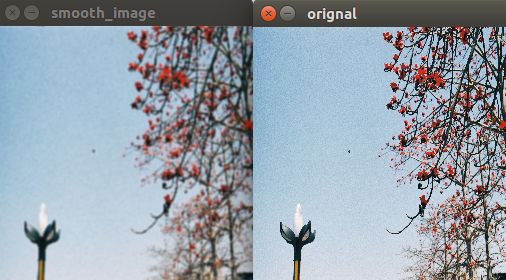
效果图如下:
初学CUDA,做个记录,希望和大家多多交流。
使用纹理内存步骤如下:
1、声明纹理内存,如:
texture
2、设置纹理通道格式等,并以此申请内存
cudaChannelFormatDesc channelDesc=cudaCreateChannelDesc
cudaArray *cuArray;
cudaMallocArray(&cuArray,&channelDesc,width,height);
使用openCV时,width=Mat.cols,height=Mat.rows
3、将内容拷贝至GPU内存中
cudaMemcpyToArray(cuArray,0,0,src.data,size,cudaMemcpyHostToDevice);
4、绑定内存
tex.addressMode[0]=cudaAddressModeWrap;
tex.addressMode[1]=cudaAddressModeWrap;
tex.filterMode = cudaFilterModeLinear;
tex.normalized =false;
cudaBindTextureToArray(tex,cuArray,channelDesc)
5、使用内存
tex2D(tex,x,y);
注意:由于纹理内存使用浮点型4字节,对于opencv读取RGB三通道,应使用cvtColor(src, src, CV_BGR2BGRA)转换为RGBA三通道格式。
#include "cuda.h"
#include "cuda_runtime.h"
#include "opencv2/core/core.hpp"
#include "opencv2/highgui/highgui.hpp"
#include "opencv2/opencv.hpp"
#include "stdio.h"
using namespace std;
using namespace cv;

texture tex;
//cudaReadModeNormalizedFloat 为了让tex2D读取,格式可转换。

__global__ void smooth_kernel(char *img,int width,int heigth,int channels)
{
    unsigned int x = blockIdx.x*blockDim.x + threadIdx.x;
    unsigned int y = blockIdx.y*blockDim.y + threadIdx.y;
    unsigned int offset = x + y*blockDim.x+gridDim.x;

    //若使用归一化
    float u = x/(float)width;
    float v = y/(float)heigth;

    //如果使用cudaReadModeElementType,则读取uchar4不能转为float
    float4 pixel    = tex2D(tex,x,y);
    float4 left     = tex2D(tex,x-1,y);
    float4 right    = tex2D(tex,x+1,y);
    float4 top      = tex2D(tex,x,y-1);
    float4 botton   = tex2D(tex,x,y+1);

    img[(y*width+x)*channels+0] = (left.x+right.x+top.x+botton.x)/4*255;
    img[(y*width+x)*channels+1] = (left.y+right.y+top.y+botton.y)/4*255;
    img[(y*width+x)*channels+2] = (left.z+right.z+top.z+botton.z)/4*255;
    img[(y*width+x)*channels+3] = 0;
}


#define IMAGE_DIR "/home/dzqiu/Documents/zuyan.jpeg"
int main(int argc,char **argv)
{
        Mat src = imread(IMAGE_DIR,IMREAD_COLOR);

    //注意:纹理内存绑定限制每行应该为256字节,也有非256字节掉对齐方法
    //  这里为了方便,我们将图片resize位256*256大小
        resize(src, src, Size(256, 256));

        //为了使用float的纹理,将RGB三字节的格式改为BGRA四字节掉存储方式
        cvtColor(src, src, CV_BGR2BGRA);

        int rows=src.rows;
        int cols=src.cols;
        int channels=src.channels();
        int width=cols,height=rows,size=rows*cols*channels;

        cudaChannelFormatDesc channelDesc=cudaCreateChannelDesc();
        cudaArray *cuArray;
        cudaMallocArray(&cuArray,&channelDesc,width,height);
        cudaMemcpyToArray(cuArray,0,0,src.data,size,cudaMemcpyHostToDevice);

        tex.addressMode[0]=cudaAddressModeWrap; //暂未弄明白
        tex.addressMode[1]=cudaAddressModeWrap;
        tex.filterMode = cudaFilterModeLinear;  //暂未弄明白
        tex.normalized =false;          //不使用归一化

        cudaBindTextureToArray(tex,cuArray,channelDesc);


        Mat out=Mat::zeros(width, height, CV_8UC4);
        char *dev_out=NULL;
        cudaMalloc((void**)&dev_out, size);

        dim3 dimBlock(16, 16);
        dim3 dimGrid((width + dimBlock.x - 1) / dimBlock.x, (height + dimBlock.y - 1) / dimBlock.y);
        smooth_kernel<<>>(dev_out,width,height,channels);

        cudaMemcpy(out.data,dev_out,size,cudaMemcpyDeviceToHost);

        imshow("orignal",src);
        imshow("smooth_image",out);
        waitKey(0);

        cudaFree(dev_out);
        cudaFree(cuArray);
        cudaUnbindTexture(tex);
        return 0;

}
源码下载: GitHub
参考博客:
CUDA二维纹理内存+OpenCV图像滤波 牧野
cuda纹理内存的使用 一棹烟波
