最近公司的项目中提到了蓝牙开发,而且现在市面上的蓝牙分为普通蓝牙和低功耗蓝牙(BLE)也就是蓝牙4.0
iOS 提供了
话不多说,让我们进入正题吧:
蓝牙常见名称和缩写
BLE:(Bluetooth low energy)蓝牙4.0设备因为低耗电,也叫BLE
peripheral,central:外设和中心设备,发起链接的是central(一般是指手机),被链接的设备是peripheral(比如运动手环)
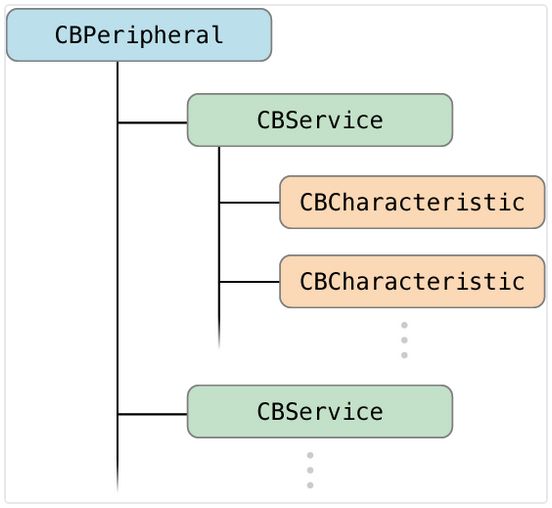
service and characteristic:(服务和特征)每个设备会提供服务和特征,类似于服务端的API,但是结构不同.每个设备会有很多服务,每个服务中包含很多字段,这些字段的权限一般分为读(read),写(write),通知(notify)几种,就是我们连接设备后具体需要操作的内容
Description:每个characteristic可以对应一个或者多个Description用于描述characteristic的信息或属性(eg.范围,计量单位)
关于上边的名称详情可以参考
Central 和 Peripheral 在蓝牙交互中的角色
Core Bluetooth Programming Guide
服务和特征(service and characteristic)
- 每个设备都会有1个or多个服务
- 每个服务里都会有1个or多个特征
- 特征就是具体键值对,提供数据的地方
- 每个特征属性分为:读,写,通知等等
BLE中心模式流程
1.建立中心角色
2.扫描外设(Discover Peripheral)
3.连接外设(Connect Peripheral)
4.扫描外设中的服务和特征(Discover Services And Characteristics)
4.1 获取外设的services
4.2 获取外设的Characteristics,获取characteristics的值,,获取Characteristics的Descriptor和Descriptor的值
5.利用特征与外设做数据交互(Explore And Interact)
6.订阅Characteristic的通知
7.断开连接(Disconnect)
BLE外设模式流程
1.启动一个Peripheral管理对象
2.本地peripheral设置服务,特征,描述,权限等等
3.peripheral发送广告
4.设置处理订阅,取消订阅,读characteristic,写characteristic的代理方法
蓝牙和版本使用限制
- 蓝牙2.0:越狱设备
- BLE:iOS6以上
- MFI认证设备:无限制
这里我把手机作为central 周围蓝牙的设备作为peripheral 根据BLE中心模式的流程 相关代码步骤如下:
1.首先导入我们需要的蓝牙框架 定义一些需要的宏
#import
#define kServiceUUID @"590A" //服务的UUID
#define kCharacteristicUUID @"590B" //特征的UUID
2.建立中心管理者
- (CBCentralManager *)cMgr
{
    if (!_cMgr) {
        /*
         设置主设备的代理,CBCentralManagerDelegate
         必须实现的:
         - (void)centralManagerDidUpdateState:(CBCentralManager *)central;//主设备状态改变调用,在初始化CBCentralManager的适合会打开设备,只有当设备正确打开后才能使用
         其他选择实现的代理中比较重要的:
         - (void)centralManager:(CBCentralManager *)central didDiscoverPeripheral:(CBPeripheral *)peripheral advertisementData:(NSDictionary *)advertisementData RSSI:(NSNumber *)RSSI; //找到外设
         - (void)centralManager:(CBCentralManager *)central didConnectPeripheral:(CBPeripheral *)peripheral;//连接外设成功
         - (void)centralManager:(CBCentralManager *)central didFailToConnectPeripheral:(CBPeripheral *)peripheral error:(NSError *)error;//外设连接失败
         - (void)centralManager:(CBCentralManager *)central didDisconnectPeripheral:(CBPeripheral *)peripheral error:(NSError *)error;//断开外设
         */
        _cMgr = [[CBCentralManager alloc] initWithDelegate:self
                                                     queue:dispatch_get_main_queue() options:nil];
    }
    return _cMgr;
}
调用懒加载
- (void)viewDidLoad
{
    [super viewDidLoad];

    // 调用get方法,先将中心管理者初始化
    [self cMgr];

}
3.扫描外设 (这里注意 在中心管理者成功开启后再扫描)
// 只要中心管理者初始化,就会触发此代理方法
- (void)centralManagerDidUpdateState:(CBCentralManager *)central
{
    /*
     CBCentralManagerStateUnknown = 0,
     CBCentralManagerStateResetting,
     CBCentralManagerStateUnsupported,
     CBCentralManagerStateUnauthorized,
     CBCentralManagerStatePoweredOff,
     CBCentralManagerStatePoweredOn,
     */
    switch (central.state) {
        case CBCentralManagerStateUnknown:
            NSLog(@"CBCentralManagerStateUnknown");
            break;
        case CBCentralManagerStateResetting:
            NSLog(@"CBCentralManagerStateResetting");
            break;
        case CBCentralManagerStateUnsupported:
            NSLog(@"CBCentralManagerStateUnsupported");
            break;
        case CBCentralManagerStateUnauthorized:
            NSLog(@"CBCentralManagerStateUnauthorized");
            break;
        case CBCentralManagerStatePoweredOff:
            NSLog(@"CBCentralManagerStatePoweredOff");
            break;
        case CBCentralManagerStatePoweredOn:
        {
            NSLog(@"CBCentralManagerStatePoweredOn");
            // 在中心管理者成功开启后再进行一些操作
            // 搜索外设
            [self.cMgr scanForPeripheralsWithServices:nil // 通过某些服务筛选外设
                                              options:nil]; // dict,条件
            // 搜索成功之后,会调用我们找到外设的代理方法
            // - (void)centralManager:(CBCentralManager *)central didDiscoverPeripheral:(CBPeripheral *)peripheral advertisementData:(NSDictionary *)advertisementData RSSI:(NSNumber *)RSSI; //找到外设

        }
            break;

        default:
            break;
    }
}
4.连接外设
#pragma mark - CBCentralManagerDelegate

// 发现外设后调用的 CBCentralManagerDelegate 方法
- (void)centralManager:(CBCentralManager *)central // 中心管理者
 didDiscoverPeripheral:(CBPeripheral *)peripheral // 外设
     advertisementData:(NSDictionary *)advertisementData // 外设携带的数据
                  RSSI:(NSNumber *)RSSI // 外设发出的蓝牙信号强度
{
    //NSLog(@"%s, line = %d, cetral = %@,peripheral = %@, advertisementData = %@, RSSI = %@", __FUNCTION__, __LINE__, central, peripheral, advertisementData, RSSI);

    /*
    peripheral = , advertisementData = {
     kCBAdvDataIsConnectable = 1;
     kCBAdvDataLocalName = 27010010;
     kCBAdvDataServiceUUIDs =     (
     590A
     );
     }, RSSI = -92
     根据打印结果,我们可以得到车锁设备 它的名字叫 27010010


     */

    // 需要对连接到的外设进行过滤
    // 1.信号强度(40以上才连接, 80以上连接)
    // 2.通过设备名(设备字符串27010010)
    // 在此时我们的过滤规则是:有OBand前缀并且信号强度大于35
    // 通过打印,我们知道RSSI一般是带-的

    if ([peripheral.name isEqualToString:@"27010010"] && (ABS(RSSI.integerValue) > 35)) {
        // 在此处对我们的 advertisementData(外设携带的广播数据) 进行一些处理

        // 通常通过过滤,我们会得到一些外设,然后将外设储存到我们的可变数组中,
        // 这里由于附近只有1个运动手环, 所以我们先按1个外设进行处理

        // 标记我们的外设,让他的生命周期 = vc
        self.peripheral = peripheral;
        // 发现完之后就是进行连接
        [self.cMgr connectPeripheral:self.peripheral options:nil];
        NSLog(@"%s, line = %d", __FUNCTION__, __LINE__);
    }
}
连接外设成功或者失败 会调用代理方法
// 中心管理者连接外设成功
- (void)centralManager:(CBCentralManager *)central // 中心管理者
  didConnectPeripheral:(CBPeripheral *)peripheral // 外设
{
    NSLog(@"%s, line = %d, %@=连接成功", __FUNCTION__, __LINE__, peripheral.name);
    // 连接成功之后,可以进行服务和特征的发现
    // 4.1 获取外设的服务
    // 4.1.1 设置外设的代理
    self.peripheral.delegate = self;

    // 4.1.2 外设发现服务,传nil代表不过滤
    // 这里会触发外设的代理方法 - (void)peripheral:(CBPeripheral *)peripheral didDiscoverServices:(NSError *)error
    [self.peripheral discoverServices:nil];
}
// 外设连接失败
- (void)centralManager:(CBCentralManager *)central didFailToConnectPeripheral:(CBPeripheral *)peripheral error:(NSError *)error
{
    NSLog(@"%s, line = %d, %@=外设连接失败", __FUNCTION__, __LINE__, peripheral.name);
}

// 丢失连接
- (void)centralManager:(CBCentralManager *)central didDisconnectPeripheral:(CBPeripheral *)peripheral error:(NSError *)error
{
    NSLog(@"%s, line = %d, %@=外设断开连接", __FUNCTION__, __LINE__, peripheral.name);
}
5.扫描外设中的服务和特征(Discover Services And Characteristics)
#pragma mark - 外设代理

// 发现外设的服务后调用的方法
- (void)peripheral:(CBPeripheral *)peripheral didDiscoverServices:(NSError *)error
{
    NSLog(@"%s, line = %d", __FUNCTION__, __LINE__);
    // 判断没有失败
    if (error) {
        NSLog(@"%s, line = %d, error = %@", __FUNCTION__, __LINE__, error.localizedDescription);
        return;
#warning 下面的方法中凡是有error的在实际开发中,都要进行判断
    }
    for (CBService *service in peripheral.services) {
// 发现服务后,让设备再发现服务内部的特征们 didDiscoverCharacteristicsForService
        [peripheral discoverCharacteristics:nil forService:service];
    }
}
6.获取外设的services
获取外设的Characteristics,获取characteristics的值,,获取Characteristics的Descriptor和Descriptor的值
利用特征与外设做数据交互(Explore And Interact)
订阅Characteristic的通知
// 发现外设服务里的特征的时候调用的代理方法
- (void)peripheral:(CBPeripheral *)peripheral didDiscoverCharacteristicsForService:(CBService *)service error:(NSError *)error
{
    //根据自己的需要筛选ServiceUUID]
    if ([service.UUID isEqual:[CBUUID UUIDWithString:kServiceUUID]]) {

        for (CBCharacteristic *characteristic in service.characteristics) {

            NSLog(@"特征UUID:%@",characteristic.UUID);

            if ([characteristic.UUID isEqual:[CBUUID UUIDWithString:kCharacteristicUUID]]) {
                NSLog(@"监听特征:%@",characteristic);//监听特征
                self.openLockCharacteristic = characteristic;
            }

            if (self.openLockCharacteristic) {
                //characteristic 包含了 service 要传输的数据。例如温度设备中表达温度的 characteristic,就可能包含着当前温度值。这时我们就可以通过读取 characteristic,来得到里面的数据。
                //可以直接获取特征的值  使用下面的方法
                //[peripheral readValueForCharacteristic:self.openLockCharacteristic];
                //当调用上面这方法后,会回调peripheral:didUpdateValueForCharacteristic:error:方法,其中包含了要读取的数据。如果读取正确,在该方法中获取到值

               //也可以订阅通知
               //其实使用readValueForCharacteristic:方法并不是实时的。考虑到很多实时的数据,比如心率这种,那就需要订阅 characteristic 了。
               //当订阅成功以后,那数据便会实时的传回了,数据的回调依然和之前读取 characteristic 的回调相同
                [self.peripheral setNotifyValue:YES forCharacteristic:self.openLockCharacteristic];//拿到读特征

                //向openLockCharacteristic 发送数据 这里的数据根据自己硬件的实际情况发送
                [self sj_peripheral:self.peripheral didWriteData:[self stringToByte:@""] forCharacteristic:self.openLockCharacteristic];

            }
        }
    }
}
获取外设发来的数据
// 更新特征的value的时候会调用
//中心接受外设信息,外设通知手机连接成功的时候并不会调用这个函数;手机向外设发送消息后,外设回应数据,这个函数会接受到数据。
- (void)peripheral:(CBPeripheral *)peripheral didUpdateValueForCharacteristic:(CBCharacteristic *)characteristic error:(NSError *)error
{
    NSLog(@"%s, line = %d", __FUNCTION__, __LINE__);

    NSString *value = [[NSString alloc] initWithData:characteristic.value encoding:NSASCIIStringEncoding];
    NSLog(@"收到蓝牙的消息=======%@",value);//这个就是蓝牙给我们发的数据;

}

// 更新特征的描述的值的时候会调用
- (void)peripheral:(CBPeripheral *)peripheral didUpdateValueForDescriptor:(CBDescriptor *)descriptor error:(NSError *)error
{
    NSLog(@"%s, line = %d, descriptor.UUID = %@ ,descriptor.value = %@", __FUNCTION__, __LINE__,descriptor.UUID ,descriptor.value);

    // 这里当描述的值更新的时候,直接调用此方法即可
    [peripheral readValueForDescriptor:descriptor];
}

//如果是订阅,成功与否的回调是peripheral:didUpdateNotificationStateForCharacteristic:error:,读取中的错误会以 error 形式传回:
- (void)peripheral:(CBPeripheral *)peripheral
didUpdateNotificationStateForCharacteristic:(CBCharacteristic *)characteristic
             error:(NSError *)error {
      if (error) {
        NSLog(@"Error changing notification state: %@", [error localizedDescription]);
    }else{
        NSLog(@"订阅成功");
    }
}

//用于检测中心向外设写数据是否成功
-(void)peripheral:(CBPeripheral *)peripheral didWriteValueForCharacteristic:(CBCharacteristic *)characteristic error:(NSError *)error
{
    if (error) {
        NSLog(@"=======%@",error.userInfo);
        [self updateLog:[error.userInfo JSONString]];
    }else{
        NSLog(@"发送数据成功");
        [self updateLog:@"发送数据成功"];
    }

    /* When a write occurs, need to set off a re-read of the local CBCharacteristic to update its value */
    [peripheral readValueForCharacteristic:characteristic];
}
还有一些自定义方法 向外设写数据 通知订阅 断开连接
#pragma mark - 自定义方法

//外设写数据到特征中

// 需要注意的是特征的属性是否支持写数据
- (void)sj_peripheral:(CBPeripheral *)peripheral didWriteData:(NSData *)data forCharacteristic:(nonnull CBCharacteristic *)characteristic
{
    /*
     typedef NS_OPTIONS(NSUInteger, CBCharacteristicProperties) {
     CBCharacteristicPropertyBroadcast                                              = 0x01,
     CBCharacteristicPropertyRead                                                   = 0x02,
     CBCharacteristicPropertyWriteWithoutResponse                                   = 0x04,
     CBCharacteristicPropertyWrite                                                  = 0x08,
     CBCharacteristicPropertyNotify                                                 = 0x10,
     CBCharacteristicPropertyIndicate                                               = 0x20,
     CBCharacteristicPropertyAuthenticatedSignedWrites                              = 0x40,
     CBCharacteristicPropertyExtendedProperties                                     = 0x80,
     CBCharacteristicPropertyNotifyEncryptionRequired NS_ENUM_AVAILABLE(NA, 6_0)        = 0x100,
     CBCharacteristicPropertyIndicateEncryptionRequired NS_ENUM_AVAILABLE(NA, 6_0)  = 0x200
     };

     打印出特征的权限(characteristic.properties),可以看到有很多种,这是一个NS_OPTIONS的枚举,可以是多个值
     常见的又read,write,noitfy,indicate.知道这几个基本够用了,前俩是读写权限,后俩都是通知,俩不同的通知方式
     */
    NSLog(@"%s, line = %d, char.pro = %lu", __FUNCTION__, __LINE__, (unsigned long)characteristic.properties);
    // 此时由于枚举属性是NS_OPTIONS,所以一个枚举可能对应多个类型,所以判断不能用 = ,而应该用包含&
    if (characteristic.properties & CBCharacteristicPropertyWrite) {
        // 核心代码在这里
        [peripheral writeValue:data // 写入的数据
             forCharacteristic:characteristic // 写给哪个特征
                          type:CBCharacteristicWriteWithResponse];// 通过此响应记录是否成功写入


    }
}
// 6.通知的订阅和取消订阅
// 实际核心代码是一个方法
// 一般这两个方法要根据产品需求来确定写在何处
- (void)sj_peripheral:(CBPeripheral *)peripheral regNotifyWithCharacteristic:(nonnull CBCharacteristic *)characteristic
{
    // 外设为特征订阅通知 数据会进入 peripheral:didUpdateValueForCharacteristic:error:方法
    [peripheral setNotifyValue:YES forCharacteristic:characteristic];
}
- (void)sj_peripheral:(CBPeripheral *)peripheral CancleRegNotifyWithCharacteristic:(nonnull CBCharacteristic *)characteristic
{
    // 外设取消订阅通知 数据会进入 peripheral:didUpdateValueForCharacteristic:error:方法
    [peripheral setNotifyValue:NO forCharacteristic:characteristic];
}

// 7.断开连接
- (void)sj_dismissConentedWithPeripheral:(CBPeripheral *)peripheral
{
    // 停止扫描
    [self.cMgr stopScan];
    // 断开连接
    [self.cMgr cancelPeripheralConnection:peripheral];
}
再次连接 peripheral
Core Bluetooth 提供了三种再次连接 peripheral 的方式:
调用 retrievePeripheralsWithIdentifiers: 方法,重连已知的 peripheral 列表中的 peripheral(以前发现的,或者以前连接过的)。
调用 retrieveConnectedPeripheralsWithServices: 方法,重新连接当前【系统】已经连接的 peripheral。
调用 scanForPeripheralsWithServices:options: 方法,连接搜索到的 peripheral。
