MockServer
简单介绍:
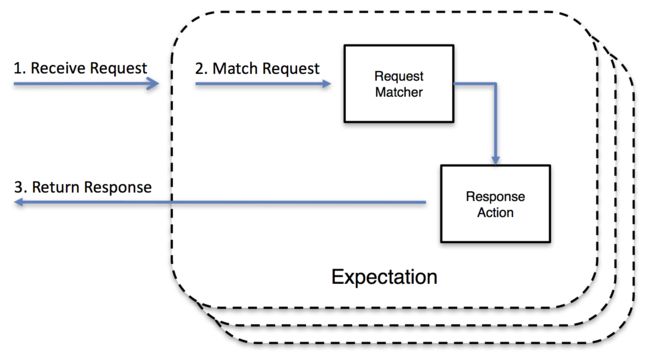
这个MockServer 提供了一些API,根据定义的Request定义和指定Response规则,生成一条Expectation,那么在请求该Request指定的地址的时候,会将Response指定的数据返回,用来模拟API。
目前用的人应该不多,能找到的中文介绍比较少。。
特性
该MockServer主要有两个概念,分别为 MockServer和MockClients
MockServer顾名思义就是服务端应用程序,
MockClients就是通过API 与MockServer服务端交互的程序。
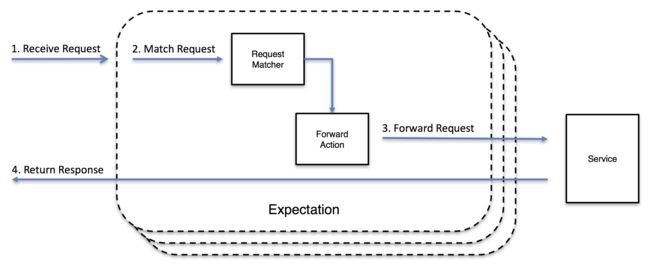
MockServer 还支持Proxy,为应用设置代理端口和代理地址,并转发到远程地址的指定端口。用来分析应用程序十分方便。
- 支持Node.js客户端
- 支持Java客户端
- 支持Javascript客户端
- 支持ruby客户端
十分强大
服务端是用Netty写的,支持HTTP协议,支持Websocket。
下面是官方的一些图
https://github.com/jamesdbloom/mockserver
http://mock-server.com/
实战
从github上clone该项目,然后checkout 5.4.1(目前最新版本)。
官方文档非常详细,可惜提供的 NodeClients 和文档 的最新版本是5.3.0。
启动
5.3.0 版本
java -jar ./mockserver-jetty-jar-with-dependencies.jar -serverPort 1080 -proxyPort 1090 -proxyRemotePort 80 -proxyRemoteHost www.mock-server.com
serverPort表示 MockServer的主要端口,通过该端口提供的API可以创建规则。
proxyPort表示MockServer提供的Proxy端口,通过该端口可以转发到 proxyRemoteHost对应的端口 proxyRemotePort。
5.4.1 版本
通过查看源码发现,作者似乎将 proxyPort和主要serverPort合并成一个,并且不识别ProxyPort
java -jar ./mockserver-jetty-jar-with-dependencies.jar -serverPort 1080 -proxyRemotePort 80 -proxyRemoteHost www.mock-server.com
serverPort表示 MockServer的主要端口,通过该端口提供的API可以创建规则。
同时也是Proxy端口,通过该端口可以转发到 proxyRemoteHost对应的端口 proxyRemotePort。
创建Expectation
根据文档是可以创建一些简易的请求和返回规则的。
下面以nodeClient为例子:
新建run.js
var mockServerClient = require('mockserver-client').mockServerClient;
var instance = mockServerClient("localhost", 1080);

instance.reset();

instance.mockAnyResponse({
    "httpRequest": {
      "method": "GET",
      "path": "/view/cart",
      "queryStringParameters": {
        "cartId": ["055CA455-1DF7-45BB-8535-4F83E7266092"]
      },
      "cookies": {
      }
    },
    "httpResponse": {
      "body": "some_response_body"
    }
  })
  .then(
    function () {
      console.log("expectation created");
    },
    function (error) {
      console.log(error);
    }
  );
确保系统已经安装node.js 和npm.
通过下面的命令安装 MockServer Node客户端
npm install mockserver-node --save-dev
然后执行 node run.js
可以看到输出
expectation created
通过请求MockServer
127.0.0.1:1080/view/cart?cartId=055CA455-1DF7-45BB-8535-4F83E7266092
即可看到返回数据:
some_response_body
创建带Callback的Expectation
var mockServerClient = require('mockserver-client').mockServerClient;
var instance = mockServerClient("localhost", 1080);
var callback = function (request) {
  if (request.method === 'POST') {
      console.log("Callback received BY POST")
  } else {
      console.log("Callback received NOT BY POST");
  }
};

instance.mockWithCallback(
    {
        "path":"/callback"
    },
    callback
  ).then(
          function () {
            console.log('expectation sent');
          },
          function (error) {
            console.log(error);
            process.exit();
          }
);
这里当创建这个Expectation之后,访问
127.0.0.1:1080/callback 可以看到
输出Callback received NOT BY POST。
这里非常令人惊叹,作者是把这个js function 作为一个client,把clientId 告诉服务端,服务端收到请求之后,node.js 是通过websocket 和服务端通信的,这时候,会通知客户端,客户端收到通知之后,调用这个callback。
这个callback function 在官网文档 return 了一个 response定义。这个似乎可以进一步在客户端处理,然后再次告诉服务端,来返回期望的定义。不过我没有成功实现,会一直报错。
奈何技术水平有限,不知道怎么才能成功调用定义的Callback来返回指定的数据,不知道是文档还是官方提供的NodeModule哪里写的不对。
通过REST API创建一般Expectation
通过POSTMAN 发起请求:
PUT 127.0.0.1:1080/expectation
{
  "httpRequest": {
    "path": "/somePath",
    "method": "POST"
  },
  "httpResponse": {
    "statusCode": 404,
    "headers": [{
      "name": "Content-Type",
      "values": ["application/json"]
    }, {
      "name": "Cache-Control",
      "values": ["no-cache, no-store"]
    }],
    "body": {
      "type":"JSON",
      "json":"{\"httpRequest\":{\"path\":\"/somePath\",\"method\":\"POST\"},\"httpResponse\":{\"statusCode\":201,\"headers\":[{\"name\":\"Content-Type\",\"values\":[\"application/json\"]},{\"name\":\"Cache-Control\",\"values\":[\"no-cache, no-store\"]}],\"body\":{\"type\":\"JSON\",\"json\":\"\"}}}"
    }
  }
}
这里故意把请求本身当作Reponse定义,并故意返回404。
当发起somePath请求时,会接受到对应的JSON。
POST 127.0.0.1:1080/somePath
{
  "httpRequest": {
    "path": "/somePath",
    "method": "POST"
  },
  "httpResponse": {
    "statusCode": 404,
    "headers": [{
      "name": "Content-Type",
      "values": ["application/json"]
    }, {
      "name": "Cache-Control",
      "values": ["no-cache, no-store"]
    }],
    "body": {
      "type":"JSON",
      "json":""
    }
  }
}
但愿作者能把5.4.1的文档补全。
如果你也喜欢这个工具,直接私信我,可以和我一起研究。

