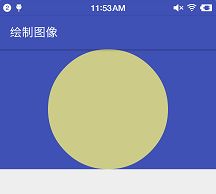
上一篇学习了Paint中关于绘制文字时的属性,接下来学习了解在绘制图像时的属性。重点有三个:ColorMatrix,PorterDuffXfermore和Shader
关于这三个重点,本篇先学习第一个。
学习目标:
了解基本知识点,能够了解都可以用来干嘛,知道有这么个东西,在学习别人写的控件代码时,看到不至于懵逼。 : )
学习资料:
Android开发群英传- 爱哥写的非常非常好的系列:自定义控件其实很简单
学习过程中,有一个小技巧就是Android Studio的一个快捷键ctrl+h,鼠标放在所要查看的类上,按快捷键就可以查看这个的类的继承关系和结构。希望可以帮助到和我一样的新人 : )
1.setColorFilter(ColorFilter filter)设置颜色过滤器
参数是一个ColorFilter,是一个抽象类,有三个子类:PorterDuffColorFilter,ColorMatrixColorFilter,LightingColorFilter
1.1 PorterDuffColorFilter
A color filter that can be used to tint the source pixels using a single color and a specific {@link PorterDuff Porter-Duff composite mode}.
一个指定单一颜色和特定模式的过滤器
PorterDuff是两个人的人名组合
构造方法:
PorterDuffColorFilter(@ColorInt int color, @NonNull PorterDuff.Mode mode)
-
int color颜色 -
PorterDuff.Mode mode模式
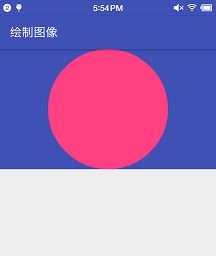
未设置过滤器前:
简单使用:
public class DrawGraphicView extends View {
    private Paint gPaint;
    public DrawGraphicView(Context context, AttributeSet attrs) {
        super(context, attrs);
        initPaint();
    }

    /**
     * 初始化画笔
     */
    private void initPaint() {
        gPaint = new Paint(Paint.ANTI_ALIAS_FLAG);
        gPaint.setColor(Color.parseColor("#FF4081"));
        PorterDuffColorFilter filter = new PorterDuffColorFilter(Color.BLUE, PorterDuff.Mode.OVERLAY);
        gPaint.setColorFilter(filter);
    }

    @Override
    protected void onDraw(Canvas canvas) {
        super.onDraw(canvas);
        float x = getWidth()/2;
        float y = getHeight()/2;
        float radius= Math.min(getWidth(),getHeight())/2;
        canvas.drawCircle(x,y,radius,gPaint);
    }

    /**
     * 测量
     */
    @Override
    protected void onMeasure(int widthMeasureSpec, int heightMeasureSpec) {
        super.onMeasure(widthMeasureSpec, heightMeasureSpec);

        int wSpecMode = MeasureSpec.getMode(widthMeasureSpec);
        int wSpecSize = MeasureSpec.getSize(widthMeasureSpec);
        int hSpecMode = MeasureSpec.getMode(heightMeasureSpec);
        int hSpecSize = MeasureSpec.getSize(heightMeasureSpec);

        if (wSpecMode == MeasureSpec.AT_MOST && hSpecMode == MeasureSpec.AT_MOST) {
            setMeasuredDimension(300, 300);
        } else if (wSpecMode == MeasureSpec.AT_MOST) {
            setMeasuredDimension(300, hSpecSize);
        } else if (hSpecMode == MeasureSpec.AT_MOST) {
            setMeasuredDimension(wSpecSize, 300);
        }
    }
}
颜色设置的Color.BLUE,模式PorterDuff.Mode.OVERLAY,设置后的效果:
第一个参数就是代表颜色的int值,网上搜索了下rgb的计算,看得有点懵,这里只好先挖坑 ,先朝下学 : )
第二个参数模式。一共有18种。这里不打算一一介绍,到了PorterDuffXfermore再做学习
1.2 LightingColorFilter
A color filter that can be used to simulate simple lighting effects.
ALightingColorFilteris defined by two parameters, one
used to multiply the source color (calledcolorMultiply)
and one used to add to the source color (calledcolorAdd).
The alpha channel is left untouched by this color filter.
Given a source color RGB, the resulting R'G'B' color is computed thusly:
R' = R * colorMultiply.R + colorAdd.R
G' = G * colorMultiply.G + colorAdd.G
B' = B * colorMultiply.B + colorAdd.
The result is pinned to the[0..255]range for each channel.
名字的直白翻译就是:光照色彩过滤器
一个可以模拟简单光照影响的色彩过滤器
构造方法:
LightingColorFilter(int mul, int add)
-
mul全称是colorMultiply意为色彩倍增 -
add全称是colorAdd意为色彩添加
这两个值都是16进制的色彩值0xAARRGGBB
看得也同样是一脸懵逼,继续朝下学
调用方法:
LightingColorFilter filter = new LightingColorFilter(Color.WHITE,Color.GREEN);
gPaint.setColorFilter(filter);
效果图就不上了,因为控制不了显示的颜色。没有学会计算原理,继续挖坑,先往下继续学习
1.3 ColorMatrixColorFilter
涉及到了第一个重点ColorMatrix,色彩矩阵。
A color filter that transforms colors through a 4x5 color matrix. This filter can be used to change the saturation of pixels, convert from YUV to RGB, etc.
一个通过 4 * 5 色彩矩阵计算进行变换颜色的过滤器
构造方法只需要一个参数:
ColorMatrixColorFilter(ColorMatrix matrix)
尽管不理解参数是干嘛用的还有怎么样的效果,先随便创建一个出来
private void initPaint() {
    gPaint = new Paint(Paint.ANTI_ALIAS_FLAG);
    gPaint.setColor(Color.GRAY);

    ColorMatrix colorMatrix = new ColorMatrix(new float[]{
            1.3F,0,0,0,0,
            0,1.5F,0,0,0,
            0,0,1.6F,0,0,
            0,0,0,1.9F,0});
    ColorMatrixColorFilter filter = new ColorMatrixColorFilter(colorMatrix);
    gPaint.setColorFilter(filter);
}
这里暂时只知道,每个位置上值,1代表不改变颜色的值,只要不是1就可以看出效果,尽管不知道怎么得来的结果,继续向下学习
三个方法,也只是简单了解怎么调用,向下继续 : )
2.ColorMartix 色彩矩阵
Android中图片处理最常使用到的数据结构就是Bitmap,包含整个图片所有的数据。整个图片由点阵和颜色值组成。
- 点阵 , 一个包含像素的矩阵,每一个元素对应着图片的像素
- 颜色值 ,
ARGB,分别对应透明度,红,绿,蓝四个通道分量,四个共同决定每个像素点显示的颜色
2.1色彩矩阵的运算分析
在色彩处理中,一般用色调,饱和度,亮度来描述一个图像
- 色调 , 物体传播的颜色
- 饱和度 ,颜色的纯度,从0(灰)到100%(饱和)来进行描述
- 亮度 , 颜色的相对明暗程度
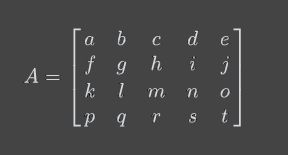
色彩矩阵:
写好了才发现不支持LaTeX来写矩阵,只好使用截图
用来处理图片色彩
-
abcde值决定新的颜色值中的R—— 红色 -
fghij值决定新的颜色值中的G—— 绿色 -
klmno值决定新的颜色值中的B—— 绿色 -
pqrst值决定新的颜色值中的A—— 透明度 -
ejot值决定每个分量重的offset——偏移量
每一个像素都有一个颜色分量矩阵保存颜色的RGBA值
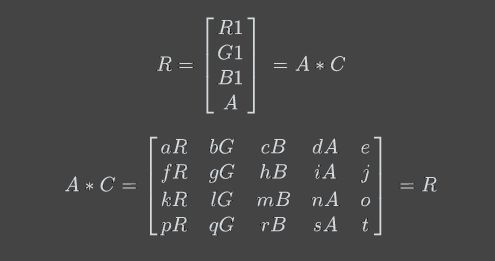
矩阵乘法运算:
计算过程:
R1 = a * R + b * G + c * B + d * A + e
G1 = f * R + g * G + h * B + i * A + j
B1 = k * R + l * G + m * B + n * A + o
A1 = P * R + q * G + r * B + s * A + t
过程分析:
R1 = a * R + b * G + c * B + d * A + e
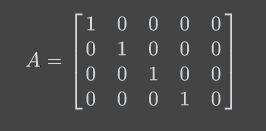
设置a = 1,b,c,d,e都为0,R1 = R。同理,G1 = G条件为g = 1, fhij = 0,然后依次轮推,便可以得到下面这个矩阵:
这个矩阵不会对原有颜色值造成改变,被当做初始矩阵
根据R = A * C得知,一般改变颜色值有两种方法可以选择:
- 改变
offset,改变偏移量来进行改变颜色分量 - 改变
RGBA值的系数进行调整颜色分量
2.1.1 改变 offset 偏移量
改变了R和G的偏移量,图像的红色和绿色的分量就增加了100,红色和绿色混合会得到黄色,整个图像也就会偏黄色
简单进行测试:
private void initPaint() {
    gPaint = new Paint(Paint.ANTI_ALIAS_FLAG);
    gPaint.setColor(Color.GRAY);//灰色

    ColorMatrix colorMatrix = new ColorMatrix(new float[]{
            1 , 0 , 0 , 0 , 50 ,
            0 , 1 , 0 , 0 , 50 ,
            0 , 0 , 1 , 0 , 0  ,
            0 , 0 , 0 , 1 , 0
    });
    ColorMatrixColorFilter filter = new ColorMatrixColorFilter(colorMatrix);
    gPaint.setColorFilter(filter);
}
原始颜色为系统提供的灰色,R和G的偏移量我设置了50
灰色是稍微偏了点黄
大于0代表增加,小于0则代表减少
2.1.2 改变颜色系数
简单测试:
private void initPaint() {
        gPaint = new Paint(Paint.ANTI_ALIAS_FLAG);
        gPaint.setColor(Color.GRAY);

        ColorMatrix colorMatrix = new ColorMatrix(new float[]{
                1.5f , 0 , 0 , 0 , 0 ,
                0 , 1.5f , 0 , 0 , 0 ,
                0 , 0 , 1 , 0 , 0  ,
                0 , 0 , 0 , 1 , 0
        });
        ColorMatrixColorFilter filter = new ColorMatrixColorFilter(colorMatrix);
        gPaint.setColorFilter(filter);
    }
矩阵运算结果
R和G色彩分量就会变为1.5倍,也显示黄色
若小于1,则代表分量减少,红和绿减少,就会偏蓝
大于1代表增加分量,小于1则意味着减少
到了这里,对于前面1中挖的坑多少有点了解了
2.2 图像的色光属性
在ColorMatrix中,提供了方法来调节图像的色调,饱和度,亮度
-
setRotate(int axis, float degrees)设置色调
-
axis颜色编号 0,1,2 -
degrees需要处理的值
方法调用:
//色调
ColorMatrix rotateMatrix = new ColorMatrix();
rotateMatrix.setRotate(0,hue);//红
rotateMatrix.setRotate(1,hue);//绿
rotateMatrix.setRotate(2,hue);//蓝
0,代表红,1代表绿,2代表蓝
-
setSaturation(float sat)设置饱和度
float sat饱和度值 ;0位灰色图像, 1为原图
方法调用:
//饱和度
ColorMatrix saturationMatrix = new ColorMatrix();
saturationMatrix.setSaturation(saturation);
区间为 0~1
-
setScale(float rScale, float gScale, float bScale, float aScale)设置亮度
当rScale,gScale,bScale代表的三原色相同时,就会显示白色。利用这个原理进行亮度的改变 。0代表全黑 1原图
方法调用:
//亮度
ColorMatrix scaleMatrix = new ColorMatrix();
scaleMatrix.setScale(lum,lum,lum,1);
将三原色比例设置为同一个值
2.2.1 简单测试
把Android群英传代码敲了敲
public class LightingActivity extends AppCompatActivity implements SeekBar.OnSeekBarChangeListener {
    private ImageView iv;
    private SeekBar sb_rotate;
    private SeekBar sb_saturation;
    private SeekBar sb_scale;
    private Bitmap bitmap;

    private float hue;
    private float saturation;
    private float lum;
    private final float MID_VALUE = 100.0F;
    @Override
    protected void onCreate(Bundle savedInstanceState) {
        super.onCreate(savedInstanceState);
        setContentView(R.layout.activity_lighting);
        initView();
    }

    private void initView() {
        iv = (ImageView) findViewById(R.id.iv_lighting_activity);
        bitmap = BitmapFactory.decodeResource(getResources(), R.drawable.text);
        iv.setImageBitmap(bitmap);
        sb_rotate = (SeekBar) findViewById(R.id.sb_rotate_lighting_activity);
        sb_saturation = (SeekBar) findViewById(R.id.sb_saturation_lighting_activity);
        sb_scale = (SeekBar) findViewById(R.id.sb_scale_lighting_activity);

        sb_scale.setOnSeekBarChangeListener(this);
        sb_saturation.setOnSeekBarChangeListener(this);
        sb_rotate.setOnSeekBarChangeListener(this);
    }

    @Override
    public void onProgressChanged(SeekBar seekBar, int progress, boolean fromUser) {
        switch (seekBar.getId()) {
            case R.id.sb_rotate_lighting_activity:
                hue = (progress - MID_VALUE) * 1.0f/MID_VALUE * 180;
                break;
            case R.id.sb_saturation_lighting_activity:
                saturation = progress * 1.0f / MID_VALUE;
                break;
            case R.id.sb_scale_lighting_activity:
                lum = progress * 1.0F / MID_VALUE;
                break;
        }
        iv.setImageBitmap(handleImageEffect(bitmap,hue,saturation,lum));
    }

    private Bitmap handleImageEffect(Bitmap bitmap, float hue, float saturation, float lum) {
        Bitmap b = Bitmap.createBitmap(bitmap.getWidth(),bitmap.getHeight(), Bitmap.Config.ARGB_8888);
        Canvas canvas = new Canvas(b);
        Paint paint = new Paint();
        //色调
        ColorMatrix rotateMatrix = new ColorMatrix();
        rotateMatrix.setRotate(0,hue);
        rotateMatrix.setRotate(1,hue);
        rotateMatrix.setRotate(2,hue);
        //饱和度
        ColorMatrix saturationMatrix = new ColorMatrix();
        saturationMatrix.setSaturation(saturation);
        //亮度
        ColorMatrix scaleMatrix = new ColorMatrix();
        scaleMatrix.setScale(lum,lum,lum,1);


        ColorMatrix imgMatrix = new ColorMatrix();
        imgMatrix.postConcat(rotateMatrix);
        imgMatrix.postConcat(saturationMatrix);
        imgMatrix.postConcat(scaleMatrix);

        paint.setColorFilter(new ColorMatrixColorFilter(imgMatrix));
        canvas.drawBitmap(bitmap,0,0,paint);
        return b;
    }

    @Override
    public void onStartTrackingTouch(SeekBar seekBar) {}

    @Override
    public void onStopTrackingTouch(SeekBar seekBar) {}
}
书上的代码,徐医生并没有完全给全,MID_VALUE = 100.0F这个值是我自己猜测的,也测试了50,最后选择了100
这三个方法的对图像的影响大概也有了解了
3.最后
关于ColorMatrix简单了解,依然不是很清晰,具体使用还得再次学习。暂时先了解基本的知识点,而Matrix中知识点更多。下篇学习PorterDuffXfermore
啊,要发工资,下班买吃的去 : )
