1、目录介绍
blog.csdn.net/sydpz1987/article/details/51520068
以下是对该目录下的几个重要目录的简单介绍:
(1)目录core: 该目录为tensorflow的C++源码的核心存放地点,接下来我们会对该目录中存放的各个模块进行简要介绍。
(2)目录python: 该目录下存放了tensorflow使用python编写的相关代码,个人感觉该部分代码主要是使用python封装了相关的机器学习算法,但最终的计算操作是通过调用目录core 中的C++逻辑实现的。这样做的好处是利用了python较方便的编程特性和C++较高效的执行效率。
(3)目录tensorboard tensorborad:是tensorflow中非常有特色的一个模块,该模块可以用于生成模型训练中实时生成图表,用于监控模型的训练程度。关于tensorboard的相关介绍可以点击 这里
(4)目录models: 该目录下存放这多个使用pyton实现的模型实例。
(5)目录contrib: 该目录下存放有其他项目贡献者添加的相关贡献代码,由于tensorflow受关注程度较高,目前该目录正急剧膨胀。以下是一个关于该目录下scikit flow的相关介绍。
(6)其他
2、sanwen8.cn/p/63flBuU.html
3、xtr = tf.placeholder("float", [None, 784]):
解释:xtr 不是一个特定的值,而是一个占位符placeholder,我们在TensorFlow运行计算时输入这个值。我们希望能够输入任意数量的MNIST图 像,每一张图展平成784维的向量。我们用2维的浮点数张量来表示这些图,这个张量的形状是[None,784 ]。(这里的None表示此张量的第一个维度可以是任何长度的。)
4、cross_entropy = tf.reduce_mean(-tf.reduce_sum(y_actual*tf.log(y_predict),reduction_indies=1)) #求交叉熵,reduction_indices:在哪一维上求解
5、tensorflow中的tf.reduce_mean()这类函数
reduction_indices:在哪一维上求解。举例说明:
# 'x' is [[1., 2.]
# [3., 4.]]
x是一个2维数组,分别调用reduce_*函数如下:
首先求平均值,
tf.reduce_mean(x) ==> 2.5 #如果不指定第二个参数,那么就在所有的元素中取平均值;
tf.reduce_mean(x, 0) ==> [2., 3.] #指定第二个参数为0,则第一维的元素取平均值,即每一 列求平均值;
tf.reduce_mean(x, 1) ==> [1.5, 3.5] #指定第二个参数为1,则第二维的元素取平均值,即每 一行求平均值;
同理,还可用tf.reduce_max()求最大值。
6、tf.nn.conv2d(x, W, strides=[1, 1, 1, 1], padding='SAME')#strides第0位和第3为一定为1(mine: 应该是对应的patch与channel,与x的维度对应),剩下的是卷积的横向和纵向步长,第四个参数padding:string类型的量,只能是"SAME","VALID"其中之一
tf.nn.conv2d( input_tensor, weight_tensor, strides_param, padding_method)
padding的方式:
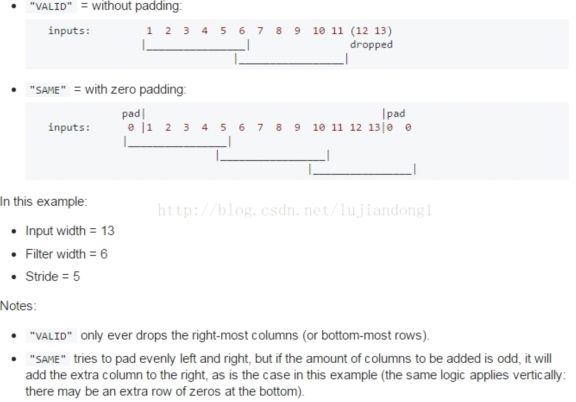
其中,padding='SAME'表示通过填充0,
The TensorFlow Convolution example gives an overview about the difference between SAME and VALID :
For the SAME padding, the output height and width are computed as:
out_height = ceil(float(in_height) / float(strides[1]))
out_width = ceil(float(in_width) / float(strides[2]))
And for the VALID padding, the output height and width are computed as:
out_height = ceil(float(in_height - filter_height + 1) / float(strides1))
out_width = ceil(float(in_width - filter_width + 1) / float(strides[2]))
反正就这样记得就好,好像是上面的valid的公式与下面的也不一定是对应的,看图更容易理解
貌似是左面添加上Filter width-Stride多个0
7、源码:x_image = tf.reshape(x, [-1, 28, 28, 1])
这里是将一组图像矩阵x重建为新的矩阵,该新矩阵的维数为(a,28,28,1),其中-1表示a由实际情况来定。例如,x是一组图像的矩阵(假设是50张,大小为56×56),则执行
x_image = tf.reshape(x, [-1, 28, 28, 1]),可以计算a=50×56×56/28/28/1=200。即x_image的维数为(200,28,28,1)。
8、h_fc1_drop = tf.nn.dropout(h_fc1, keep_prob)#按照keep_prob的概率扔掉一些,为了减少过拟合
train_acc = accuracy.eval(feed_dict={x:batch[0], y_actual: batch[1], keep_prob: 1.0})与
train_step.run(feed_dict={x: batch[0], y_actual: batch[1], keep_prob: 0.5}):
9、tf中的变量和操作(合称tensor)定义好后,由Session对象合成graph。
但对于像python原生编辑器,或者jupyter这样的基于浏览器的python编辑器,要一段一段的输入代码,
于是就有了 tf.InteractiveSession() 这样的交互式会话,它不需要用 "sess.run(变量)”这种形式,而是定义好会话对象后,每次执行tensor时,调用tensor.eval()即可。
如下:
import tensorflow as tf
x = tf.constant(10)
y = tf.constant(23)
sess = tf.InteractiveSession()
print(x.eval())
print(y.eval())
sess.close()#with tf.Session() as sess:这种的不需要手动关掉sess
上面两段代码可得到同样的结果,区别仅在于编辑模式不同,满足各种生产环境的需要。
两者的的区别将在学习过程中逐步区分。
但是我不知道为啥还有train_step.run(feed_dict={x: batch[0], y_actual: batch[1], keep_prob: 0.5})这种的:
解释:If you have only one default session, they are basically the same.
op.run() is a shortcut for calling tf.get_default_session().run(op)
t.eval() is a shortcut for calling tf.get_default_session().run(t)
Why these differences between Tensor and Operation?
Note: the Tensor class will be replaced by Output in the future. Currently these two are aliases for each other.
难道是张量就用.eval(),操作就用.run()?是的:www.open-open.com/lib/view/open1451607994167.html
可以使用InteractiveSession 代替Session 类, 使用 Tensor.eval()和 Operation.run() 方法代替Session.run(). 这样可以避免使用一个变量来持有会话.
10、 print step, sess.run(W)#注意step是python的变量,可以直接输出,而tensorflow的变量/常量,则只能print sess.run(变量名/常量)
11、tensorflow貌似还只能开一个窗口跑程序
12、Note that {strides} is a 4D array whose shape matches the data layout: [image index, y, x, depth].
13、softmax_tensor = sess.graph.get_tensor_by_name('softmax:0'):
14、h_pool2_flat = tf.reshape(h_pool2, [-1, 7*7*64]) :这种原来是把卷基层输入到全连接层之前的feature map数据拉直的
15、 train_acc = accuracy.eval(feed_dict={x:batch[0], y_actual: batch[1], keep_prob: 1.0})
16、如果数据量不大的话,不需要转换,直接把图片读出来就可以了,一般是四维tensor(num, width, height, channels)。如果数据量非常大的话,才需要转换成tfrecord
17、好像输入都是在外部弄好的,tensorflow里面都是用的变量:
18、accuracy = tf.reduce_mean(tf.cast(correct_prediction, "float")) #其实构图的时候,一般都可以认为是这个节点叫什么(accuracy),做的是什么事(tf.reduce_mean)
19、train_acc = accuracy.eval(feed_dict={x:batch[0], y_actual: batch[1], keep_prob: 1.0})#一个图构出来,其实整个的输入就只有用了占位符的那几个,就直接用 feed_dict去给参数传值就好。train_acc = accuracy.eval(feed_dict={x:batch[0], y_actual: batch[1], keep_prob: 1.0})可以写成:train_acc = accuracy.eval({x:batch[0], y_actual: batch[1], keep_prob: 1.0})
20、g_2.as_default():

