前言
在android应用程序四大组件中,Activity负责界面的展示, 同时android系统是基于linux系统的,熟悉linux系统的都知道,linux下图形输出最终是通过FrameBuffer设备完成的,那么问题来了,android系统是如何将多个应用程序的界面内容输出到FrameBuffer中的呢?
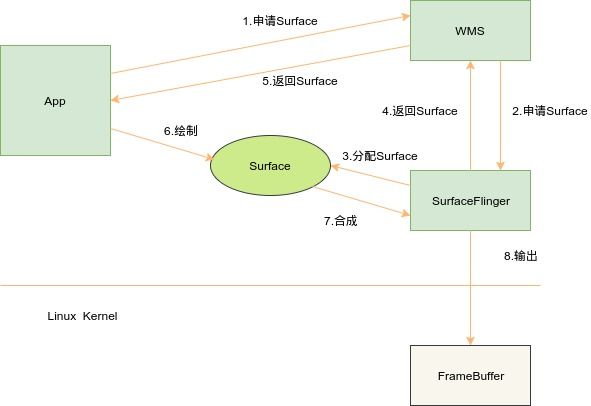
在android系统中,完成这种工作涉及到WMS和SurfaceFlinger,如图1所示,WMS负责维护各个应用程序的窗口顺序(俗称Z序),同时充当应用程序和SurfaceFlinger的桥梁,而SurfaceFlinger顾名思义,就是负责完成图像合成输出的。真正绘制时,是由应用程序直接提供原始图像数据,SurfaceFlinger将各个应用程序的数据按照窗口Z序次序合成输出,而应用程序和SurfaceFlinger运行在不同的进程空间,这就需要一种机制来负责跨进程传输大量的图像数据,在linux下最合适的就是共享内存了,的确如此,android在设计时基于共享内存设计了一套Surface机制,在应用程序这端,Surface可以简单的理解为绘制时用的画布,在程序中可以抽象为一块内存,应用程序绘制前通过WMS先SurfaceFlinger申请一个Surface,然后就可以随意的绘制,绘制完之后,通知SurfaceFlinger将该Surface合成输出即可。原理如下所示:
上图看似简单,但是背后的机制和流程还是非常值的研究的,我打算分两篇文章分析一下Surface的前世今生,先以android 2.1版本为切入点,分析Surface相关流程,然后再分析android 6.0版本的实现。文章主要是从流程方面来分析,因为分析Surface的目的主要是想把原理搞清楚,至于细节和策略方面,后续有时间再来写一些更深入的东西。
闲话少说,首先先贴一张序列图,如下所示:
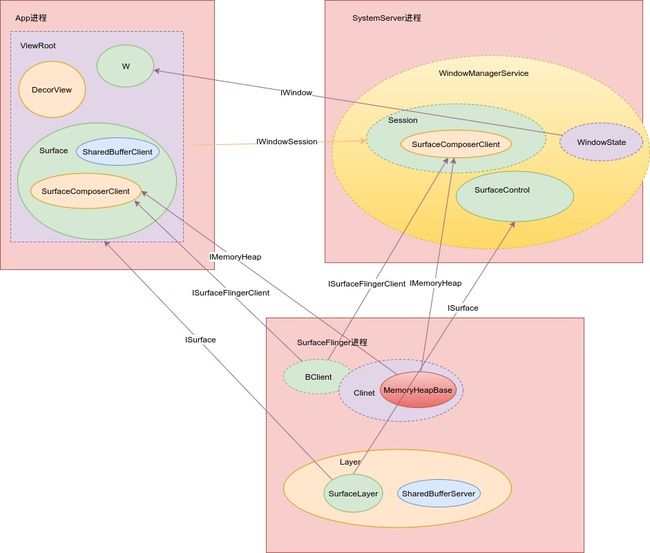
图二梳理了surface相关主要流程,如果你之前没接触过相关的东西,很有可能会看晕了,因此下面再来一张简化版的图醒醒脑,如下所示:
接下来从关键代码的角度来分析图二涉及的流程:
step1到step7
首先,可以从应用程序调用WindowManagerImpl的addView函数开始分析,至于何时调用addView函数,以后再写相关的文章分析吧。
addView函数声明如下,其中传入的view一般就是DecorView了,也就是Activity的根view。
public void addView(View view, ViewGroup.LayoutParams params)
该函数调用另外一个addView,定义如下:
    private void addView(View view, ViewGroup.LayoutParams params, boolean nest) {
        root = new ViewRoot(view.getContext());
        mViews[index] = view;
        mRoots[index] = root;
        mParams[index] = wparams;
        root.setView(view, wparams, panelParentView);
    }
先是创建了一个ViewRoot对象,然后调用其setView函数,ViewRoot构造函数定义如下:
    public ViewRoot(Context context) {
        getWindowSession(context.getMainLooper());
        mWindow = new W(this, context);
    }
ViewRoot构造函数调用了getWindowSession请求WMS创建一个Session,然后创建一个W对象,getWindowSession函数定义如下:
    public static IWindowSession getWindowSession(Looper mainLooper) {
        synchronized (mStaticInit) {
            if (!mInitialized) {
                InputMethodManager imm = InputMethodManager.getInstance(mainLooper);
                sWindowSession = IWindowManager.Stub.asInterface(
                        ServiceManager.getService("window"))
                        .openSession(imm.getClient(), imm.getInputContext());
                mInitialized = true;
                return sWindowSession;
            }
        }
    }
通过调用IWindowManager的openSession请求WMS创建一个Session,IWindowManager的openSession定义如下:
    IWindowSession openSession(in IInputMethodClient client,
                               in IInputContext inputContext);
WMS实现了openSession,如下所示:
    public IWindowSession openSession(IInputMethodClient client,
                                      IInputContext inputContext) {
        return new Session(client, inputContext);
    }
Session是WindowManagerService内部类,之后来自应用程序的请求可直接转给WMS处理。
小结
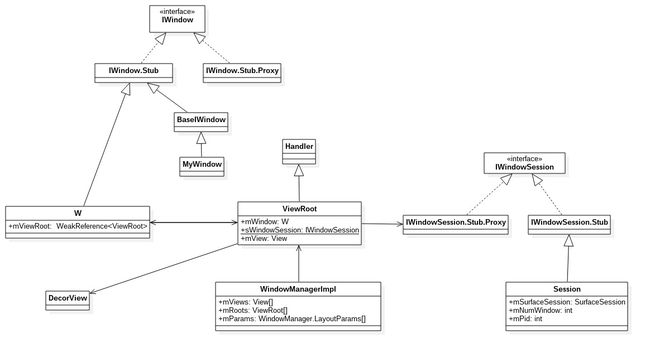
通过step1到step7,在应用程序这端创建了ViewRoot、W和IWindowSession.Stub.Proxy对象,在WMS这端创建了代表应用程序的Session(继承IWindowSession.Stub类),需要注意的是一个应用程序进程在WMS中只存在一个Session,相应的也就只存在一个IWindowSession.Stub.Proxy对象,但是会有多个ViewRoot和W,因为一个Activity对应一个DecorView,一个DecorView对应一个ViewRoot和W,而应用程序一般会同时存在多个Activity。
DecorView、ViewRoot、W和Session的关系如下所示:
step8到step29
step8到step29是从调用ViewRoot的setView开始的,setView定义如下:
    public void setView(View view, WindowManager.LayoutParams attrs,
                        View panelParentView) {
        res = sWindowSession.add(mWindow, mWindowAttributes,
                getHostVisibility(), mAttachInfo.mContentInsets);
    }
应用程序通过IWindowSession的add方法将IWindow添加到WMS,IWindowSession接口的add定义如下:
    int add(IWindow window, in WindowManager.LayoutParams attrs,
            in int viewVisibility, out Rect outContentInsets);
Session实现了add,如下所示:
    public int add(IWindow window, WindowManager.LayoutParams attrs,
                   int viewVisibility, Rect outContentInsets) {
        return addWindow(this, window, attrs, viewVisibility, outContentInsets);
    }
直接调用了WMS的addWindow,WMS实现如下所示:
    public int addWindow(Session session, IWindow client,
                         WindowManager.LayoutParams attrs, int viewVisibility,
                         Rect outContentInsets) {
        WindowToken token = mTokenMap.get(attrs.token);
        if (token == null) {
            token = new WindowToken(attrs.token, -1, false);
            addToken = true;
        }

        win = new WindowState(session, client, token,
                attachedWindow, attrs, viewVisibility);

        if (addToken) {
            mTokenMap.put(attrs.token, token);
            mTokenList.add(token);
        }
        win.attach();
        mWindowMap.put(client.asBinder(), win);
    }
WMS的addWindow先创建一个维护应用程序窗口信息的WindowState对象,然后调用了WindowState的attach函数,如下所示:
    void attach() {
        mSession.windowAddedLocked();
    }
attach调用了Session的windowAddedLocked,如下所示:
    void windowAddedLocked() {
        if (mSurfaceSession == null) {
            mSurfaceSession = new SurfaceSession();
            mSessions.add(this);
        }
        mNumWindow++;
    }
windowAddedLocked创建一个SurfaceSession对象,SurfaceSession的构造函数如下所示:
    public SurfaceSession() {
        init();
    }
在构造函数中,调用了init函数,如下所示:
    static void SurfaceSession_init(JNIEnv * env, jobject clazz)
    {
        sp client = new SurfaceComposerClient;
        client->incStrong(clazz);
        env->SetIntField(clazz, sso.client, (int)client.get());
    }
SurfaceSession_init创建一个SurfaceComposerClient对象,SurfaceComposerClient的构造函数如下所示:
    SurfaceComposerClient::SurfaceComposerClient()
    {
        sp sm(getComposerService());
        _init(sm, sm->createConnection());
        if (mClient != 0)
        {
            Mutex::Autolock _l(gLock);
            gActiveConnections.add(mClient->asBinder(), this);
        }
    }
在SurfaceComposerClient构造函数中,通过getComposerService获取ISurfaceComposer接口,通过ISurfaceComposer的createConnection请求SurfaceFlinger创建Client实例,返回的是ISurfaceFlingerClient接口,然后调用_init,接着将ISurfaceFlingerClient接口和SurfaceComposerClient存储在gActiveConnections Vector中,gActiveConnections是WMS所在进程定义的全局变量,定义如下所示:
static DefaultKeyedVector, sp> gActiveConnections;
_init定义如下所示:
    void SurfaceComposerClient::_init(
        const sp &sm, const sp &conn)
    {
        mClient = conn;
        mControlMemory = mClient->getControlBlock();
        mSignalServer = sm;
        mControl = static_cast(mControlMemory->getBase());
    }
_init调用了ISurfaceFlingerClient的getControlBlock从SurfaceFlinger获取IMemoryHeap接口,调用IMemoryHeap接口的getBase获取匿名共享内存在本进程的地址,这块内存的内容是一个SharedClient对象。
创建SurfaceFlinger Client是通过调用ISurfaceComposer的createConnection完成的,createConnection定义如下:
virtual sp createConnection() = 0;
SurfaceFlinger实现了createConnection,如下所示:
    sp SurfaceFlinger::createConnection()
    {
        Mutex::Autolock _l(mStateLock);
        uint32_t token = mTokens.acquire();
        sp client = new Client(token, this);
        status_t err = mClientsMap.add(token, client);
        sp bclient =
            new BClient(this, token, client->getControlBlockMemory());
        return bclient;
    }
首先生成一个token,然后创建一个Client对象和BClient对象,Client的构造函数如下所示:
    Client::Client(ClientID clientID, const sp &flinger)
        : ctrlblk(0), cid(clientID), mPid(0), mBitmap(0), mFlinger(flinger)
    {
        const int pgsize = getpagesize();
        const int cblksize = ((sizeof(SharedClient) + (pgsize - 1))&~(pgsize - 1));

        mCblkHeap = new MemoryHeapBase(cblksize, 0,
                                       "SurfaceFlinger Client control-block");

        ctrlblk = static_cast(mCblkHeap->getBase());
        if (ctrlblk)   // construct the shared structure in-place.
        {
            new(ctrlblk) SharedClient;
        }
    }
Client的构造函数中会调用MemoryHeapBase构造函数创建一块匿名共享内存,这块内存的内容是一个SharedClient对象。MemoryHeapBase构造函数定义如下所示:
    MemoryHeapBase::MemoryHeapBase(size_t size, uint32_t flags, char const * name)
        : mFD(-1), mSize(0), mBase(MAP_FAILED), mFlags(flags),
          mDevice(0), mNeedUnmap(false)
    {
        const size_t pagesize = getpagesize();
        size = ((size + pagesize - 1) & ~(pagesize - 1));
        int fd = ashmem_create_region(name == NULL ? "MemoryHeapBase" : name, size);
        if (fd >= 0)
        {
            if (mapfd(fd, size) == NO_ERROR)
            {
                if (flags & READ_ONLY)
                {
                    ashmem_set_prot_region(fd, PROT_READ);
                }
            }
        }
    }
在MemoryHeapBase构造函数中调用了ashmem_create_region创建一块名称为MemoryHeapBase的共享内存。调用mapfd将内存映射到SurfaceFlinger进程的地址空间。
BClient的构造函数如下所示:
    BClient::BClient(SurfaceFlinger * flinger, ClientID cid,
                     const sp &cblk)
        : mId(cid), mFlinger(flinger), mCblk(cblk)
    {
    }
小结
通过step8到step29,在SurfaceFlinger创建一块匿名共享内存,这块内存的内容是一个SharedClient对象,该对象最终会在应用程序进程、WMS进程和SurfaceFlinger进程中共享,用来协调GraphicBuffer在应用程序进程和SurfaceFlinger进程的生产和消费,这里再简单的说明一下SharedClient对象如何在WMS进程和SurfaceFlinger进程中共享,关键的地方就是binder调用,在WMS SurfaceComposerClient的_init函数中调用mClient->getControlBlock(),mClient是一个BpSurfaceFlingerClient实例,返回的IMemoryHeap接口是一个BpMemoryHeap实例,然后调用它的getBase函数,该函数最终会调用以下代码把binder返回的代表匿名共享内存的fd映射到WMS所在进程空间。
mBase = mmap(0, size, access, MAP_SHARED, fd, 0);
而在SurfaceFlinger这端,MemoryHeapBase的构造函数中创建一块匿名共享内存后调用了mapfd函数,该函数最终会调用以下代码把代表匿名共享内存的fd映射到SurfaceFlinger进程空间。
    void* base = (uint8_t*)mmap(0, size,
        PROT_READ|PROT_WRITE, MAP_SHARED, fd, offset);
    mBase = base;
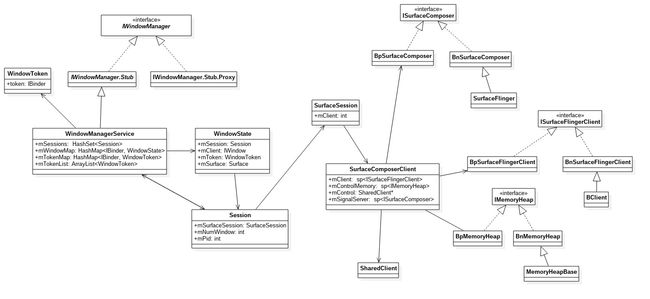
通过step8到step29,在WMS这端创建了WindowState、SurfaceSession、SurfaceComposerClient、BpSurfaceComposer、BpSurfaceFlingerClient、BpMemoryHeap和SharedClient对象,在WMS中一个IWindow对应一个WindowState,一个应用程序进程对应一个SurfaceSession、SurfaceComposerClient、BpSurfaceFlingerClient、BpMemoryHeap和SharedClient对象,而BpSurfaceComposer在WMS只存在一个实例。
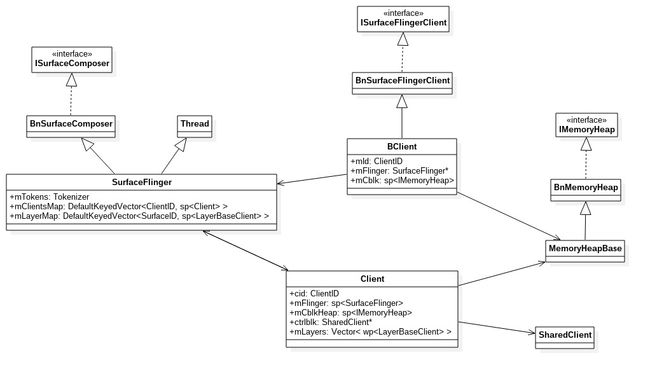
在SurfaceFlinger这端创建了跟一个应用程序进程相关的Client、MemoryHeapBase(继承BnMemoryHeap类)、SharedClient和BClient(继承BnSurfaceFlingerClient类)对象。
WindowState、SurfaceSession、SurfaceComposerClient、BpSurfaceComposer、BpSurfaceFlingerClient、BpMemoryHeap和SharedClient的关系如下所示:
Client、MemoryHeapBase、SharedClient和BClient的关系如下所示:
step30到step123
step30到step123从调用performTraversals开始,该函数在绘制activity的时候调用,依次调用了relayoutWindow和draw完成绘制过程,先分析relayoutWindow,ViewRoot relayoutWindow函数调用了IWindowSession的relayout请求WMS relayout,如下所示:
    int relayoutResult = sWindowSession.relayout(
            mWindow, params,
            (int) (mView.mMeasuredWidth * appScale + 0.5f),
            (int) (mView.mMeasuredHeight * appScale + 0.5f),
            viewVisibility, insetsPending, mWinFrame,
            mPendingContentInsets, mPendingVisibleInsets, mSurface);
IWindowSession接口的relayout定义如下:
    int relayout(IWindow window, in WindowManager.LayoutParams attrs,
                 int requestedWidth, int requestedHeight, int viewVisibility,
                 boolean insetsPending, out Rect outFrame, out Rect outContentInsets,
                 out Rect outVisibleInsets, out Surface outSurface);
sWindowSession在应用程序这端为IWindowSession.Stub.Proxy,其relayout定义如下:
    public int relayout(android.view.IWindow window,
                        android.view.WindowManager.LayoutParams attrs,
                        int requestedWidth, intrequestedHeight,
                        int viewVisibility, boolean insetsPending,
                        android.graphics.Rect outFrame,
                        android.graphics.Rect outContentInsets,
                        android.graphics.Rect outVisibleInsets,
                        android.content.res.Configuration outConfig,
                        android.view.Surface outSurface) {

        android.os.Parcel_data = android.os.Parcel.obtain();
        android.os.Parcel_reply = android.os.Parcel.obtain();

        _data.writeStrongBinder((((window != null)) ? (window.asBinder()) : (null)));

        mRemote.transact(Stub.TRANSACTION_relayout, _data, _reply, 0);

        outSurface.readFromParcel(_reply);

        return_result;
    }
最后是调用Surface的readFromParcel函数获取WMS返回的Surface信息,readFromParcel函数定义如下:
    static void Surface_readFromParcel(
        JNIEnv * env, jobject clazz, jobject argParcel)
    {
        sp rhs = new Surface(*parcel);
        setSurface(env, clazz, rhs);
    }
创建一个native层的Surface实例,Surface构造函数定义如下:
    Surface::Surface(const Parcel & parcel)
        :  mBufferMapper(GraphicBufferMapper::get()), mSharedBufferClient(NULL)
    {
        sp clientBinder = parcel.readStrongBinder();
        mSurface    = interface_cast(parcel.readStrongBinder());
        mToken      = parcel.readInt32();
        mIdentity   = parcel.readInt32();
        mWidth      = parcel.readInt32();
        mHeight     = parcel.readInt32();
        mFormat     = parcel.readInt32();
        mFlags      = parcel.readInt32();

        mClient = SurfaceComposerClient::clientForConnection(clientBinder);
        mSharedBufferClient = new SharedBufferClient(
            mClient->mControl, mToken, 2, mIdentity);

        init();
    }
利用从WMS返回的ISurfaceFlingerClient接口在应用程序这端也创建一个SurfaceComposerClient实例,在这过程中,也将存储SharedClient对象的匿名共享内存映射到应用程序进程空间,然后创建了一个SharedBufferClient对象。
在WMS这端,收到binder请求的处理类是IWindowSession.Stub,对TRANSACTION_relayout的处理如下:
    public boolean onTransact(int code, android.os.Parcel data,
                              android.os.Parcelreply, int flags) {
        switch (code) {
            case TRANSACTION_relayout: {
                android.view.IWindow _arg0;
                android.view.Surface _arg10;

                _arg10 = new android.view.Surface();

                int_result = this.relayout(_arg0, _arg1, _arg2, _arg3, _arg4,
                        _arg5, _arg6, _arg7, _arg8, _arg9, _arg10);

                _arg10.writeToParcel(reply,
                        android.os.Parcelable.PARCELABLE_WRITE_RETURN_VALUE);
            }
        }
    }
先创建Surface对象,然后调用Session实现的relayout函数,内部会向SurfaceFlinger申请Surface,接着调用Surface的writeToParcel将Surface信息发给应用程序,writeToParcel函数定义如下:
    static void Surface_writeToParcel(
        JNIEnv * env, jobject clazz, jobject argParcel, jint flags)
    {
        const sp &control(getSurfaceControl(env, clazz));
        SurfaceControl::writeSurfaceToParcel(control, parcel);
    }
调用SurfaceControl类的writeSurfaceToParcell将Surface信息发给应用程序,定义如下:
    status_t SurfaceControl::writeSurfaceToParcel(
        const sp &control, Parcel * parcel)
    {
        uint32_t flags = 0;
        uint32_t format = 0;
        SurfaceID token = -1;
        uint32_t identity = 0;
        uint32_t width = 0;
        uint32_t height = 0;
        sp client;
        sp sur;
        if (SurfaceControl::isValid(control))
        {
            token    = control->mToken;
            identity = control->mIdentity;
            client   = control->mClient;
            sur      = control->mSurface;
            width    = control->mWidth;
            height   = control->mHeight;
            format   = control->mFormat;
            flags    = control->mFlags;
        }
        parcel->writeStrongBinder(client != 0  ? client->connection() : NULL);
        parcel->writeStrongBinder(sur != 0     ? sur->asBinder()      : NULL);
        parcel->writeInt32(token);
        parcel->writeInt32(identity);
        parcel->writeInt32(width);
        parcel->writeInt32(height);
        parcel->writeInt32(format);
        parcel->writeInt32(flags);
        return NO_ERROR;
    }
接下来回到Session实现的relayout函数,看看SurfaceControl的创建过程,定义如下:
    public int relayout(IWindow window, WindowManager.LayoutParams attrs,
                        int requestedWidth, int requestedHeight, int viewFlags,
                        boolean insetsPending, Rect outFrame, Rect outContentInsets,
                        Rect outVisibleInsets, Surface outSurface) {
        return relayoutWindow(this, window, attrs,
                requestedWidth, requestedHeight, viewFlags, insetsPending,
                outFrame, outContentInsets, outVisibleInsets, outSurface);
    }
调用了WMS的relayoutWindow,定义如下:
    public int relayoutWindow(Session session, IWindow client,
                              WindowManager.LayoutParams attrs,
                              int requestedWidth, int requestedHeight,
                              int viewVisibility, boolean insetsPending,
                              Rect outFrame, Rect outContentInsets,
                              Rect outVisibleInsets, Surface outSurface) {

        WindowState win = windowForClientLocked(session, client);

        Surface surface = win.createSurfaceLocked();

        outSurface.copyFrom(surface);
    }
首先利用应用程序传递过来的client找到对应的代表一个窗口的WindowState对象,然后调用createSurfaceLocked,定义如下:
    Surface createSurfaceLocked() {
        mSurface = new Surface(
                mSession.mSurfaceSession, mSession.mPid,
                0, w, h, mAttrs.format, flags);
        return mSurface;
    }
创建了一个Surface对象,Surface构造函数定义如下:
    public Surface(SurfaceSession s,
                   int pid, int display, int w, int h, int format, int flags) {
        mCanvas = new CompatibleCanvas();
        init(s, pid, display, w, h, format, flags);
    }
调用了init函数,定义如下:
    static void Surface_init(
        JNIEnv * env, jobject clazz,
        jobject session, jint pid, jint dpy, jint w, jint h, jint format, jint flags)
    {
        SurfaceComposerClient *client =
            (SurfaceComposerClient *)env->GetIntField(session, sso.client);

        sp surface(client->createSurface(pid, dpy, w, h, format, flags));

        setSurfaceControl(env, clazz, surface);
    }
调用了SurfaceComposerClient的createSurface创建一个SurfaceControl对象,定义如下:
    sp SurfaceComposerClient::createSurface(
        int pid,
        DisplayID display,
        uint32_t w,
        uint32_t h,
        PixelFormat format,
        uint32_t flags)
    {
        sp result;
        if (mStatus == NO_ERROR)
        {
            ISurfaceFlingerClient::surface_data_t data;
            sp surface = mClient->createSurface(&data, pid,
                                   display, w, h, format, flags);
            if (surface != 0)
            {
                if (uint32_t(data.token) < NUM_LAYERS_MAX)
                {
                    result = new SurfaceControl(this, surface, data, w, h, format, flags);
                }
            }
        }
        return result;
    }
先通过ISurfaceFlingerClient的createSurface方法请求SurfaceFlinger返回一个ISurface接口,然后创建一个SurfaceControl对象,构造函数如下:
    SurfaceControl::SurfaceControl(
        const sp &client,
        const sp &surface,
        const ISurfaceFlingerClient::surface_data_t & data,
        uint32_t w, uint32_t h, PixelFormat format, uint32_t flags)
        : mClient(client), mSurface(surface),
          mToken(data.token), mIdentity(data.identity),
          mWidth(data.width), mHeight(data.height), mFormat(data.format),
          mFlags(flags)
    {
    }
这里先回到WMS的relayoutWindow函数,从createSurfaceLocked返回后调用了Surface的copyFrom,定义如下:
    static void Surface_copyFrom(
        JNIEnv * env, jobject clazz, jobject other)
    {
        if (clazz == other)
        {
            return;
        }

        const sp &surface = getSurfaceControl(env, clazz);
        const sp &rhs = getSurfaceControl(env, other);
        if (!SurfaceControl::isSameSurface(surface, rhs))
        {
            // we reassign the surface only if it's a different one
            // otherwise we would loose our client-side state.
            setSurfaceControl(env, clazz, rhs);
        }
    }
只是将other的SurfaceControl保存起来,可见现在有两个java层的Surface对象引用同一个native层的SurfaceControl对象。
SurfaceControl的创建过程分析完了,接下来回头看看请求SurfaceFlinger返回一个ISurface接口的过程,SurfaceFlinger处理该请求的是BClient的createSurface函数,定义如下:
    sp BClient::createSurface(
        ISurfaceFlingerClient::surface_data_t * params, int pid,
        DisplayID display, uint32_t w, uint32_t h, PixelFormat format,
        uint32_t flags)
    {
        return mFlinger->createSurface(mId, pid, params, display, w, h, format, flags);
    }
调用了SurfaceFlinger的createSurface,定义如下:
    sp SurfaceFlinger::createSurface(ClientID clientId, int pid,
            ISurfaceFlingerClient::surface_data_t * params,
            DisplayID d, uint32_t w, uint32_t h, PixelFormat format,
            uint32_t flags)
    {
        sp layer;
        sp surfaceHandle;

        Mutex::Autolock _l(mStateLock);
        sp client = mClientsMap.valueFor(clientId);

        int32_t id = client->generateId(pid);
        if (uint32_t(id) >= NUM_LAYERS_MAX)
        {
            LOGE("createSurface() failed, generateId = %d", id);
            return surfaceHandle;
        }

        switch (flags & eFXSurfaceMask)
        {
            case eFXSurfaceNormal:
                if (UNLIKELY(flags & ePushBuffers))
                {
                    layer = createPushBuffersSurfaceLocked(client, d, id,
                                                           w, h, flags);
                }
                else
                {
                    layer = createNormalSurfaceLocked(client, d, id,
                                                      w, h, flags, format);
                }
                break;
            case eFXSurfaceBlur:
                layer = createBlurSurfaceLocked(client, d, id, w, h, flags);
                break;
            case eFXSurfaceDim:
                layer = createDimSurfaceLocked(client, d, id, w, h, flags);
                break;
        }

        if (layer != 0)
        {
            setTransactionFlags(eTransactionNeeded);
            surfaceHandle = layer->getSurface();
            if (surfaceHandle != 0)
            {
                params->token = surfaceHandle->getToken();
                params->identity = surfaceHandle->getIdentity();
                params->width = w;
                params->height = h;
                params->format = format;
            }
        }

        return surfaceHandle;
    }
首先根据flags创建对应的layer,然后调用layer的getSurface返回给WMS,这里只分析createNormalSurfaceLocked,定义如下:
    sp SurfaceFlinger::createNormalSurfaceLocked(
        const sp &client, DisplayID display,
        int32_t id, uint32_t w, uint32_t h, uint32_t flags,
        PixelFormat & format)
    {
        sp layer = new Layer(this, display, client, id);
        status_t err = layer->setBuffers(w, h, format, flags);
        addLayer_l(layer);
        return layer;
    }
创建了一个Layer对象,构造函数定义如下:
    Layer::Layer(SurfaceFlinger * flinger, DisplayID display,
                 const sp &c, int32_t i)
        :   LayerBaseClient(flinger, display, c, i),
            mSecure(false),
            mNoEGLImageForSwBuffers(false),
            mNeedsBlending(true),
            mNeedsDithering(false)
    {
        // no OpenGL operation is possible here, since we might not be
        // in the OpenGL thread.
        mFrontBufferIndex = lcblk->getFrontBuffer();
    }
基类LayerBaseClient构造函数定义如下:
    LayerBaseClient::LayerBaseClient(SurfaceFlinger * flinger, DisplayID display,
                                     const sp &client, int32_t i)
        : LayerBase(flinger, display), lcblk(NULL), client(client),
          mIndex(i), mIdentity(uint32_t(android_atomic_inc(&sIdentity)))
    {
        lcblk = new SharedBufferServer(
            client->ctrlblk, i, NUM_BUFFERS,
            mIdentity);
    }
再看看setBuffers函数,定义如下:
    status_t Layer::setBuffers(uint32_t w, uint32_t h,
                               PixelFormat format, uint32_t flags)
    {
        for (size_t i = 0 ; i < NUM_BUFFERS ; i++)
        {
            mBuffers[i] = new GraphicBuffer();
        }
        mSurface = new SurfaceLayer(mFlinger, clientIndex(), this);
        return NO_ERROR;
    }
回到ViewRoot的performTraversals函数,接着分析调用draw的流程,draw定义如下:
    private void draw(boolean fullRedrawNeeded) {
        Surface surface = mSurface;
        canvas = surface.lockCanvas(dirty);
        mView.draw(canvas);
        surface.unlockCanvasAndPost(canvas);
    }
主要是三个步骤,先调用lockCanvas获取Canvas,在调用View(mView为activity的根View,也就是DecorView)的draw函数完成具体的绘制操作,最后调用unlockCanvasAndPost通知SurfaceFlinger来合成输出。
lockCanvas调用了lockCanvasNative,定义如下:
    static jobject Surface_lockCanvas(JNIEnv * env, jobject clazz, jobject dirtyRect)
    {
        const sp &surface(getSurface(env, clazz));
        Surface::SurfaceInfo info;
        status_t err = surface->lock(&info, &dirtyRegion);

        // Associate a SkCanvas object to this surface
        jobject canvas = env->GetObjectField(clazz, so.canvas);
        env->SetIntField(canvas, co.surfaceFormat, info.format);

        SkCanvas *nativeCanvas = (SkCanvas *)env->GetIntField(canvas, no.native_canvas);
        SkBitmap bitmap;
        ssize_t bpr = info.s * bytesPerPixel(info.format);
        bitmap.setConfig(convertPixelFormat(info.format), info.w, info.h, bpr);
        if (info.format == PIXEL_FORMAT_RGBX_8888)
        {
            bitmap.setIsOpaque(true);
        }
        if (info.w > 0 && info.h > 0)
        {
            bitmap.setPixels(info.bits);
        }
        else
        {
            // be safe with an empty bitmap.
            bitmap.setPixels(NULL);
        }
        nativeCanvas->setBitmapDevice(bitmap);
        return canvas;
    }
Surface的lock定义如下:
status_t Surface::lock(SurfaceInfo * other, Region * dirtyIn, bool blocking)
    {
        sp backBuffer;
        status_t err = dequeueBuffer(&backBuffer);
        err = lockBuffer(backBuffer.get());
        void *vaddr;
        status_t res = backBuffer->lock(
                           GRALLOC_USAGE_SW_READ_OFTEN | GRALLOC_USAGE_SW_WRITE_OFTEN,
                           newDirtyRegion.bounds(), &vaddr);
        mLockedBuffer = backBuffer;
        other->w      = backBuffer->width;
        other->h      = backBuffer->height;
        other->s      = backBuffer->stride;
        other->usage  = backBuffer->usage;
        other->format = backBuffer->format;
        other->bits   = vaddr;
    }
dequeueBuffer定义如下:
    status_t Surface::dequeueBuffer(sp *buffer)
    {
        android_native_buffer_t *out;
        status_t err = dequeueBuffer(&out);
        if (err == NO_ERROR)
        {
            *buffer = GraphicBuffer::getSelf(out);
        }
        return err;
    }
    int Surface::dequeueBuffer(android_native_buffer_t **buffer)
    {
        ssize_t bufIdx = mSharedBufferClient->dequeue();
        const sp &backBuffer(mBuffers[bufIdx]);
        err = getBufferLocked(bufIdx, usage);
        *buffer = backBuffer.get();
        return err;
    }
getBufferLocked定义如下:
    status_t Surface::getBufferLocked(int index, int usage)
    {
        sp s(mSurface);
        sp ¤tBuffer(mBuffers[index]);

        sp buffer = s->requestBuffer(index, usage);
        err = getBufferMapper().registerBuffer(buffer->handle);
        currentBuffer = buffer;
        currentBuffer->setIndex(index);
    }
通过ISurface的requestBuffer方法请求SurfaceFlinger分配一个GraphicBuffer,接下来分析一下SurfaceFlinger分配GraphicBuffer的过程,在SurfaceFlinger端处理requestBuffer请求的是SurfaceLayer,实现如下:
    sp Layer::SurfaceLayer::requestBuffer(int index, int usage)
    {
        sp buffer;
        sp owner(getOwner());
        buffer = owner->requestBuffer(index, usage);
        return buffer;
    }
调用了Layer的requestBuffer,定义如下:
    sp Layer::requestBuffer(int index, int usage)
    {
        sp buffer;

        buffer = mBuffers[index];
        err = buffer->reallocate(w, h, mFormat, effectiveUsage);
        return buffer;
    }
GraphicBuffer的reallocate调用了initSize,initSize调用了GraphicBufferAllocator的alloc来完成分配GraphicBuffer的工作,定义如下:
    status_t GraphicBufferAllocator::alloc(uint32_t w, uint32_t h, PixelFormat format,
                                           int usage, buffer_handle_t * handle, int32_t * stride)
    {
        Mutex::Autolock _l(mLock);

        if (usage & GRALLOC_USAGE_HW_MASK)
        {
            err = mAllocDev->alloc(mAllocDev, w, h, format, usage, handle, stride);
        }
        else
        {
            err = sw_gralloc_handle_t::alloc(w, h, format, usage, handle, stride);
        }

        return err;
    }
GraphicBuffer分为软件实现和硬件实现,软件实现就是创建一个匿名共享内存,如下所示:
    status_t sw_gralloc_handle_t::alloc(uint32_t w, uint32_t h, int format,
                                        int usage, buffer_handle_t * pHandle, int32_t * pStride)
    {
        int fd = ashmem_create_region("sw-gralloc-buffer", size);
        void *base = mmap(0, size, prot, MAP_SHARED, fd, 0);
        sw_gralloc_handle_t *hnd = new sw_gralloc_handle_t();
        hnd->fd = fd;
        hnd->size = size;
        hnd->base = intptr_t(base);
        hnd->prot = prot;
        *pStride = stride;
        *pHandle = hnd;
        return NO_ERROR;
    }
回到Surface的getBufferLocked函数,从SurfaceFlinger获取到GraphicBuffer后,调用registerBuffer注册到应用程序进程中,registerBuffer定义如下:
    status_t GraphicBufferMapper::registerBuffer(buffer_handle_t handle)
    {
        status_t err;
        if (sw_gralloc_handle_t::validate(handle) < 0)
        {
            err = mAllocMod->registerBuffer(mAllocMod, handle);
        }
        else
        {
            err = sw_gralloc_handle_t::registerBuffer((sw_gralloc_handle_t *)handle);
        }
        LOGW_IF(err, "registerBuffer(%p) failed %d (%s)",
                handle, err, strerror(-err));
        return err;
    }
对于软件实现就是调用mmap将SurfaceFlinger创建的匿名共享内存映射到应用程序进程中,如下所示:
void* base = mmap(0, hnd->size, hnd->prot, MAP_SHARED, hnd->fd, 0);
这里应用程序进程和SurfaceFlinger传递GraphicBuffer(GraphicBuffer是软件实现的情况下)与WMS和SurfaceFlinger传递SharedClient的机制是一样的,都是通过匿名共享内存机制,这种机制原理还是很简单的,先在服务端创建一块匿名共享内存,然后映射到服务端进程的地址空间,然后通过binder机制将代表匿名共享内存的文件描述符传给客户端,客户端再将文件描述符映射到自身进程的地址空间,这里的关键是binder,因为是由binder驱动把两个进程的文件描述符关联起来的。GraphicBuffer传递文件描述符是通过writeToParcel函数完成的,读取是在GraphicBuffer构造函数中完成的。
回到ViewRoot的draw的函数中,接下来分析调用unlockCanvasAndPost的过程,
unlockCanvasAndPost是一个native函数,实现如下:
    static void Surface_unlockCanvasAndPost(
        JNIEnv * env, jobject clazz, jobject argCanvas)
    {
        jobject canvas = env->GetObjectField(clazz, so.canvas);

        const sp &surface(getSurface(env, clazz));

        // detach the canvas from the surface
        SkCanvas *nativeCanvas = (SkCanvas *)env->GetIntField(canvas, no.native_canvas);
        int saveCount = env->GetIntField(clazz, so.saveCount);
        nativeCanvas->restoreToCount(saveCount);
        nativeCanvas->setBitmapDevice(SkBitmap());
        env->SetIntField(clazz, so.saveCount, 0);

        // unlock surface
        status_t err = surface->unlockAndPost();
    }
调用了Surface的unlockAndPost,如下所示:
    status_t Surface::unlockAndPost()
    {
        status_t err = mLockedBuffer->unlock();
        err = queueBuffer(mLockedBuffer.get());

        mPostedBuffer = mLockedBuffer;
        mLockedBuffer = 0;
        return err;
    }
调用了queueBuffer,定义如下:
    int Surface::queueBuffer(android_native_buffer_t * buffer)
    {
        sp client(getClient());

        int32_t bufIdx = GraphicBuffer::getSelf(buffer)->getIndex();
        mSharedBufferClient->setDirtyRegion(bufIdx, mDirtyRegion);
        err = mSharedBufferClient->queue(bufIdx);

        client->signalServer();
        return err;
    }
最后通过signalServer通知SurfaceFlinger来合成输出,如下所示:
    void SurfaceComposerClient::signalServer()
    {
        mSignalServer->signal();
    }
小结
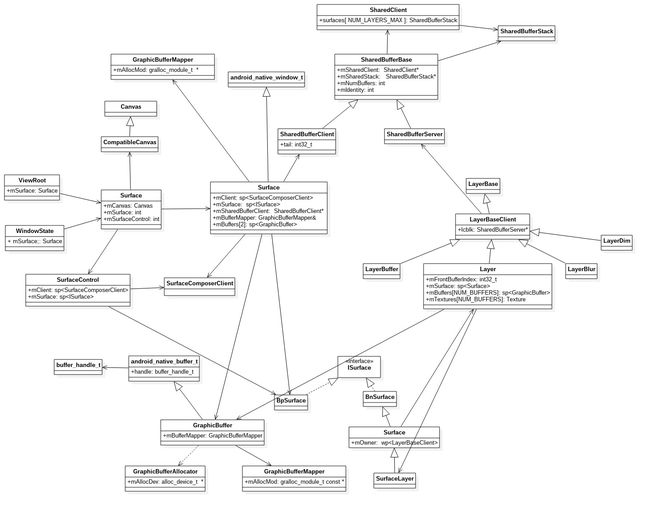
step30到step123,其实就是创建Surface、创建GraphicBuffer、绘制的过程,应用程序进程通过WMS向SurfaceFlinger申请分配Surface,在WMS这端创建了一个Surface对象(包含native层的SurfaceControl对象),在应用程序这端也创建了一个Surface对象(包含native层的Surface对象),在SurfaceFlinger这端创建了代表Surface的Layer以及SurfaceLayer对象,应用程序创建好Surface之后,就可以通过ISurface接口直接向SurfaceFlinger申请分配GraphicBuffer,对于软件实现的GraphicBuffer,就是创建一块匿名共享内存,然后分别映射到SurfaceFlinger进程和应用程序进程,应用程序进程申请到GraphicBuffer后,就可以使用OpenGL或者Skia接口随意的绘制了,绘制完成后就可以通知SurfaceFlinger合成输出到FrameBuffer了。
通过以上分析,应用程序进程和SurfaceFlinger涉及的主要类如下所示:
