介绍
本文将介绍通过jenkins+robotframework+allure report来打造美观可视化的测试报告
首先,安装如下库:
sudo pip install robotframework
sudo pip install allure-robotframework
搭建
步骤 0
下面是一个基本的RF样例
$ more mytest.robot

*** Settings ***
Library    OperatingSystem

*** Variables ***
${MESSAGE}  Hello, world!

*** Test Cases ***
My Test
  [Documentation]  Example test
  Log  ${MESSAGE}
  My Keyword  /tmp

Another Test
  Should Be Equal  ${MESSAGE}  Hello, world!

*** Keywords ***
My Keyword
  [Arguments]  ${path}
  Directory Should Exist  ${path}
我们来运行这个测试用例来生成经典的HTML 格式报告以及JSON格式的Allure报告
$ robot --listener allure_robotframework --outputdir ./output/robot mytest.robot
==============================================================================
Mytest
==============================================================================
My Test :: Example test                                               | PASS |
------------------------------------------------------------------------------
Another Test                                                          | PASS |
------------------------------------------------------------------------------
Mytest                                                                | PASS |
2 critical tests, 2 passed, 0 failed
2 tests total, 2 passed, 0 failed
==============================================================================
Output:  /home/.../linkedinTest/output/robot/output.xml
Log:     /home/.../linkedinTest/output/robot/log.html
Report:  /home/.../linkedinTest/output/robot/report.html

$ ls output/
allure  robot
经典HTML报告在接下来的截图上有给出。
步骤 1
我们也可以在同一台机器上生成HTML格式的Allure Report (以CentOS7为例)
$ yum install epel-release
$ yum update
$ yum install git java-1.8.0-openjdk.x86_64
$ cd /tmp
$ wget https://bintray.com/qameta/generic/download_file?file_path=io%2Fqameta%2Fallure%2Fallure%2F2.6.0%2Fallure-2.6.0.tgz
$ tar xvf download_file\?file_path\=io%2Fqameta%2Fallure%2Fallure%2F2.6.0%2Fallure-2.6.0.tgz
$ sudo mv allure-2.6.0/ /usr/bin/allure
$ cd /usr/bin/allure/

# Add on .bashrc and then relog again
# export PATH=$PATH:/usr/bin/allure/bin
接下来安装apache2
$ sudo yum install httpd
$ sudo systemctl enable httpd.service
$ sudo systemctl restart httpd.service
现在我们可以用以下方式来生成HTML报告
$ sudo env "PATH=$PATH" allure generate ./output/allure --clean -o /var/www/html/allure
Report successfully generated to /var/www/html/allure
生成成功以后,就可以登录 http://localhost/allure 来查看美观的HTML报告了。
步骤 2
Allure也支持报告的历史记录,但是必须集成你的工作流到GIT和Jenkins中。首先,我们新增一个Jenkinsfile:
$ more Jenkinsfile
timeout(time: 5, unit: 'MINUTES') {
    node {
           def workspace = pwd()

           stage("Cleaning workspace") {
              sh "rm -rf ${workspace}/*"
           }

           stage('Git pull') {
              checkout scm
           }

           stage('robot'){
               sh 'robot allure_robotframework --outputdir ./output/robot mytest.robot || true'
           }

           /* disabled: false --> history ON */
           /* disabled: true --> history OFF */
           stage('allure'){
               allure([
                  disabled: false,
                  includeProperties: false,
                  jdk: '',
                  reportBuildPolicy: 'ALWAYS',
                  results: [[path: 'output/allure']]
               ])
           }
    }
}
最后,保存所有文件到git上:
$ echo output > .gitignore
$ git add --all
$ git commit -m "first"
$ git push origin master
To https:// ... /linkedinTest.git
   5db3474..0d30ec9  master -> master
接下来,我们来安装Jenkins并且进行配置:
$ sudo wget -O /etc/yum.repos.d/jenkins.repo http://pkg.jenkins-ci.org/redhat/jenkins.repo
$ sudo rpm --import https://jenkins-ci.org/redhat/jenkins-ci.org.key
$ sudo yum install jenkins
$ sudo service jenkins start
$ sudo chkconfig jenkins on

# Finalize the install process browsing http://localhost:8080
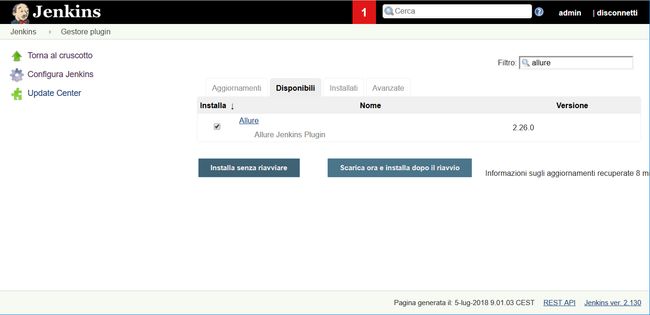
最后,添加并配置Allure 插件:
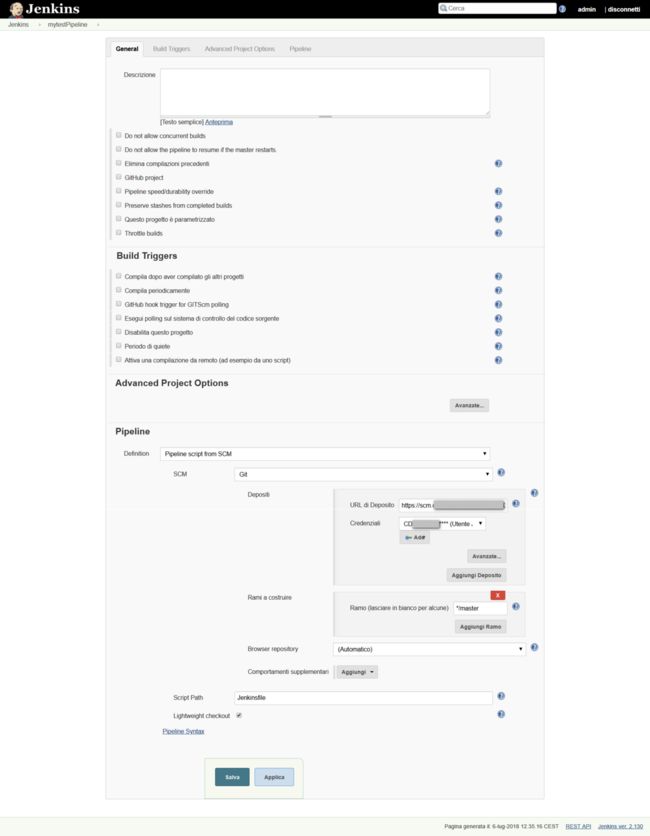
现在,你可以创建一个新的流水线:
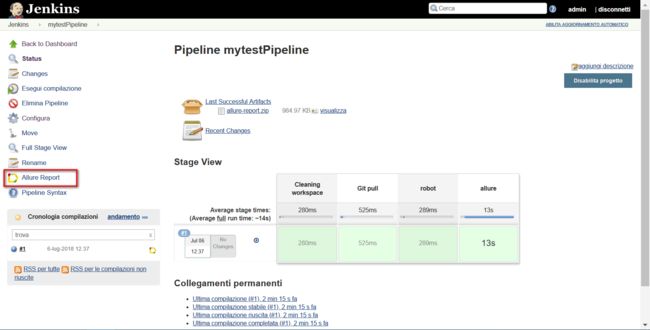
然后,我们运行第一个Job.如果你重新加载了该页面,你会看到Allure Report的图标已经显示:
试着运行几次流水线,然后点击Allure Report图标,你会看到报告的历史记录信息!
恭喜你,完成了!
大家也可以加入RobotFramework社区来交流学习。
同时我们也可以在阿里云上部署Jenkins服务器,集成robotframework与allure report, 点击访问阿里云 https://promotion.aliyun.com/ntms/yunparter/invite.html?userCode=vewhq43i


