shiro是一个权限框架,具体的使用可以查看其官网
官网地址:https://shiro.apache.org/
Shiro是Apache下的一个开源项目,我们称之为Apache Shiro。它是一个很易用与Java项目的的安全框架,提供了认证、授权、加密、会话管理,与 Spring Security 一样都是做一个权限的安全框架,但是与Spring Security 相比,在于 Shiro 使用了比较简单易懂易于使用的授权方式。
而springboot作为一个开源框架,必然提供了和shiro整合的功能!
1.创建springboot项目
主要引入Mybatis、Shiro、Web、MySQL和
thymeleaf,由于页面实现我是使用thymeleaf模板,还有lombok来简化实体类代码
这里还需要引入nekohtml,因为thymeleaf校验html文件的时候会特别严格,比如 必须加上/结尾,这里需要依赖nekohtml
            org.mybatis.spring.boot
            mybatis-spring-boot-starter
            1.3.1


            org.springframework.boot
            spring-boot-starter-thymeleaf


            net.sourceforge.nekohtml
            nekohtml
            1.9.22


            org.springframework.boot
            spring-boot-starter-web


            mysql
            mysql-connector-java
            runtime


            org.projectlombok
            lombok
            true


            org.apache.shiro
            shiro-all
            1.4.0
            pom


            org.springframework.boot
            spring-boot-starter-test
            test
2.设计数据库表
不需要设置任何外键
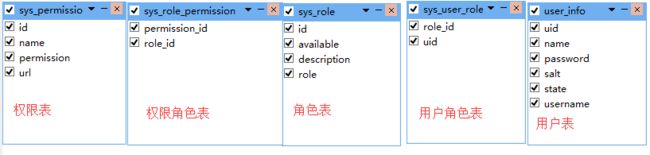
创建完表肯定要插入一些预备数据
INSERT INTO `user_info` VALUES ('1', '管理员', 'd3c59d25033dbf980d29554025c23a75', '8d78869f470951332959580424d4bf4f', '1', 'admin');
INSERT INTO `sys_user_role` VALUES ('1', '1');
INSERT INTO `sys_role_permission` VALUES ('1', '1');
INSERT INTO `sys_role_permission` VALUES ('2', '1');
INSERT INTO `sys_role` VALUES ('1', '1', '管理员', 'admin');
INSERT INTO `sys_role` VALUES ('2', '1', 'VIP会员', 'vip');
INSERT INTO `sys_permission` VALUES ('1', '用户管理', 'userInfo:view', 'userInfo/userList');
INSERT INTO `sys_permission` VALUES ('2', '用户添加', 'userInfo:add', 'userInfo/userAdd');
INSERT INTO `sys_permission` VALUES ('3', '用户删除', 'userInfo:del', 'userInfo/userDel');
3.application.yml文件的配置
spring:
    datasource:
      url: jdbc:mysql://localhost:3306/test1
      username: 数据库用户名
      password: 数据库密码
      driver-class-name: com.mysql.jdbc.Driver
    thymeleaf:
       cache: false
       mode: LEGACYHTML5
mybatis:
  type-aliases-package: com.pjb.entity
  mapper-locations: classpath*:com.pjb.mapper/*.xml
4.实体类的编写
用lombok使实体类变得简单
用户实体类
@Data
@AllArgsConstructor
@NoArgsConstructor
public class UserInfo {
    Integer uid;//用户id
    String username;//帐号
    String name;
    String password;
    String salt;
    byte state;
    /**
     * 密码盐.
     * @return
     */
    public String getCredentialsSalt(){

        return this.username+this.salt;
    }
}
角色实体类
@Data
@AllArgsConstructor
@NoArgsConstructor
public class SysRole {
    Integer id;
    String role;//角色标识程序中判断使用,如"admin",这个是唯一的:
    String description; // 角色描述
    private Boolean available = Boolean.FALSE; // 是否可用,如果不可用将不会添加给用户
}
权限实体类
@Data
@AllArgsConstructor
@NoArgsConstructor
public class SysPermission {
    Integer id;//主键.
    String name;//名称.
    String url;//资源路径.
    String permission; //权限字符串
}
5.mapper接口和xml文件
用户mapper接口
@Component
public interface UserInfoMapper {
    //通过username查找用户角色信息
    UserInfo findByUsername(@Param("username") String username);
}
角色mapper接口,一个用户对应多个角色
@Component
public interface SysRoleMapper {
    //通过username查找用户角色信息
    List findRoleByUsername(@Param("username") String username);
}
权限mapper接口,一个角色对应多个权限
@Component
public interface SysPermissionMapper {
    //根据角色ID查询角色对应的权限信息
    List findPermissionByRoleId(@Param("roleId") Integer roleId);
}
对应的mapper.xml文件,这里最最最重要的就是SQL语句
UserInfoMapper.xml这个查询很简单,并没有用到多表查询
下面都用到了多表查询,sql水平比较弱的可以用navicat去生成sql语句
这里都没有用到外键
SysRoleMapper.xml主要用到用户表,角色表和用户角色关联表
SysPermissionMapper.xml主要用到角色表,权限表和角色权限表
6.简单的用户service层
public interface UserInfoService {
    /**通过username查找用户信息;*/
    UserInfo findByUsername(String username);
}
对应的service实现类
@Service("UserInfoService")
public class UserInfoServiceImpl implements UserInfoService {
    @Autowired
    UserInfoMapper userInfoMapper;
    @Override
    public UserInfo findByUsername(String username) {
        return userInfoMapper.findByUsername(username);
    }
}
7.自定义shiro配置
Realm是一个Dao,通过它来验证用户身份和权限。只需要从我们的数据源中把用户和用户的角色权限信息取出来交给Shiro即可。
MyShiroRealm类,继承AuthorizingRealm抽象类。
实现里面的两个方法认证与授权
public class MyShiroRealm extends AuthorizingRealm {
    @Autowired
    UserInfoService userInfoService;
    @Autowired
    SysRoleMapper sysRoleMapper;
    @Autowired
    SysPermissionMapper sysPermissionMapper;
    @Override
    protected AuthorizationInfo doGetAuthorizationInfo(PrincipalCollection principal) {
        System.out.println("权限配置-->MyShiroRealm.doGetAuthorizationInfo()");
        SimpleAuthorizationInfo authorizationInfo = new SimpleAuthorizationInfo();
        UserInfo userInfo  = (UserInfo)principal.getPrimaryPrincipal();
        sysRoleMapper.findRoleByUsername(userInfo.getUsername()).stream().forEach(
                sysRole -> {
                    authorizationInfo.addRole(sysRole.getRole());
                    sysPermissionMapper.findPermissionByRoleId(sysRole.getId()).stream().forEach(
                            sysPermission -> {
                                authorizationInfo.addStringPermission(sysPermission.getPermission());
                            }
                    );
                }
        );
        return authorizationInfo;
    }

    @Override
    protected AuthenticationInfo doGetAuthenticationInfo(AuthenticationToken token) throws AuthenticationException {
        System.out.println("MyShiroRealm.doGetAuthenticationInfo()");
        //获取用户的输入的账号.
        String username = (String)token.getPrincipal();
        System.out.println(token.getCredentials());
        //通过username从数据库中查找 User对象,如果找到,没找到.
        //实际项目中,这里可以根据实际情况做缓存,如果不做,Shiro自己也是有时间间隔机制,2分钟内不会重复执行该方法
        UserInfo userInfo = userInfoService.findByUsername(username);
        System.out.println("----->>userInfo="+userInfo);
        if(userInfo == null){
            ////没有返回登录用户名对应的SimpleAuthenticationInfo对象时,就会在LoginController中抛出UnknownAccountException异常
            return null;
        }
        SimpleAuthenticationInfo authenticationInfo = new SimpleAuthenticationInfo(
                userInfo, //用户名
                userInfo.getPassword(), //密码
                ByteSource.Util.bytes(userInfo.getCredentialsSalt()),//salt=username+salt
                getName()  //realm name
        );
        return authenticationInfo;
    }
}
authorizationInfo.addRole()是添加角色的方法
authorizationInfo.addStringPermission()是添加权限的方法
这里我用到了java8函数式编程,替代原本的foreach循环。
配置的是ShiroConfig类
Apache Shiro 核心通过 Filter 来实现,就好像SpringMvc 通过DispachServlet 来主控制一样。
既然是使用 Filter 一般也就能猜到,是通过URL规则来进行过滤和权限校验,所以我们需要定义一系列关于URL的规则和访问权限。
ShiroConfig这里需要声明成一个配置类(加入@Configuration),不然不会拦截
@Configuration
public class ShiroConfig {
    @Bean
    public ShiroFilterFactoryBean shiroFilterFactoryBean(SecurityManager securityManager) {

        ShiroFilterFactoryBean shiroFilterFactoryBean = new ShiroFilterFactoryBean();
        shiroFilterFactoryBean.setSecurityManager(securityManager);

        Map filterChainDefinitionMap = new LinkedHashMap<>();
        filterChainDefinitionMap.put("/logout", "logout");
        filterChainDefinitionMap.put("/index", "user");
        filterChainDefinitionMap.put("/", "user");
        filterChainDefinitionMap.put("/favicon.ico", "anon");
        filterChainDefinitionMap.put("/**", "authc");
        //authc表示需要验证身份才能访问,还有一些比如anon表示不需要验证身份就能访问等。
        shiroFilterFactoryBean.setLoginUrl("/login");
        shiroFilterFactoryBean.setSuccessUrl("/index");
  shiroFilterFactoryBean.setFilterChainDefinitionMap(filterChainDefinitionMap);
        return shiroFilterFactoryBean;
    }


    //SecurityManager 是 Shiro 架构的核心,通过它来链接Realm和用户(文档中称之为Subject.)
    @Bean
    public SecurityManager securityManager() {
        DefaultWebSecurityManager securityManager = new DefaultWebSecurityManager();
        securityManager.setRealm(myShiroRealm()); //将Realm注入到SecurityManager中。
        securityManager.setCacheManager(ehCacheManager()); //注入缓存对象。
        securityManager.setRememberMeManager(cookieRememberMeManager()); //注入rememberMeManager;
        return securityManager;
    }

    @Bean
    public MyShiroRealm myShiroRealm() {
        MyShiroRealm myShiroRealm = new MyShiroRealm();
        myShiroRealm.setCredentialsMatcher(hashedCredentialsMatcher()); //设置解密规则
        return myShiroRealm;
    }

    //因为我们的密码是加过密的,所以,如果要Shiro验证用户身份的话,需要告诉它我们用的是md5加密的,并且是加密了两次。同时我们在自己的Realm中也通过SimpleAuthenticationInfo返回了加密时使用的盐。这样Shiro就能顺利的解密密码并验证用户名和密码是否正确了。
    @Bean
    public HashedCredentialsMatcher hashedCredentialsMatcher() {
        HashedCredentialsMatcher hashedCredentialsMatcher = new HashedCredentialsMatcher();
        hashedCredentialsMatcher.setHashAlgorithmName("md5");//散列算法:这里使用MD5算法;
        hashedCredentialsMatcher.setHashIterations(2);//散列的次数,比如散列两次,相当于 md5(md5(""));
        return hashedCredentialsMatcher;
    }
    /**
     *  开启shiro aop注解支持.
     *  使用代理方式;所以需要开启代码支持;
     * @param securityManager
     * @return
     */
    @Bean
    public AuthorizationAttributeSourceAdvisor authorizationAttributeSourceAdvisor(SecurityManager securityManager){
        AuthorizationAttributeSourceAdvisor authorizationAttributeSourceAdvisor = new AuthorizationAttributeSourceAdvisor();
        authorizationAttributeSourceAdvisor.setSecurityManager(securityManager);
        return authorizationAttributeSourceAdvisor;
    }
    @Bean
    public SimpleMappingExceptionResolver resolver() {
        SimpleMappingExceptionResolver resolver = new SimpleMappingExceptionResolver();
        Properties properties = new Properties();
        properties.setProperty("org.apache.shiro.authz.UnauthorizedException", "/403");
        resolver.setExceptionMappings(properties);
        return resolver;
    }
    @Bean
    public EhCacheManager ehCacheManager() {
        System.out.println("ShiroConfiguration.getEhCacheManager()");
        EhCacheManager ehCacheManager = new EhCacheManager();
        ehCacheManager.setCacheManagerConfigFile("classpath:ehcache-shiro.xml");
        return ehCacheManager;
    }
    //cookie对象;
    @Bean
    public SimpleCookie rememberMeCookie() {
        System.out.println("ShiroConfiguration.rememberMeCookie()");
        //这个参数是cookie的名称,对应前端的checkbox的name = rememberMe
        SimpleCookie simpleCookie = new SimpleCookie("rememberMe");

        //
        simpleCookie.setMaxAge(259200);
        return simpleCookie;
    }

    //cookie管理对象;
    @Bean
    public CookieRememberMeManager cookieRememberMeManager() {
        System.out.println("ShiroConfiguration.rememberMeManager()");
        CookieRememberMeManager manager = new CookieRememberMeManager();
        manager.setCookie(rememberMeCookie());
        return manager;
    }
}
①开启Shiro AOP注解支持
因为只有开启了AOP才执行doGetAuthorizationInfo(),也就权限拦截
②我们开启了缓存
也就是授权只会进行一次,这样就避免了重复授权
@Bean
    public EhCacheManager ehCacheManager() {
        System.out.println("ShiroConfiguration.getEhCacheManager()");
        EhCacheManager ehCacheManager = new EhCacheManager();
        ehCacheManager.setCacheManagerConfigFile("classpath:ehcache-shiro.xml");
        return ehCacheManager;
    }
然后将缓存对象注入到SecurityManager中就可以了
③需要配置记住密码
正常登录后关闭浏览器,再打开浏览器输入http://localhost:8080/index,这时候就可以直接访问index页面,不需要再登录了。
需要加入两个bean
//cookie对象;
    @Bean
    public SimpleCookie rememberMeCookie() {
        System.out.println("ShiroConfiguration.rememberMeCookie()");
        //这个参数是cookie的名称,对应前端的checkbox的name = rememberMe
        SimpleCookie simpleCookie = new SimpleCookie("rememberMe");

        //
        simpleCookie.setMaxAge(259200);
        return simpleCookie;
    }

    //cookie管理对象;
    @Bean
    public CookieRememberMeManager cookieRememberMeManager() {
        System.out.println("ShiroConfiguration.rememberMeManager()");
        CookieRememberMeManager manager = new CookieRememberMeManager();
        manager.setCookie(rememberMeCookie());
        return manager;
    }
同样将其注入到SecurityManager中就可以了
在ShiroFilterFactoryBean中添加记住我过滤器user,添加user过滤器的资源在记住我或认证之后就可以直接访问了。
filterChainDefinitionMap.put("/index", "user");
        filterChainDefinitionMap.put("/", "user");
在login.html页面添加记住我单选框
记住我
以上三点我认为AOP是必须加的,不然怎样进行权限认证呢,其他两点自己选择,不需要的可以把相关代码去掉
加入controller
HomeController
@Controller
public class HomeController {
    @RequestMapping({"/","/index"})
    public String index(){
        return"/index";
    }

    // 这里如果不写method参数的话,默认支持所有请求,如果想缩小请求范围,还是要添加method来支持get, post等等某个请求。
    @RequestMapping("/login")
    public String login(HttpServletRequest request, Map map) throws Exception {

        System.out.println("HomeController.login");

        // 登录失败从request中获取shiro处理的异常信息。
        // shiroLoginFailure:就是shiro异常类的全类名.
        Object exception = request.getAttribute("shiroLoginFailure");
        String msg = "";
        if (exception != null) {
            if (UnknownAccountException.class.isInstance(exception)) {
                System.out.println("账户不存在");
                msg = "账户不存在或密码不正确";
            } else if (IncorrectCredentialsException.class.isInstance(exception)) {
                System.out.println("密码不正确");
                msg = "账户不存在或密码不正确";
            } else {
                System.out.println("其他异常");
                msg = "其他异常";
            }
        }

        map.put("msg", msg);
        // 此方法不处理登录成功,由shiro进行处理.
        return "login";
    }

    @RequestMapping("/403")
    public String unauthorizedRole(){
        System.out.println("------没有权限-------");
        return "403";
    }
}
没有权限的操作将会跳转到403页面,没登录的操作将会强制跳转到登录界面
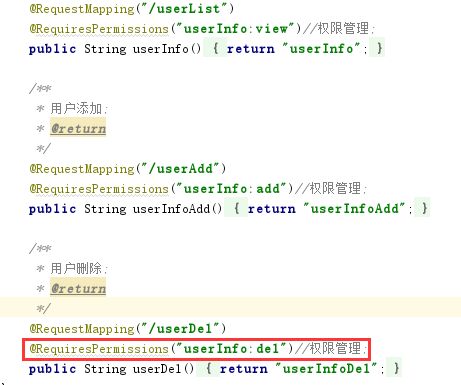
UserInfoController
@Controller
@RequestMapping("/userInfo")
public class UserInfoController {
    /**
     * 用户查询.
     * @return
     */
    @RequestMapping("/userList")
    @RequiresPermissions("userInfo:view")//权限管理;
    public String userInfo(){
        return "userInfo";
    }

    /**
     * 用户添加;
     * @return
     */
    @RequestMapping("/userAdd")
    @RequiresPermissions("userInfo:add")//权限管理;
    public String userInfoAdd(){
        return "userInfoAdd";
    }

    /**
     * 用户删除;
     * @return
     */
    @RequestMapping("/userDel")
    @RequiresPermissions("userInfo:del")//权限管理;
    public String userDel(){
        return "userInfoDel";
    }
}
权限操作的接口
@RequiresPermissions:当前Subject需要拥有某些特定的权限时,才能执行被该注解标注的方法。如果当前Subject不具有这样的权限,则方法不会被执行。
测试
打开浏览器
如果未登录的话可以定义到http://localhost:8080/login
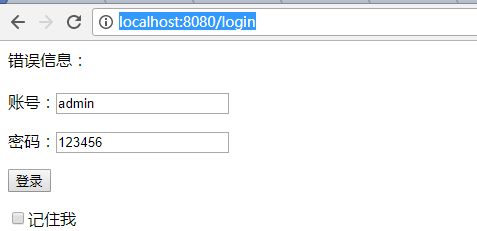
点了记住我的话关闭浏览器之后再次打开就不用再次登录
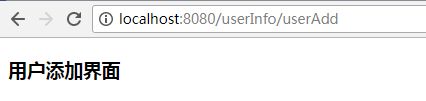
权限判断
在上面添加的测试数据中我们可以看到用户删除是没权限访问的
当访问没有权限的页面时会弹出我们配置403页面

但是访问
/userAdd和/userList就可以

源码github地址:https://github.com/JinBinPeng/Springboot-Mybatis-Shiro
参考作者:http://www.jianshu.com/u/d745fc4c5cc5