首先,大家关注我的个人微信公众号 ”物联网连接器“
然后,根据公众号的指引,先发送注册指令完成注册: "reg 英文帐号名 6位以上密码"
然后在微信上测试一下set 和 get命令。
set 命令是向数据库设置一对key value值,比如说输入 "set light on"。那么数据库里就有了light变量,值为on.
get 命令是读取数据库的值,假如之前输入过"set light on",那么输入"get light"的话,微信会返回"on"
通过 set 和 get 命令,理论上我们可以顺利的完成状态上传读取,反控等一切操作。
物联网设备那边的连接过程和命令格式如下:
1、连接我服务器的9000号端口。 url: iotbomb.com port: 9000
2、向服务器send命令 "帐号名 密码\r\n set light on\r\n",就设置了数据库的light 变量为on。\r\n是命令分隔符,每个命令都是有两对\r\n的。
3、向服务器send命令"帐号名 密码\r\n get light\r\n",就能读取到数据库的light变量。
优点:
1、命令极度简便,没有http的各种复杂解析,适合物联网设备。
2、全平台,不需要库,只要能联网的设备都能接入。3、极度灵活,以数据库的get set 操作来做数据中转,理论上能把实现任何设备的互联逻辑。
python 样例:
假设我有帐号为iotbomb 密码为111111
import socket
s = socket.socket(socket.AF_INET, socket.SOCK_STREAM)
s.connect(("iotbomb.com", 9000))
s.send("iotbomb 111111\r\nset light on\r\n");
print s.recv(1024)
执行一下,结果是
get 样例:
telnet 样例:
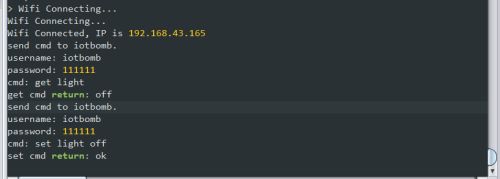
淘宝上买的esp8266-12F型板,使用nodemcu固件, 连接物联网连接器,然后用微信控制亮灯的样例。代码如下:
user_name = "iotbomb" -- 在微信上注册的名字user_password = "111111" --·在微信上注册的密码
server_url = "iotbomb.com" --url,不用改
wifi_name = "LG-D857" -- 你的wifi热点名字
wifi_password = "11111111" --你的wif热点i密码
function do_iotbomb_cmd(name,password,cmd, cb_func)
conn=net.createConnection(net.TCP, 0)
conn:on("receive", function(conn, msg)
cb_func(msg)
conn:close()
conn=nil
end)
conn:on("connection", function(sck, c)
print("send cmd to iotbomb. \nusername: "..name.."\npassword: "..password.."\ncmd: "NaNd)
conn:send(name.." "..password.."\r\n"NaNd.."\r\n")
tmr.delay(2000000)
end)
conn:connect(9000, "iotbomb.com")
end
function loop()
tmr.alarm(1, 5000, 1, function()
do_iotbomb_cmd(user_name,user_password,"get light", function(msg)
print("get cmd return: "..msg)
if(msg == "off") then
gpio.write(0, gpio.HIGH)
elseif(msg == "on") then
gpio.write(0, gpio.LOW)
end
end)
end)
end
wifi.setmode(wifi.STATION)
wifi.sta.config(wifi_name,wifi_password)
wifi.sta.connect()
tmr.alarm(1, 1000, 1, function()
if wifi.sta.getip() == nil then
print("Wifi Connecting...")
else
tmr.stop(1)
print("Wifi Connected, IP is "..wifi.sta.getip())
loop()
end
end)
nodemcu + esp8266 结果截图:
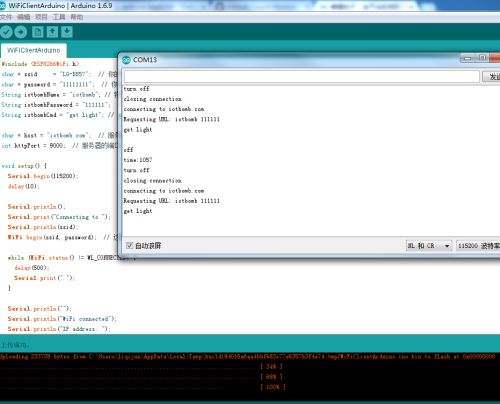
淘宝上买的esp8266-12F型板,使用arduion IDE,连接互联网连接器,用微信控制灯的样例:(帖子的6楼补充了使用配置方法)
#include
char * ssid = "LG-D857"; // 你的热点名字
char * password = "11111111"; // 你的热点密码
String iotbombName = "iotbomb"; // 物联网连接器的帐号
String iotbombPassword = "111111"; //物联网连接器的密码
String iotbombCmd = "get light"; // 要执行的命令
char * host = "iotbomb.com"; // 服务器的url,不用变
int httpPort = 9000; // 服务器的端口,不用变
void setup() {
Serial.begin(115200);
delay(10);
Serial.println();
Serial.print("Connecting to ");
Serial.println(ssid);
WiFi.begin(ssid, password); // 这里连接wifi
while (WiFi.status() != WL_CONNECTED) {
delay(500);
Serial.print(".");
}
Serial.println("");
Serial.println("WiFi connected");
Serial.println("IP address: ");
Serial.println(WiFi.localIP());
pinMode(LED_BUILTIN, OUTPUT);
}
void loop() {
delay(5000);
Serial.print("connecting to ");
Serial.println(host);
WiFiClient client;
if (!client.connect(host, httpPort)) { // 这里连接服务器
Serial.println("connection failed");
return;
}
String cmd = iotbombName + " " + iotbombPassword + "\r\n" + iotbombCmd + "\r\n";
Serial.print("Requesting URL: ");
Serial.println(cmd);
client.print(cmd); // 这一行是发送命令到服务器
// 这里设置超时,超过30秒不返回,就重试
unsigned long timeout = millis();
while (client.available() == 0) {
if (millis() - timeout > 30000) {
Serial.println(">>> Client Timeout !");
client.stop();
return;
}
}
while(client.available()){ //数据返回了。
String data = client.readStringUntil('\0'); // 把数据都读出来
Serial.println(data);
Serial.print("time:");
Serial.println(millis() - timeout);
if(data == "off")
{
Serial.println("turn off");
digitalWrite(LED_BUILTIN, HIGH);
}
if(data == "on")
{
Serial.println("turn on");
digitalWrite(LED_BUILTIN, LOW);
}
}
Serial.println("closing connection");
}
最后,附上ESP8266 使用 arduion编程的方法:
其实我觉得 esp8226-12E型的板子完全可以替代arduion开发板,22块钱一块,天生带wifi,gpio,pwm等,该有的都有。
这里补充一下esp8226-12E型的板子怎样用arduion编程。
1、当然是先打开arduion(我的是1.6.9版)。
2、选择文件->首选项,修改附加开发板管理器网址。增加一行:http://arduino.esp8266.com/stable/package_esp8266com_index.json
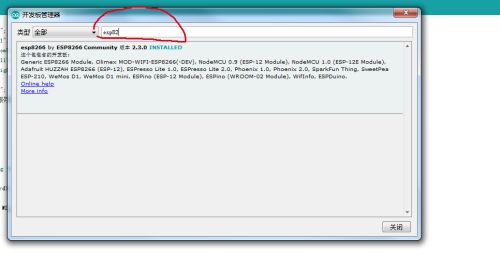
3、选择工具->开发板->开发板管理器,搜索esp8266。
4、点击安装,比较慢。
5、安装完后就可以选择开发板:nodemcu 1.0了。
6、粘贴我的代码就可以测试了。
