白塞尔...
利用Bezier可以对一些不规则图形或者不规则的动画都能做到一些很好的处理....
关于Bezier绘制长方形,圆形,弧线,线条上都有很多学习资料供大家学习...
感谢....
我参考的是:
http://www.jianshu.com/p/999ad5ae6edf
http://www.jianshu.com/p/281373b6d1a8
重复的我就不写了...
记一下我学习过程中碰到的问题...
UIBazierPath一般和CAShapeLayer配合使用的...
我不清楚有没有类似Shape一样的东西...
如果Bezier需要单独去绘图的话...
需要在重写bezier所在视图的drawRect方法...
例如...
    UIBezierPath * path1 = [UIBezierPath bezierPath];
    path1.lineWidth = 10;
    path1.lineCapStyle = kCGLineCapRound;

    [path1 moveToPoint:CGPointMake(10, 10)];
    [path1 addLineToPoint:CGPointMake(100, 100)];

    [[UIColor redColor] setStroke];

    [path1 stroke];
但是如果你重写了drawrect之后你是没办法动态改变这个view的背景颜色...
参考:
http://blog.csdn.net/xyzdm123/article/details/46891001
里面说重写backgroundcolor方法可以...
但是我试了无效...
找不到方法...
如果有办法 希望留言告知...
初始设置颜色...
-(void)drawRect:(CGRect)rect
{
    [[UIColor lightGrayColor] setFill];
    UIRectFill(rect);
}
再说一下UIColor的几个方法...
在设置Bezierpath过程中都可以用到....
边框、线条、字符的颜色...
     [[UIColor blackColor] setStroke];    // 设置边框颜色
     [[UIColor blueColor] setFill];      // 设置背景填充色
     [[UIColor greenColor] set];        // 设置字符颜色
使用...
在设置bezier的路径颜色的时候...
 [[UIColor blackColor] setStroke];
// [[UIColor greenColor] set];  这两个效果是一样的
[path stroke];
在设置bezier的填充颜色的时候....
 [[UIColor blackColor] setFill];
// [[UIColor greenColor] set];  这两个效果是一样的
[path fill];
使用-聊天泡泡...
参考...
http://www.jianshu.com/p/c3af3e37c95f
以前聊天泡泡都是让UI切一个图然后自己根据要求拉伸...
如果箭头在左右两边还好如果在中间的话...
拉伸会变形...
之前的做法是切三部分的图.左右拉伸中间不动...
但是这样子很麻烦...
用bezier就可以很好的解决这个问题...
通过线.圆.弧线.可以一点一旦拼接出来一个你想要的图案...
例如...
    CGFloat w = CGRectGetWidth(rect) - 10;
    CGFloat h = CGRectGetHeight(rect) - 10;

    CGFloat radius = 8;
    CGFloat angleWidth = 6;

    UIBezierPath *bezierPath = [UIBezierPath bezierPath];
    bezierPath.lineWidth = 1;
    bezierPath.lineCapStyle = kCGLineCapRound;
    bezierPath.lineJoinStyle = kCGLineJoinRound;

    [bezierPath moveToPoint:CGPointMake(w-angleWidth,h-radius)];
    [bezierPath addArcWithCenter:CGPointMake(w-radius-angleWidth, h-radius) radius:radius startAngle:0 endAngle:M_PI/2 clockwise:YES];
    [bezierPath addArcWithCenter:CGPointMake(radius, h-radius) radius:radius startAngle:M_PI/2 endAngle:M_PI clockwise:YES];
    [bezierPath addArcWithCenter:CGPointMake(radius,radius) radius:radius startAngle:M_PI endAngle:3*M_PI/2 clockwise:YES];
    [bezierPath addArcWithCenter:CGPointMake(w-radius-angleWidth, radius) radius:radius startAngle:3*M_PI/2 endAngle:2*M_PI clockwise:YES];
    [bezierPath addLineToPoint:CGPointMake(w-angleWidth,40/2-angleWidth)];
    [bezierPath addLineToPoint:CGPointMake(w, 40/2)];
    [bezierPath addLineToPoint:CGPointMake(w-angleWidth, 40/2+angleWidth)];

    [bezierPath closePath];

    [[UIColor redColor] set];
    [bezierPath stroke];

    [[UIColor orangeColor] set];
    [bezierPath fill];

听说可以用PaintCode可以自动生成bezier代码...
可以试试...
配合CAKeyframeAnimation制作路劲动画....
参考
http://www.jianshu.com/p/4824fc4ce4b0
http://www.jianshu.com/p/daa58c99ee1e
大概流程是这样子...
绘制一个你想要他移动动画的bezier路劲...
设置keyframe动画一些基本设置...
设置bezier的path...
    CAKeyframeAnimation *anim = [CAKeyframeAnimation animationWithKeyPath:@"position"];
    anim.fillMode=kCAFillModeRemoved;
    anim.removedOnCompletion = NO;
    anim.path = bezierPath.CGPath;
    anim.duration = 3;
    anim.repeatCount = 20;
    anim.autoreverses = YES;
    anim.timingFunction = [CAMediaTimingFunction functionWithName:kCAMediaTimingFunctionEaseIn];

    [shapeLayer addAnimation:anim forKey:nil];
具体效果可去demo中首页的UIBezierPath查看...
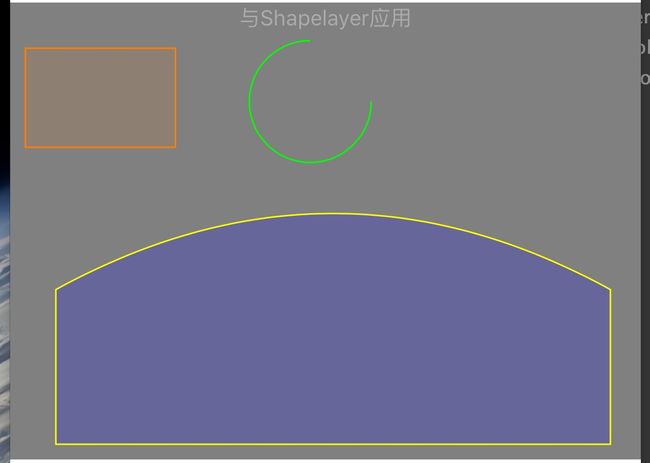
配合CAShapeLayer使用...
shapeLayer是一个layer可以直接加到视图的sublayer中去...
设置很方便...
不需要重写drawrect之类...
CAShapeLayer的fillcolor/strokecolor设置描边和填充...
例如:
    UIBezierPath * path3 = [UIBezierPath bezierPath];
    [path3 moveToPoint:CGPointMake(30, height*0.65)];
    [path3 addLineToPoint:CGPointMake(30, height)];
    [path3 addLineToPoint:CGPointMake(width, height)];
    [path3 addLineToPoint:CGPointMake(width, height*0.65)];
    [path3 addQuadCurveToPoint:CGPointMake(30, height*0.65) controlPoint:CGPointMake((width-30)*0.5+30, height*0.65-100)];

    [path3 closePath];


    CAShapeLayer * layer3 = [[CAShapeLayer alloc] init];
    layer3.fillColor = [[UIColor blueColor] colorWithAlphaComponent:0.2].CGColor;
    layer3.strokeColor = [UIColor yellowColor].CGColor;

    layer3.path = path3.CGPath;

    [superV.layer addSublayer:layer3];
效果:
通过bezier设置阴影的路径
如果有很多视图都用设置了阴影...
指定阴影的路径会解决阴影的卡顿问题...
imageV.layer.shadowPath = [UIBezierPath bezierPathWithRect:imageV.bounds].CGPath;
画波浪线...
原理跟绘制聊天泡泡是一个道理...
可以少了很多不必要的切图...
例如
    CGFloat offY = 30;
    CGFloat offX = 10;

    CGFloat waveWidth = 5;
    CGFloat waveHeight = 5;

    CGFloat width = CGRectGetWidth(self.view.frame)-2*offX;

    CAShapeLayer * layer1 = [[CAShapeLayer alloc] init];
    layer1.lineWidth = 1;
    layer1.fillColor = [UIColor clearColor].CGColor;
    layer1.strokeColor = [UIColor blueColor].CGColor;

    UIBezierPath * path1 = [UIBezierPath bezierPath];
    [path1 moveToPoint:CGPointMake(offX, offY)];
    path1.lineJoinStyle = kCGLineJoinRound;

    for(int i=0; i < width/waveWidth; i++)
    {
        [path1 addLineToPoint:CGPointMake(offX+(i+0.5)*waveWidth, offY)];
        [path1 addLineToPoint:CGPointMake(offX+(i+1)*waveWidth, offY+waveHeight)];
    }
    layer1.path = path1.CGPath;

    [superV.layer addSublayer:layer1];
效果...

Bezier还有很多其他地方可以用到...
现在我还不知道...
后续补充...
共进...