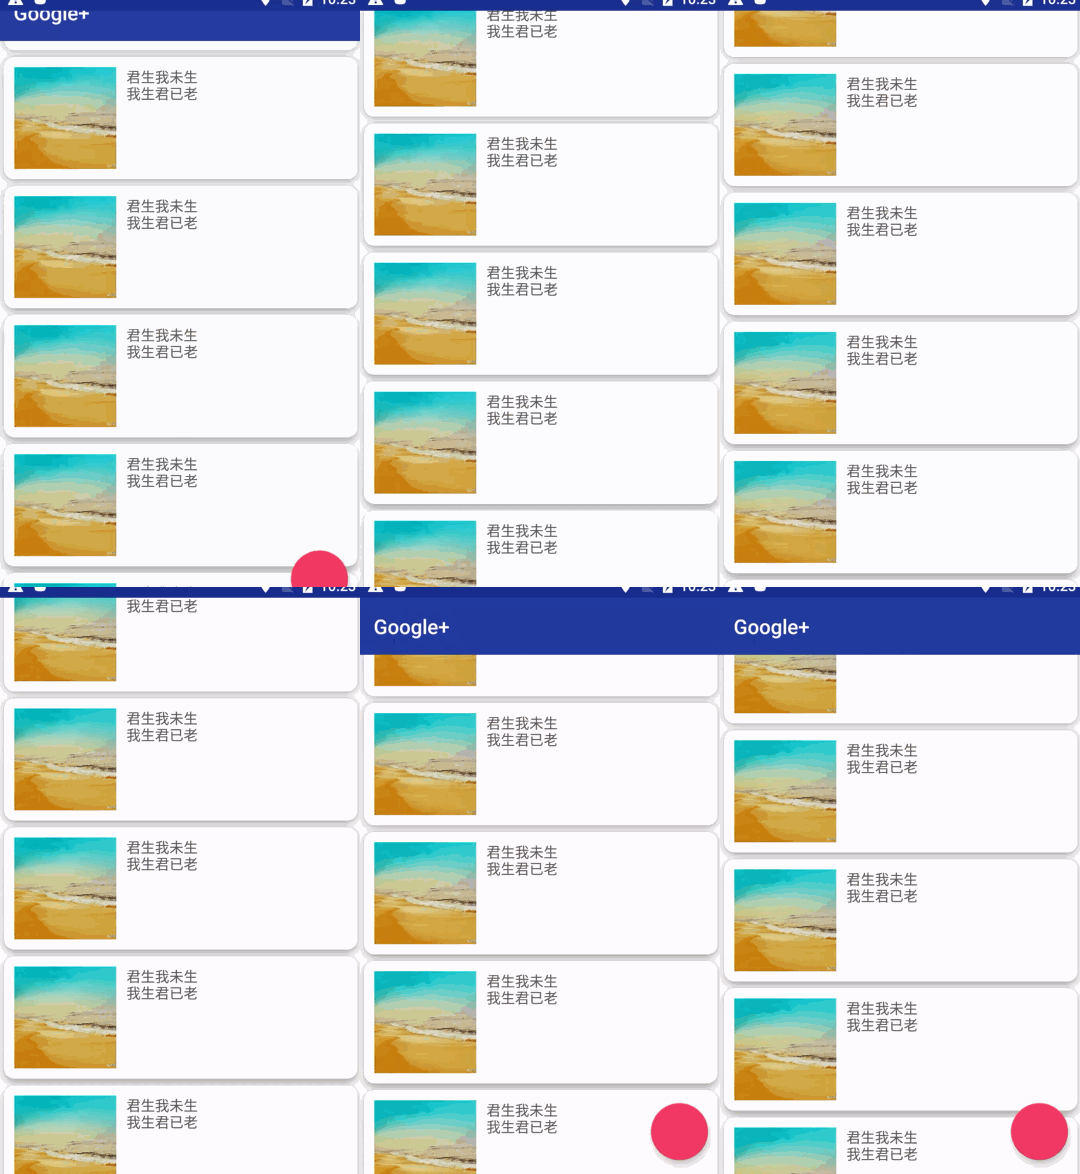
先来看下效果图
本文使用到RecyclerView、CardView、butterknife、FloatingActionBar
这里使用到了为RecyclerView添加header
可以看这篇 BaseRecyclerAdapter处理了header和footer
butterknife的使用看这篇
1、添加依赖
dependencies {
    compile fileTree(include: ['*.jar'], dir: 'libs')
    testCompile 'junit:junit:4.12'
    compile 'com.android.support:appcompat-v7:24.0.0'
    compile 'com.android.support:recyclerview-v7:24.0.0'
    compile 'com.jakewharton:butterknife:8.4.0'
    apt 'com.jakewharton:butterknife-compiler:8.4.0'
    compile 'com.android.support:cardview-v7:24.0.0'
    compile 'com.android.support:design:24.0.0'
    compile 'com.github.bumptech.glide:glide:3.7.0'
}```


####2、定义style
设置为不使用actionbar
####3、布局
主布局
android:layout_width="match_parent"
android:layout_height="match_parent"
xmlns:app="http://schemas.android.com/apk/res-auto"
tools:context=".Activity.MainActivity">
recyclerview的item布局
xmlns:app="http://schemas.android.com/apk/res-auto"
android:layout_width="match_parent"
android:layout_height="wrap_content"
app:cardBackgroundColor="#ffffff"
app:cardCornerRadius="10dp"
app:cardElevation="5dp"
app:contentPadding="10dp">
```
4、recyclerview的adapter
去看看BaseRecyclerAdapter
public class RecyclerAdapter extends BaseRecyclerAdapter {
private Context context;
public RecyclerAdapter(Context context){
this.context=context;
}
@Override
public RecyclerView.ViewHolder onCreate(ViewGroup parent, int viewType) {
return new MyViewHolder(LayoutInflater.from(parent.getContext()).inflate(R.layout.item_google_plus,parent,false));
}
@Override
public void onBind(RecyclerView.ViewHolder viewHolder, int realPosition, DataBean data) {
if (viewHolder instanceof MyViewHolder){
Glide.with(context).load(data.getImageUrl()).into(((MyViewHolder) viewHolder).imageView);
((MyViewHolder) viewHolder).textView.setText(data.getText_content());
}
}
class MyViewHolder extends RecyclerAdapter.Holder {
private ImageView imageView;
private TextView textView;
public MyViewHolder(View itemView) {
super(itemView);
imageView= (ImageView) itemView.findViewById(R.id.iv_card);
textView= (TextView) itemView.findViewById(R.id.tv_card);
}
}
}```
到此为止,先看下效果,会发现recycler顶部被toolbar覆盖了,这就是为什么要添加header的原因

####5、header布局
这里将header的高设置成和toolbar高一样
android:layout_height="wrap_content">
android:layout_height="?attr/actionBarSize"/>
```
6、最后实现隐藏显示
这里的实现思路也比较简单,为recyclerview添加OnScrollListener
recycler向上滚动时dy为正,向下滚动时dy为负数
当recycler向上滑动距离超过设置的默认值并且toolbar可见时,隐藏toolbar和fab
当recycler向下滑动距离超过设置的默认值并且toolbar不可见时,显示toolbar和fab
最后的显示隐藏用属性动画来完成
    recycler.setOnScrollListener(new HideScrollListener());

    class HideScrollListener extends RecyclerView.OnScrollListener{
        private static final int HIDE_HEIGHT=40;
        private int scrolledInstance=0;
        private boolean toolbarVisible=true;

        @Override
        public void onScrollStateChanged(RecyclerView recyclerView, int newState) {
            super.onScrollStateChanged(recyclerView, newState);
        }

        @Override
        public void onScrolled(RecyclerView recyclerView, int dx, int dy) {
            super.onScrolled(recyclerView, dx, dy);
            if ((toolbarVisible&&dy>0)||!toolbarVisible&&dy<0){
                //recycler向上滚动时dy为正,向下滚动时dy为负数
                scrolledInstance+=dy;
            }
            if (scrolledInstance>HIDE_HEIGHT&&toolbarVisible){//当recycler向上滑动距离超过设置的默认值并且toolbar可见时,隐藏toolbar和fab
                onHide();
                scrolledInstance=0;
                toolbarVisible=false;
            }else if (scrolledInstance<-HIDE_HEIGHT&&!toolbarVisible){//当recycler向下滑动距离超过设置的默认值并且toolbar不可见时,显示toolbar和fab
                onShow();
                scrolledInstance=0;
                toolbarVisible=true;
            }
        }
    }

    private void onHide() {
        ObjectAnimator.ofFloat(toolbar,"translationY",0,-toolbar.getHeight()).setDuration(200).start();
        ObjectAnimator.ofFloat(fab,"translationY",0,fab.getHeight()+fab.getPaddingBottom()).setDuration(200).start();
    }

    private void onShow() {
        ObjectAnimator.ofFloat(toolbar,"translationY",-toolbar.getHeight(),0).setDuration(200).start();
        ObjectAnimator.ofFloat(fab,"translationY",fab.getHeight()+fab.getPaddingBottom(),0).setDuration(200).start();
    }
}```

####7、完整代码
public class MainActivity extends AppCompatActivity {
@BindView(R.id.recycler)
RecyclerView recycler;
@BindView(R.id.toolbar)
Toolbar toolbar;
@BindView(R.id.fab)
FloatingActionButton fab;
private RecyclerAdapter adapter;

@Override
protected void onCreate(Bundle savedInstanceState) {
    super.onCreate(savedInstanceState);
    setContentView(R.layout.google_scroll);
    ButterKnife.bind(this);
    //toolbar
    setSupportActionBar(toolbar);
    setTitle("Google+");
    toolbar.setTitleTextColor(Color.parseColor("#ffffff"));
    //recycler
    recycler.setLayoutManager(new LinearLayoutManager(this));
    adapter=new RecyclerAdapter(this);
    adapter.addDatas(getdatas());
    adapter.setHeader(LayoutInflater.from(this).inflate(R.layout.header,recycler,false));
    recycler.setAdapter(adapter);
    recycler.addItemDecoration(new SimpleItemDecration(20));
    recycler.setOnScrollListener(new HideScrollListener());
    fab.setOnClickListener(new View.OnClickListener() {
        @Override
        public void onClick(View view) {
            T.showShort(MainActivity.this,"fab");
        }
    });
}

private ArrayList getdatas() {
    ArrayList datas=new ArrayList<>();
    for (int i = 0; i < 10; i++) {
        datas.add(new DataBean("http://pic41.nipic.com/20140531/1812578_155037556122_2.jpg","君生我未生\n我生君已老"));
    }
    return datas;
}

class HideScrollListener extends RecyclerView.OnScrollListener{
    private static final int HIDE_HEIGHT=20;
    private int scrolledInstance=0;
    private boolean toolbarVisible=true;

    @Override
    public void onScrollStateChanged(RecyclerView recyclerView, int newState) {
        super.onScrollStateChanged(recyclerView, newState);
    }

    @Override
    public void onScrolled(RecyclerView recyclerView, int dx, int dy) {
        super.onScrolled(recyclerView, dx, dy);
        if ((toolbarVisible&&dy>0)||!toolbarVisible&&dy<0){
            //recycler向上滚动时dy为正,向下滚动时dy为负数
            scrolledInstance+=dy;
        }
        if (scrolledInstance>HIDE_HEIGHT&&toolbarVisible){//当recycler向上滑动距离超过设置的默认值并且toolbar可见时,隐藏toolbar和fab
            onHide();
            scrolledInstance=0;
            toolbarVisible=false;
        }else if (scrolledInstance<-HIDE_HEIGHT&&!toolbarVisible){//当recycler向下滑动距离超过设置的默认值并且toolbar不可见时,显示toolbar和fab
            onShow();
            scrolledInstance=0;
            toolbarVisible=true;
        }
    }
}

private void onHide() {
    ObjectAnimator.ofFloat(toolbar,"translationY",0,-toolbar.getHeight()).setDuration(200).start();
    ObjectAnimator.ofFloat(fab,"translationY",0,fab.getHeight()+fab.getPaddingBottom()).setDuration(200).start();
}

private void onShow() {
    ObjectAnimator.ofFloat(toolbar,"translationY",-toolbar.getHeight(),0).setDuration(200).start();
    ObjectAnimator.ofFloat(fab,"translationY",fab.getHeight()+fab.getPaddingBottom(),0).setDuration(200).start();
}
}```
