配置管理目录
要实现目录批量管理,也需要在top中配置管理项的文件,然后再子管理项文件中配置相应的目录信息
编辑top.sls配置文件,将base: 下的修改为指定名称,这里我修改为dir
[root@nfs3 salt]# cat top.sls
base:
  '*':
    - dir        //指定子配置文件名称
接下来修改top中指定的dir名称的配置文件,配置文件全称名字为dir.sls
查看配置文件的配置参数信息
[root@nfs3 salt]# cat dir.sls
file_dir:
  file.recurse:                  配置项函数
    - name: /tmp/testdir         下发到客户端的目录路径
    - source: salt://test/dir    服务端保存目录的路径,这里如果要同时同步目录,这个目录下(dir目录)不能为空,否则不能成功下发到客户端
    - user: root                 同步目录或文件时使用的用户所属主所属组
    - file_mode: 640             下发到客户端的文件权限位
    - dir_mode: 750              下发到客户端目录的权限
    - mkdir: True                当目录不存在时,是否创建目录。True为创建
    - clean: True                当客户端删除这个目录或源文件时,客户端上的目标是否也同时删除,否则不会删除。True表示跟同服务端增删操作,服务端一旦删除源目录或文件,客户端也会同时执行删除操作
服务端创建dir该目录,并在目录下创建一个文件,再进行下发测试
需要的是下发linux和linux目录下的2345.txt文件,如果这个linux目录是个空目录的话,在下发时客户端上则不会创建该目录的
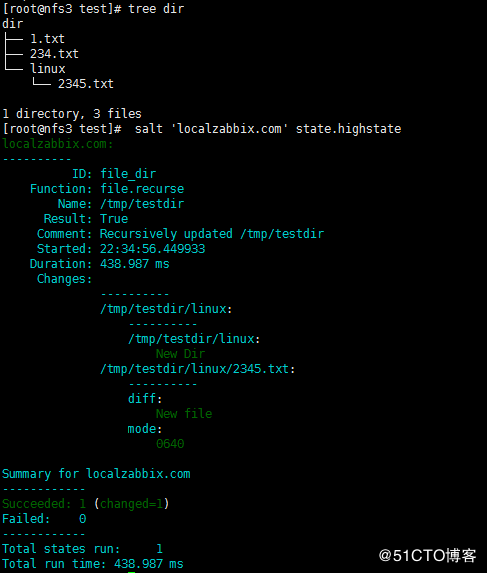
可以看到同步结果是同步了linux目录和该目录下的文件
[root@nfs3 test]# tree dir
dir
├── 1.txt
├── 234.txt
└── linux
└── 2345.txt
1 directory, 3 files
[root@nfs3 test]# salt 'localzabbix.com' state.highstate
localzabbix.com:
----------
ID: file_dir
Function: file.recurse
Name: /tmp/testdir
Result: True
Comment: Recursively updated /tmp/testdir
Started: 22:34:56.449933
Duration: 438.987 ms
Changes:
----------
/tmp/testdir/linux:
----------
/tmp/testdir/linux:
New Dir
/tmp/testdir/linux/2345.txt:
----------
diff:
New file
mode:
0640
Summary for localzabbix.com
------------
Succeeded: 1 (changed=1)
Failed: 0
------------
Total states run: 1
Total run time: 438.987 ms
下发到客户端结果
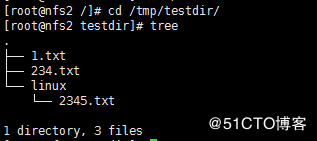
登入到客户端上,进入/tmp/testdir目录下,查看是否有发送过来的文件
[root@nfs2 /]# cd /tmp/testdir/
[root@nfs2 testdir]# tree
.
├── 1.txt
├── 234.txt
└── linux
└── 2345.txt
1 directory, 3 files配置管理远程命令
配置远程命令也就是下发脚本到minion并批量执行脚本中的命令。可以针对特定主机群组来批量执行脚本,这个前面文章也有提及
配置格式也和下发文件或目录基本相同,这里就不再阐述
修改top的总配置文件,定义执行脚本的配置文件名称
[root@nfs3 salt]# vim top.sls
base:
'*':
- shell_test创建执行脚本的配置文件
[root@nfs3 salt]# vim shell_test.sls
shell_test:
cmd.script:
- source: salt://test/shell.sh //salt的相对路径
- user: root //以root身份执行在相对路径salt目录下创建个脚本文件并测试执行结果
[root@nfs3 salt]# cd test
[root@nfs3 test]# vim shell.sh
#!/bin/bash
touch /tmp/1111.txt
if [ ! -d /tmp/2333 ]
then
mkdir /tmp/2333
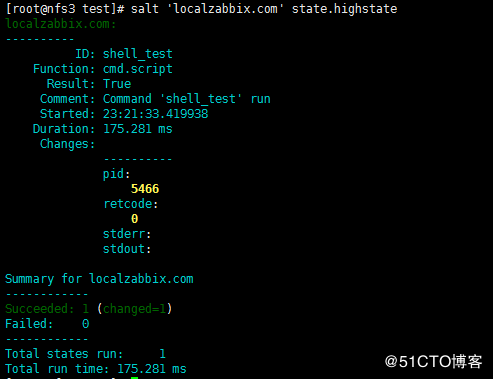
fimaster服务端执行下发操作
客户端minion上执行脚本的结果
可看见执行脚本后创建了2333这个目录
配置管理计划任务
配置计划任务每个任务都是以单独方式存在的,当然,也可以使用file.managed函数模块来管理cron,因为系统的cron都是以配置文件来保存的
接下来在服务端上向客户端上下发计划任务配置
首先修改top,添加计划任务的配置文件
[root@nfs3 salt]# vim top.sls
base:
'*':
- cron_test再以top中指定的名称来创建计划任务配置文件
配置计划任务使用的是cron.present函数模块,name配置项下指定计划任务的操作,user配置项指定root为执行用户,接下来的就是计划任务中的分钟、小时、第几日、月份、第几周的意思,按照需求填写这些参数就可以了
如果使用每一分钟或者一小时、一天等这样的配置,使用*号表示时需要使用单引号引用起来
[root@nfs3 salt]# vim cron_test.sls
cron_test:
cron.present:
- name: /bin/touch /tmp/666.txt
- user: root
- minute: '*'
- hour: 20
- daymonth: '*'
- month: '*'
- dayweek: '*'
创建多个计划任务
-----------------创建多个计划任务时,从name处复制并粘贴到下方,修改对应的操作参数即可
比如:
[root@nfs3 salt]# vim cron_test.sls
cron_test:
cron.present:
- name: /bin/touch /tmp/666.txt
- user: root
- minute: '*'
- hour: 20
- daymonth: '*'
- month: '*'
- dayweek: '*'
- name: /bin/touch /tmp/777.txt
- user: root
- minute: '*'
- hour: 20
- daymonth: '*'
- month: '*'
- dayweek: '*'在客户机上查看多个计划任务
[root@nfs2 tmp]# crontab -l
# Lines below here are managed by Salt, do not edit
# SALT_CRON_IDENTIFIER:/bin/touch /tmp/666.txt
* 20 * * * /bin/touch /tmp/666.txt
# SALT_CRON_IDENTIFIER:/bin/touch /tmp/777.txt
* 20 * * * /bin/touch /tmp/777.txt
在服务端执行下发操作,查看客户端上是否成功加入了这些计划任务配置
[root@nfs3 salt]# salt 'localzabbix.com' state.highstate
localzabbix.com:
----------
ID: cron_test
Function: cron.present
Name: /bin/touch /tmp/666.txt
Result: True
Comment: Cron /bin/touch /tmp/666.txt added to root's crontab
Started: 00:41:41.339653
Duration: 619.598 ms
Changes:
----------
root:
/bin/touch /tmp/666.txt
Summary for localzabbix.com
------------
Succeeded: 1 (changed=1)
Failed: 0
------------
Total states run: 1
Total run time: 619.598 ms在客户端上查看计划任务是否有添加上
注意,计划任务中以#号开头的行是有用的,如果这些行被删除后,那么master会认为minion没有这些计划任务,在下次创建新的计划任务时,这些计划任务不会被删掉,会导致不再需要的计划任务会继续运行
[root@nfs2 tmp]# crontab -l
# Lines below here are managed by Salt, do not edit
# SALT_CRON_IDENTIFIER:/bin/touch /tmp/666.txt
* 20 * * * /bin/touch /tmp/666.txt
推送下发删除计划任务的操作
如果不再需要继续执行某个计划任务,可以修改计划任务配置文件,将其内容改为删除的函数模块
删除客户端上的计划任务
[root@nfs3 salt]# vim cron_test.sls
cron_test:
cron.absent:
- name: /bin/touch /tmp/666.txt
- name: /bin/touch /tmp/777.txt
----------------------------------更新以删除计划任务
[root@nfs3 salt]# salt 'localzabbix.com' state.highstate
localzabbix.com:
----------
ID: cron_test
Function: cron.absent
Name: /bin/touch /tmp/777.txt
Result: True
Comment: Cron /bin/touch /tmp/777.txt removed from root's crontab
Started: 00:54:43.322933
Duration: 294.103 ms
Changes:
----------
root:
/bin/touch /tmp/777.txt
Summary for localzabbix.com
------------
Succeeded: 1 (changed=1)
Failed: 0
------------
Total states run: 1
Total run time: 294.103 ms
在客户端上查看计划任务状态
这里注意的是,我在计划任务的配置文件中指定了删除两个计划任务的配置,但是执行master更新时只会匹配并执行最后一条的计划任务,也就是这里只会删除创建777.txt计划任务。如果想要删除多条计划任务还需要一条一条的进行删除
[root@nfs2 tmp]# crontab -l
# Lines below here are managed by Salt, do not edit
# SALT_CRON_IDENTIFIER:/bin/touch /tmp/666.txt
* 20 * * * /bin/touch /tmp/666.txt
# SALT_CRON_IDENTIFIER:/bin/touch /tmp/777.txt
* 20 * * * /bin/touch /tmp/777.txt
------------------------------上面为更新删除指令前的状态
[root@nfs2 tmp]# crontab -l
# Lines below here are managed by Salt, do not edit
# SALT_CRON_IDENTIFIER:/bin/touch /tmp/666.txt
* 20 * * * /bin/touch /tmp/666.txt
----------------------------删除后的计划任务
其他命令
通过命令行直接拷贝文件
可以指定主机或主机对象群组,将1.txt拷贝到localzabbix.com主机,并保存名字为3322.txt的文件
[root@nfs3 salt]# salt 'localzabbix.com' cp.get_file salt://test/1.txt /tmp/3322.txt
localzabbix.com:
    /tmp/3322.txt
客户机上查看拷贝过来的文件
[root@nfs2 tmp]# ll /tmp/3322.txt
-rw-r--r-- 1 root root 511 Dec  6 01:22 /tmp/3322.txt
直接在命令行拷贝目录
将test/dir目录拷贝到客户机/tmp/目录下,使用cp.get_dir命令模块
[root@nfs3 salt]# salt 'localzabbix.com' cp.get_dir salt://test/dir /tmp/
localzabbix.com:
    - /tmp//dir/1.txt
    - /tmp//dir/234.txt
    - /tmp//dir/linux/2345.txt
查看客户端拷贝过来的目录
[root@nfs2 tmp]# tree dir/
dir/
├── 1.txt
├── 234.txt
└── linux
└── 2345.txt
1 directory, 3 files通过命令行直接执行指定的脚本
可以写好相应脚本文件,放入指定的目录下,使用cmd.script命令模块来指定主机批量执行脚本中的命令
[root@nfs3 salt]# ll test/shell.sh
-rw-r--r-- 1 root root 82 Dec 5 23:20 test/shell.sh
[root@nfs3 salt]# salt 'localzabbix.com' cmd.script salt://test/shell.sh
localzabbix.com:
    ----------
    pid:
        6478
    retcode:
        0
    stderr:
    stdout:
salt-ssh的使用
使用salt-ssh 命令前首先需要安装salt的官网yum源,并安装salt-ssh的安装包
安装好salt-ssh后,还需要修改配置文件,在/etc/salt/roster中增加如下内容,根据自己主机名解析和用户名密码进行配置
[root@nfs3 ~]# vim /etc/salt/roster
nfs2:
  host: 192.168.1.223
  user: root
  passwd: pwd@123
nfs3:
  host: 192.168.1.115
  user: root
  passwd: pwd@12
在第一次执行salt-ssh命令时,需要把自己本机的公钥推送到对方机器上,第一次推送后就可以把配置文件中的passwd的密码配置给删除掉,之后只使用密钥来验证登陆
[root@nfs3 ~]# salt-ssh --key-deploy '*' -r 'w'
nfs3:
    ----------
    retcode:
        254
    stderr:
    stdout:
        The host key needs to be accepted, to auto accept run salt-ssh with the -i flag:
        The authenticity of host '192.168.1.115 (192.168.1.115)' can't be established.
        ECDSA key fingerprint is SHA256:A4OrsgxgE/dfjkkfmaRKgGv/ckWLdH77aluUDbHwWlw.
        ECDSA key fingerprint is MD5:90:7e:dc:6c:5f:b5:f2:2f:ce:ff:90:25:50:90:f5:e4.
        Are you sure you want to continue connecting (yes/no)?
nfs3:
    ----------
    retcode:
        0
    stderr:
    stdout:
         02:05:20 up 6:18, 3 users, load average: 0.03, 0.08, 0.12
        USER TTY FROM LOGIN@ IDLE JCPU PCPU WHAT
        root tty1 19:47 3:59m 6.74s 6.71s ping bilibili.com
        root pts/0 192.168.1.112 01:50 8.00s 0.65s 0.00s /usr/bin/python /usr/bin/salt-ssh --key-deploy * -r w
        root pts/1 192.168.1.112 22:05 33:28 0.19s 0.19s -bash